Apartment electrics. How to put together a wiring diagram before repairing Voltage supply with a cable
The comfort of everyday life depends on the presence of a reliable source of electrical energy. Almost everything depends on it - lighting the room, preparing and preserving food, burning and heating water, air conditioning and ventilation, methods of communication and access to information, dozens of other devices and devices, without which it is important to realize your need.
Nowadays, electricity suppliers operate stably, without serious or troubling failures, and if they pay for their services on time, then they can be insured for new access to the obvious “benefits of civilization.” However, only energy supply companies guarantee the supply of voltage to the “water supply” - to the available energy. And the dali is the zone of the vidpovydalist of the Lord Zhitl, I in the yogo Roztashuvati all the dots of the overtolennye of the Pidlochennya to the Elektromezhi in the Optimal Kilkosti, the yogo point is zoos, that is the Zruchny for the core of the MSTSI. How can I get to the best food? Should you install wiring in your apartment with your own hands, or is it still faster to use the services of electricians?

Definitely, this is impossible to do. There is a lot to be found in preparedness, “skills” apartment-haired man in the fields of physics and electrical engineering. An important factor is the availability of long-term planning, the remaining work from replacement the wiring is toiling on the car a lot of rocks ahead. And, finally, the owner of the apartment is guilty of his mother’s obnoxious baggage and new arrivals, and in the galaxy of late-night work - without which you can’t get by.
 At the wiring installation there were warehouse and back-office workers
 Meta of this publication - dates of the owner's apartment, a statement about the scale of the installation of home electrical lines, about basic principlesїї planning, about the correct division of the arrangement, about acceptance of installation and electrical fittings virobiv, about other important nuances. If you can understand that you are undertaking such a task on your own, you still need to ask qualified masters. In the opinion of professionals, without evidence of practice and without approval from electrical safety systems, such robots cannot be considered on their own, as there is a lot of nuances that are simply impossible to describe on the scale of one article - their knowledge when walk with rich evidence. Tim is not a mensch, nobility basic principles The installation of wiring in the apartment will be difficult for any authority - it will become possible to control the work of the masters (unfortunately, they become sharp and pass through the middle), and for the safe operation of the life such a basic power supply will not be required at all.
When will Varto start laying new wiring for the apartment?
Anyone who has chosen a new apartment in small buildings that were built and sold according to the old principle - “turnkey” (although, as a rule, with not particularly high viscosity), knows how often it was clumsy and ill-thought out when it came to placing the connection point to the electrical outlet. So, everything corresponded to the old GOSTs, but the trouble is that these standards were written when the saturation of human life with various electrical appliances was completely out of everyone’s minds.
In the world of adding new devices, it is necessary to stretch rubber bands around the apartment or lay new lines, since some electrical installations do not have enough elasticity of the old wires. Pull by Lam cables - this leads to a lot of discomfort, and a minus to the interior design of the room.

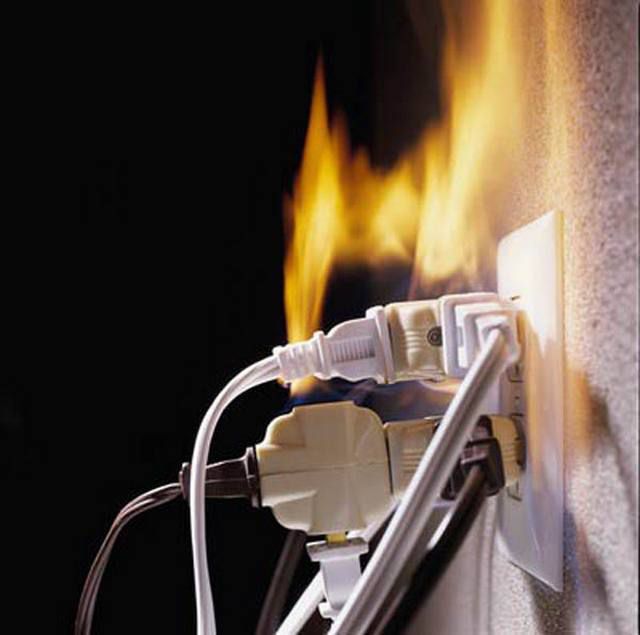
Moreover, with a lack of connection points, many people, who are poorly known in electrical engineering, often end up making incredible connections using triplets, vikoristically connecting them in a number of cascades. Unfortunately, this is a direct road to the increasingly unsafe situation at the apartment.
 And the axis is now a straight path to the great disaster
 I axis, when it’s too early and too late to carry out major repairs in your apartment, the most reasonable time - completely, from the insertion point to the remaining socket, replace both the wiring and all electrical fittings part, planning the installation point of connection of life as manually, rationally and safely as possible.
Another very important reason to completely replace the cable part. On the right, when there were a lot of surfaces in the past hours, due to the savings, the internal wiring was mostly done with aluminum wires. Aluminum has poor electrical conductivity characteristics, but at the same time it is practical not to stagnate for these purposes, because its shortcomings are important to outweigh its advantages.
- First of all, the metal was very soft on its own. It is easily deformed, pressed when the contact screws, clamping washers, etc. are removed. - making contact twice at one place is unlikely to work out - the wire simply breaks in the thinned place. These are repair work with aluminum wiring with twisted edges. Soldering this is very difficult, and in the minds of installing home wiring, it is irrational to use such technology.
- However, aluminum is plastic only if it is, so to speak, “fresh”. This metal has amazing power - the electrochemical processes that occur in a new stream, over time, radically change the power of speech. After 15 ÷ 20 years of operation (and for carrying out this is a very small term), aluminum conductors become brittle. Do not turn off the rapt, practically without reason, it is not easy to know what happens, and it is even more difficult to put it in, fragments of wires can become lame when carefully trying to make a new twist or bend it for terminal connection.

- Another blazing power: it would seem that the metal was even resistant to corrosion, but that was not the case! If only a small amount of water is used on the conductor, electrical corrosion inevitably occurs. Moreover, they may be unmistakable calls - in appearance, the entire conductor in the middle may be “connections” of the table, so that there is little heating, thickness or vidmova. Sometimes, any kind of dotik would bring such a dart to such a breakdown.
 Compare with the picture – is there a difference?
 In other words, if you want to take the electrical power supply seriously, you don’t need to worry about replacing all the old aluminum wiring with on copper Its electrical parameters are higher, its plasticity is good (albeit not excessive), and does not change over time, nor during operation under great demands. The quality of copper wires is insanely, fundamentally, but the wiring in the apartment is difficult, as has already been said, for ten years to come and saving on such food is simply unreasonable. At the same time, by replacing, you can profitably balance all your meals by optimizing the placement of all elements of your home electrical system.
If the ruler has added a new apartment, in a house, which is a building based on the “build it yourself” principle, then there is no need to think about it - it is necessary to carefully plan the entire electrical system of the apartment, to arrange the electrical equipment and furniture in the rooms, and take care of the wiring literally to hell – even before the foundation is poured, the walls and floors are finished. Below in the text it becomes clear why this is so.
There are many more arguments against modernization and repair, but the capital situation of old wiring.
1. At the end of the day, the grounding circuits in the living quarters were not respected, and all internal wiring was laid according to the TN-C system, if the working zero and grounding were connected to a single wire (PEN) while still on the electricity supply. stations. The only advantage of this approach is ease of installation and minimal wastage of material, since all the sockets in the apartment were tangled with two wires - zero and phase.
 TN-C system - "the day before yesterday" of electrical engineering
 When re-engineering or breakdown occurs on the metal casing of electrical devices, a voltage that is unsafe for life is likely to appear. Moreover, this type of contact connection does not allow for the correct operation of closed circuit devices (ECDs) or other current pulse life blocks. Today, such a system is not subject to scrutiny, it is not legally protected, and it is obligatory to replace it with one of the more thorough systems: TN-S or TN-C-S.
TN–S is most often found in private booths that have power supply. If you want, it is possible in large apartment buildings to organize grounding buses, connected to welding and grounding, which pass through the external circuit along all surfaces.

However, more often in large-surface living quarters the TN-C-S system is installed, in which solidly grounded The neutral is divided into two conductors - a working neutral and a grounding circuit, located centrally at the underside of the electrical panel.

Between the two remaining terminals, there are already three contacts for wiring - phase, neutral and ground. You can immediately guess about the color marking of these darts - one must meet the proper standards.

Please note that the color of the phase shot can be different. Ale null and grounding are connected to both sides, so that it is impossible to get confused when carrying out electrical installation work.

Before speaking, a number of phase conductors can be installed in one cable. They fight among themselves behind the color, but at the same time all one and two conductors are seen in their obligatory barbarations - “working zero” and “ground”.
Most modern electrical devices are equipped with a three-pin plug. So, it is necessary to make an important explanation. When new sockets are installed, the rulers, madly, try to install three-pin ones as well. However, if your apartment does not yet have electrical wiring organized for the TN-S or TN-C-S circuits, then in every case it is not possible to make jumpers between the neutral contact and the grounding one directly on the socket.
 As for the life and health of your family and those close to you, there is no way to avoid such “grounding”!
 Those who can work on the level of the electrical shield - absolutely unacceptable right at the connection point. It is better not to give the desired effect, but also to sharply increase the level of safety. The prevalence of electrostimulation and the occurrence of unsafe situations with such a connection is great! Better yet, do not connect the connections before grounding, so organize them in the same way.
And even better - install new wiring according to all the rules!
2. Another important argument lies in the fact that the very principle of dilution, which previously stagnated in everyday life, is extremely flawed. Let’s talk about the so-called “dozuvannya” navantazhennya. To understand, guess the old subdivided shields. An electric heater, two automatic machines (or heaters – plugs) – that’s all. Two darts went into the apartment, disappeared here at the same wall, and from them they worked in the contact boxes of the galley on the skin light point and socket. In a word, just as thin needles come out of a tree trunk, so the main darts came out. I’ll say it again: the point of view of economics is obvious, but otherwise it does not evade criticism.
This system was literally teeming with twists on the skin, and if the wires were connected, there would always be a spill in the wiring area. For the need to destroy one of the rooms, it was necessary to turn off the food in the entire apartment. It was an insignificant accident, a short circuit in one of the galleries led to the connection of the entire apartment circuit. Well, if the problem was serious (shaving or burnt cables, sitting at the wall), then the search for an emergency site and the carrying out of repair work turned into a very complicated problem.

This is easy to lose if you organize a zoned dilution system - from the point of introduction, such as an apartment distribution panel, a hole is laid along the life line with the required webbing, which indicates attention to the skin. nyah, na skin electrical device with increased tension, skin a group of sockets and lighting. So, naturally, the cable will need much more, and then home electrical installations will become manual and safe to use, and will easily lend themselves to necessary upgrades or repairs.
The basics are home electrical planning
So, the first step in any situation is to carry out a major overhaul. Otherwise, the wiring will be installed in the new apartment, and then the apartment electrical wiring diagram will be developed. And best of all, it’s better to be victorious on your own – no one, besides the rulers, can do anything better.
It is possible, although you may be unsure of your ability, to carry out such planning. It’s okay - there’s no need to hurry, we’ll do everything step by step, step by step. And you switch, but it’s not so difficult at all.
To begin with, you need to prepare a plan for your apartment. There may be some options here. First of all, you can take a copy of the technical passport. In another way, the right person does not need to carefully mount the visual diagram (mostly, especially to scale) on the original archival paper. Thirdly, behind the scenes, you can find a typical project for a booth in which the apartment is laid out. (Such a document may be in the DEZ, another operating or design organization. It is possible that the Internet will come to the rescue). And fourthly, modern computer engineering programs (CAD) allow you to quickly and accurately select the required seat.
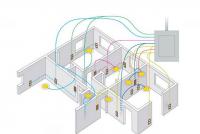
For example, let’s take the diagram of a one-room apartment, which can be purchased literally for 10 dollars from CAD. The procedure for planning apartment electrical connections with a different number of rooms and the distribution of rooms does not change - the principles themselves are lost.

In this case, Room 1 is the bathroom, Room2 is the front room, Room3 is the kitchen and Room4 is the living room.
It’s also bad to have a version of such a chair with specified dimensions: then it will be easier to determine the required quantity of cable products.
 The same chairs - with dimensions indicated on a scale
 In order not to be afraid of damage and any kind of fallout from the chair, you can disassemble your printer or make photocopies in the required quantity - for ink, taking as a basis for the "bare" diagram - only walls, windows and doors .
 The result is a “clean” scheme - we can continue to work with it
 Now it is necessary to determine how obvious pieces of furniture and electrical equipment of various purposes will be placed on this area. There’s no need to rush – it’s necessary to carefully wrap up not only those that have already been added and check for installation, but also new products planned in the future I would like to 5 ÷ 10. For example, children grow up, and after a couple of years in their room you need to put a desk with a lamp, a computer, a TV, etc. The household has long-term plans to install a climate control unit (air conditioner or convector), and in the kitchen, sooner and later, the gentleman will want a dishwasher and a richly functional oven.
Moreover, there is a need to refurbish all pieces of furniture and household appliances in the localities, and the stench, with frequent neglect, will become established. It’s a very difficult situation to cope with, since after the installation of new wiring is completed, after a very important hour, the old shoes will have to be removed! Was it all repair work then?
Of course, it would be wise to conduct an “extended family meeting” with this drive in order to have a single thought regarding the interior design and external location. And the axis is now rotating again up to the seat – we are starting to “put” everything in place. There are no special ambushes to be made here, but this is a workable scheme. Head - number all the items and accessories, enter them in the description - table, and it is important - see on the diagram how to get the electrical connection to the living area, for example, shaded with a different color (on the diagram, which is pink looks like a butt, - seen in red vidtinkom).
Ozhe, behind the rooms:
 Virtually “putting everything in its place”
 In vitality:
1 - Fold-out sofa bed.
2 - side table This is the connection point for, for example, a phone charger.
3 - Air conditioner - split system.
4 – a plasma TV with a “home cinema” sound system, a suitable receiver or other TV digital equipment.
5 - Living room table with side tables.
6 - Shafi.
7 - A working room with a computer and peripherals.
The points that require connection can be seen in the text.
In the kitchen:
8 - Fridge.
9 – a single table with sidewalls.
10 and 11– work tables (tables) on which can be installed stationary or periodically kitchen utensils - microwave oven, multicooker, food processor, blender, electric kettle and others.
12 - Electric stove with oven.
13 - Mitya.
14 - dishwasher.
At the bathroom and toilets:
15 - nice car.
16 - Boiler.
17 - Miika with point switches and a hair dryer connection point.
18 – toilet
19 - Bath.
At rest:
20 - coupe chafa with additional point switches.
Well, the main “people” on the vision scheme. It is clear that the necessary backup sockets (for example, turn on the sander, the vacuum cleaner, and other household utensils) - their placement can also be transferred so that the stench does not spread behind large pieces of furniture.
You can immediately apply a mist of sockets onto a clean, clean “form”.
In this case, of course, you can be victorious for any intellectual purpose, understandable for yourself. Ale, as the Lord wishes, so that his plan becomes sensible and the Fahivtsev electrician is better off accepted into the professional middle class. All their nobility not at all awkward, the biggest ones will be enough. For example, those listed in the table:
| Umovne assigned | What does it mean on the diagram |
|---|---|
 | Power shield |
 | Healer of recovered energy |
| Single-pole circuit breaker | |
| Double-pole automatic zakhistu | |
 | Device disconnection protection (DPP) |
 | Socket with solid grounding contact, for wall-mounted installation |
 | The socket is pendant, with a solid grounding contact, for walk-in installation |
 | The socket is tripolar, with dry contact, for indoor installation. |
 | The socket is double-pole, with a solid grounding contact, with increased moisture resistance (IP44 - IP55) |
| Vimikach one-key | |
| Vimikach double-key | |
 | Block - two plugs and socket, attached installation |
Also, it can be placed on the socket diagram:

Now is the time to think about the lightening points. They can be arranged in the center of the location (the axis if dimensions are required to scale), and in a sufficient order, reducing the emphasis of lightening at the same time as organizing a number of lighting points (tiers). Our idea is to place the lamps in the center of the rooms. And this is immediately a place for drinks. They are ordered to be located in the middle of the room (behind the bathrooms and kitchens). Typical installation location is near the door, on the side of the lock. Although this is not a dogma at all, the ruler himself can determine the best place, according to his thoughts. For example, you can place a block of chemicals in the front room, which will illuminate the corridor itself, the bathroom and the kitchen.
 Then, the lamps are “hung” and placed in
 The locations have been identified, now it is necessary to move on to planning the route for laying the wires. There are a variety of options here, depending on the stage of readiness to move from the point of view of everyday life, from the planned methods of development, from the place of expansion of entry into the apartment, from the vantage point of the rulers themselves.
Video: For the sake of good planning of apartment electrical systems
Methods for laying electrical wiring in an apartment
Let's wash ourselves right away - take a look at the apartment options, both with concrete or glazed walls. If anyone needs information, you can get it from the main publication on our portal.
Well, what are the most convenient ways to lay power cables in apartments?
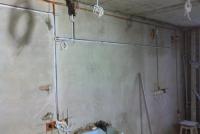
A. Since the walls are in the “rough” version, and in the future they are planned to be covered with a ball of plaster or lined with plasterboard, then the wiring can be spread directly over the surface in corrugated plastic pipes (as the future allows vomiting ball) or simply from the open eye, behind the mind, The cable has reliable and triple insulation.

Video: option for laying wires along the walls of the apartment
B. If the plaster ball on the wall has already been applied, or it is planned to be too thin, it will be necessary to cut out grooves in the wall for laying wires in them.
On the right, it’s quite tired and powdery, but there’s nowhere to go - this approach is often deprived of a single option. When laying wires in such grooves, stinks are fixed in them either with plaster patches or with special plastic dowel brackets, which are inserted into the holes for them.
 The wire can be secured in the groove with a special bracket.
  ... or simply with plaster “adhesions”
 Strobes cannot be cut in many places. It follows from this drive that the following rules apply: areas near window and door openings, external and internal passages, gas mains, grooves and cable laying are unacceptable. Graphic information about this is in the diagrams below:


It is obligatory to increase your respect for one important detail. All installations to sockets and electrical outlets must be carried out vertically. The explanation is very simple - it will be so cumbersome to quilt the route of a hole covered with plaster without the same special equipment.
 And the axle is so timid - categorically fenced
 Every ledge and turn, every “straight line” is not to be missed. You don’t need to worry about saying, “I’ll remember.” It’s very easy to forget, and, besides, I’ll try to drill the hole, otherwise another person might be killed. It may end up being very confusing.
When laying cables in grooves, you need to have another drill bit in your arsenal, which will be needed for drilling the sockets under under sockets and separate (unsolder) boxes.
Now let's talk about the main sections, which are used to lay the darts from the distribution board to the mounting boxes.
1. The first option is just as the place was described, either horizontally along the top edge of the wall, in a groove or in a corrugated pipe. This option is extremely laborious and costly - for example, in order to connect the power to the outlet at the far end of the large space, you need to go around all the cables - the cable is quite rich.
2. If in a new apartment that is subject to major renovation, the screeds on the subfloors have not yet been poured, then the mains can be laid in plastic or metal pipes along the surface of the overlap. Here you can lay routes to the distribution boxes. shortest way. The screed or other covering will be applied to the surface of the cable lining.


Before speaking, for such a “lower” installation of apartment electrical wiring in a number of surges, you can always do without strobes or reduce this operation to a minimum. To lay wires in such situations, special electrical plinths are often used, on which they are already installed.

That's not all. A new trend has become wider - special sets that include electrical engineering skirting boards cable channels, separate boxes, sockets and devices, etc. electrical fittings Virobi.
 Wiring kit - everything has been thought out, down to the details
 Unsurprisingly, this approach is not valid for all processing styles, but it also has the right to be considered. And he struggles, to the point of speech, to drink, which is gradually growing, in order to reduce to a minimum the rude and difficult everyday work.
3. Another option that helps to significantly reduce the wastage of wires is a vikoristan for laying main routes on the surface of the stele. This, of course, does not eliminate the need to cut grooves for laying wires along the walls and sockets for installing sockets and boxes. Alternatively, the axis from the split shield to the mounting boxes can be attached to special clips directly to the frame, laying routes along the shortest distance. Before speaking, there is absolutely no need to place the unsoldering boxes themselves, as well as on the flat surface (although it will then be difficult to reach them, as it is necessary to carry out any repair or maintenance work).
 The stele is a wonderful place for placing electrical wiring. Zvichaino, for the mind of the distant yogo decorative embellishment
 However, this will only be possible in the case where you plan to install a suspended or tensioned structure that accommodates cable distribution in the entrance area. In a word, since it is possible to install a suspension or tension frame - it needs to be thoroughly weathered - a lot of electrical problems simply “break down”. In extreme distress It’s really possible to come up with some kind of original suspended structure for the upper wall, in which it would be possible to hold the dart liner.

Prices for cables and wires for everyday life and repairs
Cables and wires for everyday life and repairs
Durable folding circuits
Let's go back to our diagram - the points where electricity needs to be supplied are already marked on it, but the route has not yet been laid. It's time to start studying.
How highways are laid, read already, melodiously, clearly, and one hundred percent of your apartments can be determined - there will be a wall laying, or it can be carried out on several plots along the shortest road, as the basis or flow area is determined. u.
At our butt the track is carried out by the walls.
Also, each area has its own mounting box (at least one). It is usually located near the entrance of the line from the distribution panel into the premises. The toilet box should be placed in the corridor so that the contact connections do not leak into the moving surface again.
In the diagram there are intelligently separated boxes with orange circles.
 Continued folding of circuits - we are planning to reinstall mounting boxes
 We begin to “pull the darts” to the skin box from the nearest sockets. The cable is sequential, the sockets should not be separated - there may be a drop in voltage on the distant one, if the ones lying closest to the box are re-engineered. It’s better not to skimp and lay a moisture cable to the skin.
Before speaking, if the sockets are placed “consistently” on both sides of one wall, you can connect them with wires that go from the same box and are routed in one groove (on our example this is specially shown Possibility - socket near the bathroom and kitchen). It’s crazy to allow miraculous protection in the laying of the gates. In this case, one of the cables can be stuck - however, in this case, we do not forget about those who cross the line when reaching such a block, is guilty of a total possible obsession.
It would have been easier to figure it out on the chair, dart to the sockets, for example, with a red color.
 “Stretching a fraction” from boxes to sockets
 Change the color of olive to green, and “lay” the darts, which are responsible for lighting – from mounting boxes to lamps and lamps.
 The same applies to lighting - lamps and lights.
 Now let’s put a separate power shield on the diagram and lay it out from the new “highway” to unsoldering boxes. You can, of course, share one cable per room, including power supply, lighting, and sockets. However, as we have already said, it would be wiser to divide them into two different flows. What, obviously, is allowed financial matters, Scraps of cable products, automatic machines, and electronic devices will be needed more. In a word, according to the rulers, some insults are, in principle, permissible.
On the diagram of indications there is an option for combined wiring to ensure electrical supply and lighting (extension of the blue line from the shield to the distribution boxes).
 Now draw a line from the distribution panel to the mounting boxes.
 I'll point out one more nuance. Before any devices that support tension lines are laid in the form of a splitter panel around the lines where the power supply machines, PVVs, and wire routing grooves run. The stench is, in all honesty, not the fault of the mothers of every other person. Very often such lines end not with a regular outlet, but with a special type of outlet. And in a number of electrical appliances, heavy-duty electrical appliances are connected to the extent possible not through sockets, but through installations directly next to them
In our diagram we will draw a line of life from the switchboard to the electric oven in the kitchen and to the boiler in the communal bathroom (the line is in violet color).
 “Connected” especially refers to the line (oven and boiler) and the entrance from the underside. The scheme is ready!
 I, we will decide, we will complete the scheme by placing on it the entrance to the apartment from the underground electrical panel
Now, the scheme is ready and you can start putting it together practically. And first of all, we’ll help you sort out how much and what kind of equipment you’ll need to install a new apartment electrical system.
You can move on to working “on the spot” - actually transferring the chair to the wall area, which also means the place for moving boxes, lines of grooves, installation points for sockets and devices - everything basic principles We were prepared, the chair was at hand - let's get to work!
Chantly, at the hour of marking, the food will be announced - on? There are no rules here, and recommendations are written down in our publication, specifically dedicated to this problem.
Placements on the walls of the marking and scaling lines of the chair will help to maintain a quantity of darts for the skin area. And what kind of axle will I need?
What kind of cutting is needed for laying?
Any line on our circuit that comes out of the distribution board is equipped with a power supply circuit breaker and a dry connection device (ECD), with its own parameters for handling the current flow. Plus, up to this point, a zagalny machine gun is installed throughout the entire apartment and a zagalny EZV. All these predicted values must be taken into account due to the overall importance of the skin seen, and then They can’t give a damn result for the whole apartment.
Well, you know how to finish it exactly What kind of electrical appliances will be installed on the outside of the apartment, you can protect the overall importance on the new one. Take into account the specifications of the devices (attachments), take into account the possibility of their one-hour operation, and the basic conditions are subject to tension. Since there are no passports available, you can search for their data on the Internet or simply use the averaged table of the pressure of the most popular household appliances and devices:
| Type of electrical equipment | Zrazkova relieved tension |
|---|---|
| Hydromassage bath (Jacuzzi) | 2000–2500 W. |
| Stoves for mini-sauna | 10-15 kW |
| Warmth of reason | 0.7-1.5 kW |
| Home solarium | 1.5-2.5 kW |
| Split air conditioner | close to 2500 W |
| Fan | up to 900 W |
| Lighting fixtures (be sure to keep away from stalled lamps and many lights) | 100 – 1000 W |
| Radio receiver (Music center) | 100-250 W |
| Desktop computer with RC monitor + peripherals (printer, scanner, modem, router, etc.) | up to 800 W |
| TB | 100-200 W |
| Sound system "home cinema" | up to 750 W |
| Gunpowder | up to 1200 W |
| Praska | 1000-2000 W |
| Electric massager | up to 300 W |
| Hairdryer | 500 – 1000 W |
| Gadget charging devices | close to 50 W |
For dehiscence, you can quickly use a formula that allows you to significantly reduce the severity of the skin dilatation.
I croseum= Psum/unom
Icroseum- Sumarny strum navantazhenya na tsіy dilyantsі lantsyuga.
Psum- The tension of electrical devices that are turned on at the same time at the lancets is extremely alarming.
Unom– the nominal voltage at the limit (in our model – the nominal voltage is 220 U).
For example, a plot of land is insured where, with great flexibility, the computer (750 W), the heater (1.5 kW), the table lamp 100 W, and the electric kettle will be turned on periodically (more than 1.75 kW), then we reject The average pressure is low, which reduces the peak pressure to 4.1 kilowatts. By substituting the values in the formula, we can remove the strum gain 18.6 A.
When carrying out professional procedures, one needs to use complex methods to cover a lot of the nuances of the circuit (more specifically, up to a triphasic circuit of 380 volts). It is recommended to simply add another 5 amperes to the desired result for insurance purposes. The results in our application come out 18,6 + 5 = 23,6 ≈ 24 A
Now you can only go to the table (located below) and find the most convenient cut for the copper cable, depending on what type of wire will be installed.
| Peretin copper veins | ||||||
|---|---|---|---|---|---|---|
| single-strand darts | woody darts | three-core darts | ||||
| single line laying | a bunch of two darts | a bunch of three darts | a bunch of four darts | single double wire | single three-core wire | |
| 0.5 | 11 | - | - | - | - | - |
| 0,75 | 15 | - | - | - | - | - |
| 1,0 | 17 | 16 | 15 | 14 | 15 | 14 |
| 1,5 | 23 | 19 | 17 | 16 | 18 | 15 |
| 2,5 | 30 | 27 | 25 | 25 | 25 | 21 |
| 4,0 | 31 | 38 | 35 | 30 | 32 | 27 |
| 6,0 | 50 | 46 | 42 | 40 | 40 | 34 |
| 10,0 | 80 | 70 | 60 | 50 | 55 | 50 |
| 16,0 | 100 | 85 | 80 | 75 | 80 | 70 |
| 25,0 | 140 | 115 | 100 | 90 | 100 | 85 |
| 35,0 | 170 | 135 | 125 | 115 | 125 | 100 |
| 50,0 | 215 | 185 | 170 | 150 | 160 | 135 |
The focus on the problem in the butt falls seriously. According to the table, it appears that with such installations either three single wires are installed, laid in a single bundle, a 2.5 mm crossbar, or one three-core wire with a 4 mm crossbar.
Tse – more One argument on the merits is that it is recommended to lay a power cable up to the skin socket (socket block). Work with the wires of the great cut, connecting them to electrical fittings devices or conducting their contact connections is not easy due to the extreme harshness.
Chi politely rozrahovuvat this retin? Maybe we should announce a new ceremony in all the plots?
It’s very important to bring the vision from many points!
Perche. By carrying out a few small changes, you can easily cope with your tasks. It gets too hot, which will lead to the insulation being damaged and the contacts on the terminals or twists being damaged. Tse - straight path until it freezes briefly, which will cause electrostrum or burn it.
Friend. Gospodar overdid it, and laid the darts of the excess overcut. If you are interested, go to the store and compare prices for copper darts of the same brand, or different cuts, for example, 1.5 and 2.5 mm. The song of you, melodiously, cheers and encourages those who still want to take care of the vantage, so as not to pay a lot for absolutely unnecessary, protected parametr.
Evidence of qualified electricians who have changed the wiring in more than one hundred apartments makes it possible to roughly depict the home wiring in the following picture:

The diagram shows several possible sections of the apartment boundary, based on the recommended cable cutting, the approximate total voltage, the rating of the automatic shutdown machine and the threshold for the application (flow current) of the EPV. Due to the wide variety of cable products, most sellers unanimously recommend VVGNG (Index N G d talk about those that are installed with non-flammable insulation).
The scheme shown is not a dogma at all. The method of planning the project and its development, which you have become familiar with, does not apply to anyone, and it is simply impossible to capture all the nuances in every area of a taken apartment.
Before speaking, there is a particular concern about the daily kitchen, which is literally “stuffed” with electronics and electrical equipment. All you have to do is look at the table to see in which range both functionality and ease of use of kitchen accessories lie.
| Type of electrical appliance | Average tension | Features of connection to power supply |
|---|---|---|
| The stove or cooking surface is electric | 3500 to 12000 W | Individually laid life line |
| The spiritual shafa is electric | 2500 to 10000 W | |
| Pralna automatic machine | 1500 to 3000 W | |
| Water heater | 2500 to 7000 W | |
| Dishwashing machine | 1500 to 3500 W | |
| Mikrokhvilova pich | 700 to 2500 W | connection to a 16 A mains socket is allowed |
| Refrigerator (only at the time of startup) | 500 to 2000 W | |
| Electric kettle | 700 to 1500 W | |
| Kitchen processor (processor) | 500 to 1500 W | |
| Bread maker, steamer, etc. | 700 to 2000 W | |
| Toaster | up to 1000 W | |
| Kitchen hood | 500 to 1500 W | |
| Details of inputs | 400 to 1000 W |
To connect this mass of mastery, you have to use your imagination in terms of organizing it in the kitchen, and carry out scrupulous work on the tension. Judge for yourself - as it would seem, it would be difficult to organize the arrangement of sockets:
 The kitchen is a very special place due to the electrical wiring
 And this, to be sure, is not yet a “fancy” option. It’s no less important that you can sit calmly with an archival paper, an olive and a calculator; everything can be clearly and clearly explained.
Well, having learned how to read the folding diagram, with the rules of rozrakhunki - knowledge, basic principles laying the cable parts in the same area. You can happily get down to work, and don’t hesitate to become assistants in our portal, who will tell you about the techniques, about the types, about connecting electrical appliances and much more. Everything is in sections i.
I will remain respectful. The author of this publication is fully aware that even if any electrical engineer gets involved in the wicked graphic circuits of the “Soviet Dual”, the comments may be critical of Respect shodo tsyogo. However, the method was not taken into account at the site of the reception of the chair. Golovne, so that the reader understands the principle, by studying how you can independently plan your home plan.
Video: basic concepts about self-installation of apartment wiring
In most cases, apartment renovation cannot be done without changing the electrical wiring, rearranging the living area, physical and moral wear and tear of cables, moving the edge along the edge, and other factors.
The work to be done from the reconstruction of the electrical wiring depends on both the size of the vein and the planned stage of equipping with everyday equipment and skin application technology. Before the electricity today, everything rang, but as a result of the shock, people did not become lighter from the electrostrum - the flow at 5-10 A of a household voltage of 220 V is fatally unsafe. Also, when the electrical wiring is plugged in, there is no noise.
Installation of electrical wiring in an apartment consists of the following stages:
- Development of the project/scheme.
- Consider the quality of materials and fittings.
- Layout for gating and washing of grooves.
- Laying of cables and installation of distribution boxes, sockets, terminals.
- Folding the electrical panel and “dialing” the electrical wiring.

Electrical wiring project
Vikonati competent installation of the electrical wiring of a modern apartment without a backwards breakdown of the electrical supply circuits, being carried out by unnecessary power solutions that fail, is impossible. Reconstruction or installation of new electrical wiring must be completed only after detailed inspection of everything possible before new electrical installations. Failure to follow these recommendations can only lead to a better life, but it is also unsafe for the poor in the household as a whole. Therefore, before starting electrical installation work, it is necessary to develop a design for the electrical supply of the apartment and maintain the power supply better with the help of professionals.
The complexity of the design of the electrical supply to the apartment is not fixed by law, but the procedure for connecting the installed electrical wiring to the power line is regulated by strict rules, including the need for maintenance.
A professionally completed electrical project after completion of repairs will become an important addition to the apartment’s registration certificate and make it easier to pass the weather. According to the PUE, the electrical wiring system of the apartment is an electrical installation, and therefore the connection to the alarm line and operation can be carried out in accordance with the requirements for such equipment:
- The internal conduction of the life may be less due to the external electrical current due to tension;
- The electrical wiring of the apartment is not responsible for becoming unsafe (electrical fire) for the homeowners.
The design of the internal electrical supply of the apartment is determined by Rostekhnaglyad and obligatory in the following cases:
- when installing electrical wiring at Novobudovo “from scratch”;
- during reconstruction, the second resident has a clear difference in tension, which can be seen in the apartment.
Controlling authorities, during hourly visits to the site for an application for connection to the alarm system, obtain information on all standards of the apartment's electrical wiring project, and the correctness of this document is an argument for its validity. and electrical supply systems for all necessary needs.
General rules for installing electrical wiring
A document that outlines the requirements before installing electrical wiring and any other electrical equipment, ie PUE - “Rules for the Installation of Electrical Installations”.
Basic rules for monitoring internal electrical systems in an apartment:
- Distribution and connection of cables are carried out in the middle of the distribution boxes with insulated insulation joints.
The direct connection of various types of darts (copper, aluminum, steel) is fenced.
- Dispensers, distribution boxes, sockets and emergency supplies will be available.
- Vimikach are mounted on a wall section that is not covered by the door leaf in the open position (on the side of the door handle).
- There are 2 standards for the height of growing the vimikach as a substructure - “Radyansky” (160 cm) and “European” (90 cm), until it settles, insults are permissible.
- When connected to the bottom, sockets are installed at a height of no more than 1 m, focusing on the hand-holding of the socket; when connected to the maximum - from 1 to 1.5 m. In children's rooms of apartments, safety is allowed There is a higher socket - at a height of 1.8 m , deviating from the standard for the adoption of installations from the presence of children.
- Sockets and outlets should be placed no closer than 50 cm from the gas pipeline.
- The placement of wiring sections on the walls may be orthogonal (vertical or horizontal) - this will make it easier to unfasten cables during major repairs (drilling openings, gating).
- Electrical wiring must not come into contact with metal elements of building structures (fittings, mounting parts).
- When installing multiple cables with single-ball insulation in one groove, the skin from the wires may be placed in corrugated covers.
- Vertical sections of wiring must be extended from door and window openings at a distance of at least 10 cm.
- Horizontal wiring sections should be placed no closer than 15 cm from the ceiling slabs.
- The distance between the cable and the gas pipeline pipes is no less than 0.4 m.
Consumption of materials and accessories
The required strength of the material is determined in two ways:
- for the wiring diagram - the most accurate;
- behind the back area of the apartment - approx.
When installing the cable behind the circuit, the total amount of electrical wiring markings is measured, up to which 10% plus 20 cm per electrical socket or 50 cm per electrical outlet and 50 cm per electrical panel are added.
To determine the need for cables based on the area of the apartment, multiply the numerical value of the area of the core by 4 and subtract the underground footage from all cuts. 40% of the calculated value is equal to the cable for lighting, and 60% is the meter of the power cable.
When cutting cables, wiring sections should be insured according to the material used, the method of laying and maximum attachment to the line. To make it easier to select the required fraction of the value, the cut-off is shown in the table based on the meaning of the factors:
| Retin cable (mm2) | Open-air installation | Pipe installation | ||||||||||
|---|---|---|---|---|---|---|---|---|---|---|---|---|
| Midna | Alyuminieva | Midna | Alyuminieva | |||||||||
| Strum (A) | Pressure, kW) | Strum (A) | Pressure, kW) | Strum (A) | Pressure, kW) | Strum (A) | Pushing | |||||
| 220 V | 380 V | 220 V | 380 V | 220 V | 380 V | 220 V | 380 V | |||||
| 0,5 | 11 | 2,4 | — | — | — | — | — | — | — | — | — | — |
| 0,75 | 15 | 3,3 | — | — | — | — | — | — | — | — | — | — |
| 1,0 | 17 | 3,7 | 6,4 | — | — | — | 14 | 3 | 5,3 | — | — | — |
| 1,5 | 23 | 5 | 8,7 | — | — | — | 15 | 3,3 | 5,7 | — | — | — |
| 2,0 | 26 | 5,7 | 9,8 | 21 | 4,6 | 7,9 | 19 | 4,1 | 7,2 | 14 | 3 | 5,3 |
| 2,5 | 30 | 6,6 | 11 | 24 | 5,2 | 9,1 | 21 | 4,6 | 7,9 | 16 | 3,5 | 6 |
| 4,0 | 41 | 9 | 15 | 32 | 7 | 12 | 27 | 5,9 | 10 | 21 | 4,6 | 7,9 |
| 6,0 | 50 | 11 | 19 | 39 | 8,5 | 14 | 34 | 7,4 | 12 | 26 | 5,7 | 9,8 |
| 10,0 | 80 | 17 | 30 | 60 | 13 | 22 | 50 | 11 | 19 | 38 | 8,3 | 14 |
| 16,0 | 100 | 22 | 38 | 75 | 16 | 28 | 80 | 17 | 30 | 55 | 12 | 20 |
| 25,0 | 140 | 30 | 53 | 105 | 23 | 39 | 100 | 22 | 38 | 65 | 14 | 24 |
| 35,0 | 170 | 37 | 64 | 130 | 28 | 49 | 135 | 29 | 51 | 75 | 16 | 28 |
Calling a conductor a cable or a wire, you should know what they are synonymous with:
- wire - a high-core or single-core conductor with or without light tubular insulation;
- A cable is a system of insulated conductors, united in a single structure, which is additionally insulated and is protected by an armored casing.
When choosing a material for electrical wiring of an apartment, you should give preference to the cable - a more reliable and durable material.
Based on the material used in the preparation, the regulatory documents clearly indicate the following:
PEU 1.7.34
“...In the booths the cables and wires with copper cores are stuck together...”
SP 31-110-2003, clause 14.3
“Internal electrical connections must be such that they do not dissipate the main line and are connected with cables and wires with medium conductors up to 2.1 and 7.1 PUE.”
Pristriy strobe
In modern life, open-air wiring is rarely exposed, and internal installation is particularly specific, depending on the material of the future structures.
Mount the cables on the entire wall before plastering, securing the wiring with clamps. If such a wall is already plastered, then use plaster to make the grooves of the required cut with the front cut on the surface using a grinder.
Walls in panel booths should be done with care - no closer than a standard plaster ball of the panel and not damaging the reinforcement of the structure.
For monolithic booths, the wiring is either fixed to the “black” walls before plastering, or laid near the grooves, viscosity in old plaster.
Remember: the construction of monolithic gardening structures is blocked!
The cables running across the wall between the adjacent spaces are formed into a rigid steel channel-sleeve, which is mounted in front of the structure with flexible bends in the design).
The sockets for the mounting and distribution boxes are finished with a drill and a core bit.
Cable laying and installation of distribution boxes, sockets, connectors
The cables in the grooves must be fixed with plaster before plastering. The sockets under the installation and distribution boxes are cleaned with a saw and wetted. A box is placed on the end of the cable, after which it is also immediately fixed in the socket - with a small amount of gypsum, level with the surface of the wall. When the cables are sanded at the grooves, the gaps around the boxes will be left behind and rubbed with cement. The connections to the skin sockets should be made directly through the junction box, without forming one cable for many sockets. When the single-core ends of the cable are cleaned from insulation for connection to the contactors, the conductor becomes brittle at the point of such a notch.
The installation of front covers for sockets and outlets will be completed after the finishing of the walls is completed.
Folding units in separate boxes are assembled with the help of special terminal bars - twisting of cables is unavoidable due to the need for strong insulation and ease of disassembly.
Folding the electrical panel and “dialing” the electrical wiring
The shield itself bathes before us:
- external design - easy to install, but it is important in place;
- internal type - more aesthetic and compact, rather than being installed in a niche.
Then the panel is installed near the apartment, most often at the front room, after which all the dry circuit breakers in the apartment are assembled and installed. It is not recommended to install more than one line on one machine.
All power lines are “ringed” from node to node, after which they are brought to the switchboard and connected to the machines.
After completing the connection to the machines of all lines from the distribution panel to the entrance panel, one underground cable is inserted with a cross-section of at least 6 mm2.
Visnovok
It is possible to install electrical wiring in an apartment independently. Especially since a professional has learned the circuit diagram and the skills of electrical installation work. However, remember that electrical installation on your machines is not safe for life. If you haven’t had the opportunity to finish this work before, it’s better to turn to professionals, at least for a step-by-step consultation, including the grading of the tension of the companions and the choice of cable webbing.
Enjoy your work with the installation of electrical wiring in your apartment!
Fold the flow of work and remove the spoilage of warts for 10 hvilins from the brigades and masters!
From this article you will find out:
- Why do you need to work your electrical wiring in Novobudovo?
- What are the benefits of installing electrical wiring in Novobudovo?
- What type of electrical wiring can be obtained from Novobudovo
- How to select cables for electrical wiring in Novobudovo
If you have become the lucky owner of an apartment in Novobudovo, then you are expecting a bug from this property. The most important stage of repair is installation of electrical wiring. Today it is allowed that electrical installation work was carried out by apartment owners. Some utility companies, with the same savings, allow homeowners to install electrical wiring themselves. We are figuring out how to do it so that the electrical wiring in the apartment is clearly visible, and how to do it independently.
Why do you need to replace the electrical system in Novobudovo?
Since the foreman installs the electrical wiring in the apartment himself, then, more than anything else, the master of life re-produces it. Even everything depends on functionality, and you can work it in a way that is easy for you.
What problems can be encountered if the electrical wiring in Novobudovo is already installed?
- Since automation is cheap, there is no guarantee that the equipment will be 100% protected.
- The cable that is being laid does not meet the luminosity standards, however, as it satisfies the specifications. The cut will not be sufficient, and the insulating ball will be too thin. It may happen that the inner insulating ball sticks together with the outer one, and during the cable processing time the smell will disappear at once.
- If the electrical wiring in Novobudovo is wired using the hoisting method, the cable should be twisted more. No one can guarantee that such wiring, stored close to the wall or under the roof, will last a long time and will not become overcooked.
- To protect the cable, pipes buried under plaster should be laid diagonally. It all comes down to the fact that the cable can be broken, for example, if the owner of the apartment wants to install sconces or drive the flowers in his place. Electrical lines must be made straight, making minor turns at 90 degrees.
- The height at which sockets and devices are placed will vary. When you spend your donkey, take a centimeter thread and change into it yourself.
All adjustments made to the electrical wiring diagram (including changing parameters) must be made before the core is reinstalled. He will have to make changes to the organs of local self-government. For example, it may be necessary if you want to lay a cable through another cut, replace the machine, install a new electrical distribution panel, install another power line, and so on.
You will lose your weight in just 45 days. In this case, you may be convinced by Perebudova. Ensure that you provide all necessary documentation from the moment you provide it. The authority responsible for carrying out the procedure, after the decision is made, will receive (or by mail) a supporting document of 3 dibs.
On the basis of this document, the owner of the apartment has the right to carry out a re-living.
Now you can change the electrical wiring in Novobudovo. Don’t forget that the addition of the electrical line, as well as the new gasket characteristics, are indicated in the technical data sheet of the object.
The electrical wiring in the apartment in Novobudovo is made from copper cable, which is covered with an insulating ball. The cable made of aluminum is shielded: if you touch a number of tight electrical accessories, it will not be damaged.
The 7th edition of the PUE rules stipulates that the electrical wiring in Novobudovo may be divided into a three-wire cable from the middle, in which one of the cores ensures grounding.
There are two types of grounding, the difference being the subzero point:
- TN-S system (working zero N);
- TN-C-S system (stable zero PE).
A three-wire cable enters the booth from the shield: phase – L, neutral – N and grounding – PE.

Grounding is necessary to protect people from electrocution. In addition, since there is a grounding conductor, the electrical equipment will not burn out. If you are working on electrical wiring in Novobudovo, do not forget about grounding. If it is unclear to connect the grounding conductor, it will become a rupture. Then, under the hour of a phase breakdown, for example, on a refrigerator, all the electrical equipment in your system, which is supplied to the limit, will stop working under extreme voltage.

How can I turn off this situation? Don't mess with the twisted ones. It is recommended to use special terminal blocks that are cut by pressing the cable. Or you can solder the connection, placing it in a separate box, electrical outlet, electrical panel, so that if necessary, you can easily reach them.
Since the apartment has been installed in the old style - with aluminum, it is necessary to dismantle it and create copper. Is it possible to install new wiring? Then twist the terminal blocks to connect the cable from the middle to the aluminum.
- Where are the sockets and devices located?
Place the sockets and keep them fenced. This moment is regulated by SNiP 23-05-95.
Thus, the driver must stand no more than 10 cm from the door opening (on the side where the door handle is removed). At what height you want to install it, choose the most convenient option. However, in children's organizations, vimikac is required to grow at a height of 180 cm from the base.
According to SNiP, if the room of a child is more than 6 square meters, one socket can be installed. Please do not connect electrical appliances (which supply a lot of electrical energy) to other portable devices. It’s better to just install the sockets so that all electrical equipment can be connected. It is recommended to install more sockets in the kitchen area.

Sockets that will be installed in areas with high moisture content are selected to be specially resistant to water. Place them at a distance of at least 60 cm from sinks, bathtubs, and toilets. It is necessary to arrive through the EPV. Choose the layout of the sockets so that you can easily handle them. Stand in front of the frames, windows and door openings – height 10 cm, height of the frame – 20 cm.
Connections to sockets and outlets are located 50 cm away from the gas pipeline, and 4 cm from other communications.
- There are different types of electrical wiring
Subject to the requirements of SNiP, electrical wiring in an apartment in Novobudovo is installed either horizontally or vertically. Installation wiring can be:
- Let's get it in the best way- It is important for you to protect yourself and save your internet. The cable is laid in the underlay, empty between concrete slabs, and also against walls. If the wall is wooden, the cable should be laid in a special dry hose to reduce the risk of borrowing;
- in a secret way- this way the installation of electrical wiring in Novobudovo will be simpler. Darts can be placed in channels that are mounted on the surface of the walls. The advantage of this method is that you can quickly get to the bottom to repair it. However, the Internet will be zipped.
You can remove electrical wiring in an apartment in Novobudovo by combining two described methods. For example, the main line will be hidden in the underside or in the stele. In this case, the wires leading to sockets and electrical outlets must be laid in a closed way. The combination method is used infrequently, usually for installation of wiring in utility rooms.
Most often, electrical installations in Novobudovo are installed using the fixed method. However, be sure to think about how you will replace the cable in case it breaks.
It is best to place the cable near the corrugated sleeves. This way you can easily remove it and replace it with a new one. With this finish, the walls will not be sealed. The corrugated hose is laid near the channels, which are cut with a grinder or a grinder. Please note that according to SNiP it is possible to protect the metal reinforcement when cutting channels on reinforced concrete slabs. In addition, it is not possible to place wires near the joints of panel slabs.
- Automatic for zakhistu
Once the electrical wiring is installed in the apartment in Novobudovo, do not forget about the dry machines. Disconnect them from the local electrical panel according to the following rules:
- If the machine is 16 A, you must also connect the lighting line;
- 20 A automatic machine – socket line;
- 25 A automatic machine for connecting everyday equipment with great difficulty. It is necessary to draw a close line to the electrical shield.
Cream automatic machines, then install EPV on all electrical equipment. Here you will see how the current flow becomes 100 mA. All lines are connected directly to the ELV, which is rated for a voltage of 10 to 30 mA.
Electrical installation planning in Novobudovo
Don’t you want the supply chain to be re-introduced as time goes on? To avoid additional damage to the walls, the contractors must first proceed to the installation work and develop an electrical wiring diagram for the apartment in Novobudovo. The wiring and connections are shown schematically below.

The wiring diagram for electrical wiring in Novobudovo is as follows: the connection on the chair indicates lighting fixtures and electrical equipment. Then, having taken care of the voltage, select the wiring diagram of the conductors, identify the cable crossover, and select the drying machines.
- Power block
This includes household electrical appliances that generate a lot of electricity, for example, oven, electric stove, boiler, split system. To bring the technique to the limit, carefully draw a line of tension, which is used with the help of automatic machines. This is the only way to ensure proper safety of household appliances in your home. In addition, if you need to carry out electrical repairs, you can easily do it quickly.
- Lighting block
How can the lighting part be designed:
- one group;
- 2-3 groups of lightening devices.
The first way is suitable for small rooms, where the space on the edge will be small. The other type of scheme is the one that gets stuck most often. The connection diagram for several groups is shown below.

If in the area, next to the lighting fixtures, there will be living units, transformers, and their trace will be fed through the adjacent electrical circuit from the individual circuit breakers.
- Large electrical equipment
The kitchen area is where most of the electrical equipment is located. And most often they work with electrical appliances, as long as you don’t use them (for example, a refrigerator, an electric stove, a bread maker, etc.). To ensure that the vents function properly and the fence does not become distorted, lay a line around it. In this case, the cable runs with a large crossbar, and a dry machine needs to be held with such pressure that it exerts maximum stress on your brain.
Electrical wiring in Novobudovo begins with the installation of the electrical distribution panel. Until then, an electrician will be supplied from the power supply. The shield must be installed when inserted into the farmhouse, at the exit of the rich surface or in the apartment.
After the apartment panel, the electrician will go to the hospital, which records how much energy has been wasted. Then go to the sockets, lighting fixtures and lighting fixtures.
To protect the electric lance, special automatic installations are required. They are cut into the circuit board in front of the cable, which leads to the socket or connector.
How much energy was wasted by the skin electrical device is recorded on the shield, after which it is treated with an electrical device, which passes all the impulses through itself. This explains why the mains of the shield are separated from the cable with a large span: this way it is possible to prevent the tension of the barrier and the leakage of the insulating ball.
The wire that goes from the shield to the survivable energy may have a small bridle, and even the smells feel less intense. However, the retin lived on the material from which it was prepared, so choose carefully. Special advanced literature specifies the rules for cable routing and permissible installation.
There are three ways to create an electrical wiring diagram for an apartment in Novobudovo:
- Loop (buses) - installation of the main line is carried out through separate boxes, of which the installations are carried out using live energy.
- Radial method - the stream is supplied to the skin through a semi-conductor cable, it goes straight through the middle, there is no rupture and it is connected to a drying machine.
- Combination method - combine two forward methods.
All electrical wiring diagrams in Novobudovo are not similar to one another, but they are based on the design of different models of electrical equipment, wires (cables). They are installed for standard or specially developed projects using this or other technology.
1. Supplied with a string.
The ends of the cables are connected in the middle of the junction boxes. In order to commune them, we will end up with a separation scheme.
As a guide, you can take a diagram that shows how to install electrical wiring in a 1-room apartment.
The shield, installed at the bottom, has a disinfectant installed, as well as 2 automatic machines: one for the socket group, the other for the lighting group. Cables run through them in a cable for up to 3-4 unsoldering boxes.
- for vitality;
- for the kitchen area;
- for collection.
Both the cable and the other must be laid parallel to the boxes and connected there. Through those dozens of years ago, the attraction at the border was small, a lot of people were victorious in new comrades. The work was carried out using aluminum cables with a cross-cut of 2.5 mm 2 . At this time, to install the electrical system in the apartment in Novobudovo, put darts from the middle. Let's tell you how to unzip the binding.
At the front of the room there is a separate box for the toilet, which is connected by a wire to a socket and two keys so that you can turn on and off the light in the bathroom and toilet.
Also for zakhistu you can vikoristovuvat automat. Connect them directly to the sockets and lighting fixtures. Also, with your companions, you can keruvat after the mixture, and the stench will be removed. For example, AB No. 1 protects electrical appliances in the kitchen area and toilets, No. 2 – appliances in the front room and in the bathroom.
You can bring the power supply to the living quarters in another way: some of the electrical power is supplied through the additional third automatic switch of the shield. How to properly connect sockets and wires?
- includes lighting in the room, including all electrical equipment (for example, a floor lamp and a TV);
- We plug one circuit breaker into the panel, and it’s surprising that both the lamp and the electrical appliance have stopped functioning;
- Fix it so you don’t forget;
- We also check with another automatic recorder and record what happened;
- analysis of the extracted data is carried out.
2. Supplied with tension using a radial method.
Here, as in the situation described above, the distribution of energy among the machines is achieved with the help of an additional housing panel. Automatically select the following so that the stench matches the technical parameters and the voltage.

A solid cable without twists is carried out in automatic machines until it is ready.
In the event of a breakdown, you can connect the faulty line itself to the circuit, routing the electricity in the new building in this way will be as reliable as possible. Ale has its own nuances:
- the number of automatic machines is great;
- The size of the shield is important, in which stench will be located;
- long highways with cable.
As a result, in order to create the scheme, as well as implement it, you will have to spend a lot of money.
3. Supply voltage using a combined method.
This method, combining both loop and radial connections, will ensure that the particularities of dilution for a specific skin condition are ensured. In order to ensure optimal selection of equipment, you can change it.
It doesn’t matter which electrical wiring diagram you choose for your apartment in Novobudovo, the cable is laid either in a closed or in a closed way.
With the hoist method, the wire is laid in the walls either underneath (under the plaster) or in empty structures made of plasterboard.
As for the method of conducting wires, the wire is attached to the wall or stele with a series of brackets.
Advantages of the chosen method:
- The wire is not visible.
- It is impossible to damage the wiring.
- As soon as the vinikne is shortened, a solid ball of plaster will not allow the spalk to melt, at most the darts will melt. When carried out in an open manner, the finishing of the coating may collapse.
- Easy to carry out cosmetic treatment.
- Since the electrical wiring in Novobudovo is planned in an optimal manner and clearly defined, it will last for a long time.
Nedoliky:
- To install electrical wiring in Novobudovo using a closed method, you will waste a lot of money and energy. Come to sand and polish the surfaces, and then spend additional money.
- To replace faulty wires, you will have to spend a lot.
- The wiring is stuck and it's cooling down badly. This means that the permissible voltage is lower (aligned with the shutter).
Advantages of the open method:
- Ease of installation.
- Budgeting.
- You can quickly change the electrical circuit in Novobudovo.
Nedoliky:
- The internet will be zipped.
- Advancement of the risk of damage to the wiring.
- Maybe you were asleep.
Analyze the advantages and disadvantages of both methods, first choosing the other. Prote fakhivtsi recommend wiring electricity in Novobudovo using a closed method.

We are talking about a power cable for everyday use or a wire rated for a voltage of 220/380 V. We will not consider other types, such as cables for a TV, a computer, for heating, etc.
- Why is the cable made, its design features.
- Pereriz.
- Thickness of an insulating ball.
- Obolonka.
- Markuvannya.
- Color
- How does the packaging work?
- Certification
- External look.
The preparation can be carried out with copper or aluminum. Copper cables lined with aluminum (with the same crossbar) have better reliability characteristics, support, flow, and practically do not heat up. The copper cable does not oxidize, it is plastic. Therefore, the term of his service is long, and over time, the virus does not lose its brilliance.
Important! PUE is protected against aluminum wires for electrical distribution in an apartment in Novobudovo.
The wire can be single-core (single-core) or multi-core (high-core). The single-strands will be harsh, the stench is practically indescribable, especially if the cut is large.
Theoretically, for the installation of electrical wiring in Novobudovo, it is possible to quickly install a single-core cable from the middle. The plaster is protected from the conductor. However, in reality, no one is using single-shot cable.
Single-core multi-drag cable is soft and flexible. It can be folded and turned as needed. It is recommended to be careful with both the open and closed type of wiring.
A three-core single-draw cable is the right choice if you need to install electrical wiring in an apartment in Novobudovo.
Important! The cable, where the core is divided into one conductor, is cut into a hole, into which the core is divided into several conductors. The fragments are of great importance, the rich cables are not damaged when installing wiring in the frame.

Dimensions - mm 2 overcut means the throughput of the wire. So, 1 mm 2 darts from the middle of the building allow 8 to 10 A, for aluminum - 5 A. In order for the wiring to function properly, the cross-section may be larger. This way the cable will not overheat, and the insulation will not melt due to the increased pressure. Moreover, if the electrical wiring in the apartment in Novobudovo is of the same type, then it is bad to realize that it will be out of stock.
Important! Webbing and diameter - different sizes. You can change the diameter yourself using a ruler or a caliper, or more precisely. The data is removed using a special formula and is clearly cut across.
Also, do not forget that when choosing a wire for routing electrical equipment in the New Budovo trace, round off to the high side. For example, you carried out a refresher and it turned out to be 1.4 mm2. This means that you should choose a wire from a crossbar of 1.5 mm 2, and not 1 mm 2.
The ideal option is if the spandrel is the same as indicated on the dart. However, in truth it may be less. As a result, certification of the plant is obtained not for the cut, but for the support, damage is allowed. However, if the data varies greatly, it means there is a defect. A professional can tell by simply marveling at the wire. And you can determine the diameter of the wire, and then break through the cable girder to get the hang of it.
It doesn’t matter whether it’s single-core or multi-core, the skin of the veins is covered with an insulating ball of PVC plastic. In addition, as an insulating material, the polymer is made of cross-linked polyethylene. The insulation thickness may meet the luminosity standards. For example, the insulating material that is installed in the apartment (voltage no more than 660 V, cross-section 1.5-2.5 mm 2) requires 0.6 mm. The insulating ball can be a little smaller, but not less than 0.44 mm.
At the top, the insulated shells lived and were covered with shell. Their treasures are to be seized and captured. Vikonano shell is made of PVC plastic, polymer, and is rich in insulating materials. For example, a multi-core cable has a sheath thickness of 1.8 mm, a single-core cable - 1.4 mm. The totality may be a little less than the value of the values.
The shell is always in the mouth, intended for home vikoristan. Apparently it has a low tension and a flexible insulating ball. Only then will the conductor work properly, and the peace of mind will be zero.
Once the electrical wiring is done in Novobudovo, pay attention to what is written on the cable. Labeling will contain all the data so that you can select a specific virus. The writing can be done with a contrasting color or with more pressure, so that it can be clearly seen.
On the market, as well as in the electronic catalogue, there may not be information about the river of release, as well as about the plant. Standard marking looks like this: VVGng(ozh)-0.66 kV 3x1.5.
This means that in front of you is a three-core cable with a mid-length cross-section of 1.5 mm 2 single-core cores. Insulating ball, Vikonani shell with PVC plastic compound (VV), filament virib (G), non-flammable (ng), voltage - 660 V.
Important! The letter of the designation of the brand must begin with the material from which it was cut. Letter A means aluminum cable. For copper cables, the same letter is not specified. This means that all BBH brands are prepared from honey.
Standard colors can be used: plain solid, or a 0.1 cm thickening is applied to the outer shell throughout the entire frame. They added that it is carried out in the back or in the overlay - which means that it is not made in a handicraft way and there is no guarantee of quality and safety there is no sign.
The cable can be packaged in a bay or drum. The bays are being sold for sale. Drums - for wholesale. There is a label on the cable with the main characteristics of the device.
The cable for distributing electricity in Novobudovo bay is 100 meters long and comes straight from the tag. Unless they sell you a piece of cable or a tag, of course, no one will give it to you, but you can ask to see it.
The presence of the certificate confirms the quality of the product and that the cable is suitable for electrical installation work. In addition, there is a fire safety certificate. To become familiar with these documents, ask your consultant to give them to you. The documentation states that the conduction meets the national standards of cleanliness. Also, pay attention to the term of attribution, until the end of which you will lose every hour. Make sure that the documents contain technical equipment according to DSTU for wiring. This means that the product is clear.
What does a clear cable look like? Make sure that there are no dents, kinks, or any pressure - that’s all we can say about those that have defective wires. We may have lived in spite of each other, closed to each other. Obviously, it is not necessary to use such a circuit to install electrical wiring in a Novobudov apartment. Therefore, carefully look at the cable before you decide to buy it.
Carrying out electrical work in an apartment with your own hands is not an easy task, but for the obvious knowledge and skill you will definitely have to say goodbye. Make sure you call an electrician to replace the old wiring in the hut or build a new apartment with a complete renovation. This robot will be expensive for the housekeeper. Having mastered the basic rules for installing electrical wiring, you can learn more about electrical engineering. If you do not risk getting involved with electricity, recommendations for laying out the wiring will help you control the work of the master, quickly spot shortcomings and eliminate shortcomings.
Necessary materials and tools for work
Safe electrical wiring must comply with BNiP and safety standards. To carry out such wiring, you will need the following materials and tools:
- electric hospital;
- dry connection device (DEV) for carrying out flows for emergency use or when the flow of flows is faulty;
- power, low-current, brightening cable;
- Galvanizing boxes;
- terminal blocks (preferably without screws);
- sockets and vimikachi;
- electrical outlets;
- open-type electrical wiring boxes;
- add alabaster for installing the cable in the middle of the groove;
- glue;
- screws and screws;
- plinth;
- electrical insulating cardboard;
- paste for fastening.
Tools required: wall chaser, chisel, hammer, cable cutters. To lay the cable in the middle of walls or boxes, you will need a spatula and an emery grater. You will also need pliers, a screwdriver, a tape measure and the following.
Replacing the wiring in an apartment: when it is necessary to change it
An indication that the wiring in the cabin needs to be changed is:
New implementation: authorization, agreement, necessary documents
New wiring for the apartment with your own hands can begin with the project. This is the plan of the living room in the apartment with the signs of the place, the electrical wiring will be removed.

The plan for lighting and placement of sockets is based on two lines of electrical wiring, so they need to work side by side.
The electrical supply project is prepared by a specialist or organization with the right to carry out such work. The designer puts together a plan that is consistent with the possible PUE, so there are no problems when putting electrical wiring into operation. In this case, the insurer must ensure the placement of sockets, plugs, and the number of connected household appliances.
Before installing new electrical wiring, it is necessary to take care of the technical minds and the required effort. It is especially important before the start of a new day.
To register electrification, it is necessary to go through several stages:
- Return to the Homeowners Association or CC to obtain proof of the validity of the act in which the electrical diagram of the apartment is shown.
- Return to the company, which has a warehouse project for the electrical supply of the apartment according to the terms of the contract.
- Usage of the project with the operational service of the booth, then with Energonoglyad.
- Installation of electrical wiring.
- Request a licensed electrical laboratory to test the electrical current. Behind the test pouches you can see the technical evidence from the verification and verification protocols.
- Submit your application to Energonaglyad with additional documents containing the results of testing the gauge to attract new wiring. Facilitation of installation and correctness of installation by the Energonoglyad inspector. If the robots are installed without any damage, the certificate of approval for operation of the electrical installation is displayed.
Having received the certificate of approval, you will need to go back to the service station to connect the power supply to the permanent circuit.
Safety equipment
To avoid any injury or shock when installing wiring, follow these safety precautions:
- Turn off the robot when the voltage is removed. It is necessary to control the voltage level using an indicator screw or an electrical tester.
- Connecting electrical tools and transferring for lighting must be carried out by a qualified service technician.
- The power tool must be completely serviceable, and the tool must be without any defects or damage.
- For work at height, it is necessary to install only a stable support, for example, a platform, and not tables or stools.
- It is necessary to obtain special clothing, special clothing and headdress.
- When working with power tools, you need to learn how to use your hands, eyes, and hands.
- It is not recommended to practice alone, but especially with a partner. At work, you will always need to take a first aid kit for first aid.
- If you are suffering from struma, your partner needs immediate help: immediately relieve the stress and call for urgent help.
At the site of the test, the presence of a fire extinguisher is observed.
See wiring installation
Do-it-yourself activities in the apartment can be done in two ways: by opening and by admitting. The first method involves installing electrical wiring in pipes or baseboards. The height of the gasket may be whatever, the drive does not comply with strict standards. The plinth is made from non-flammable material. During installation, it is not allowed to lay wires for sockets and lighting at the same time.
Another way to do it is in the middle of the walls and partitions, in the middle of the walls.

Electrical cables should be well insulated from moisture and heat. To install cables, it is necessary to add metal pipes, clear pipes or corrugation.
Prihokhanov installation of new wiring
Laying the cable in a hoisted manner has its advantages:
- Neat external appearance (wiring is invisible in the interior).
- Fire safety has been moved up (behind the sinks, the walls are concrete).
- Protection was carried out from external mechanical radiation and ultraviolet radiation, which is the term for the electrical service.
When planning to reinstall the electrical wiring, it is necessary to open the cable openings on the walls. They have electrical outlets and a separate box for the darts. To fix them in the openings, vicorize the parts with plaster. After this, place the electrical cable along the grooves. First, the cable needs to be cut into sections of the required length with a reserve for the connected cores.
What are the disadvantages of choosing a method of installing electrical wiring?
The shortcomings of installation using the correct method lie in the fact that during the hour the installation and repairs require demolition of the wall. This process is labor-intensive and requires a low-tech installation method. The head needs to work with the cable of the attached electrical wiring for an hour - to ensure the color marking of the wires.

Then place it in the middle of the walls and stiles, covered with plaster (dotted with dots with a gap).

When installing the cable in the middle of plasterboard walls, place the gasket in plastic pipes or corrugations. Having checked all the connected wiring to make sure it works, you can start plastering the walls.
Installation of wiring in cable channels
The cable channel is an electrical box, which consists of a U-like profile and a flexible cover.
Sockets and devices must be installed at a manual height.
Laying the wiring in an open way works on a level wall. Methods of fastening cable channels on the deck:
- rare flowers (for plastic viruses);
- self-drying with crocus at intervals of 50 cm (for wooden walls);
- dowels (for fastening on concrete and solid walls);
- sticky stitch (for fastening the electrical current).

The box needs to be cut carefully using a vikorist and a metal hacksaw. It is important to keep the lid closed, so as to keep the hook intact. When cutting metal with knives, the cutting process can be done in many places.
If two types of cables are laid at the same time, the inner empty parts of the boxes must be divided into adjacent sections in order to disconnect their cross sections. At the same time, the cable in the middle of the channel can be moved easily, and the cover can be closed without difficulty.

To create a diagram of the installation work, you need an apartment plan, on which it is necessary to indicate the place for installing sockets, switches, and lighting fixtures. The starting point of the diagram is the area where the split shield is located.
- To reduce the risk of damage, the electrical wiring route must be laid vertically and horizontally along the walls.
- Turns on the highway will only take place under a straight line.
- To reduce the risk of damage to the cable during repair, it is better to lay it above the base (near baseboards) or on a stand 20 cm from the ceiling.
- Vimikachi for the scheme need to be installed from the entrance to the room at a height of 80-150 cm.
- At 6 sq. At least one socket is required, the bathroom has two, and there are even more in the kitchen.
- There is a separate box near the skin room.
- When folding the scheme, it is recommended to plan out the arrangement of household appliances and furniture.

The electrical wiring diagram must include a 30 mA ESV to protect against leakage. The 10 mA ELV for the bathroom is installed separately.
Wall slitting
To start, you need to remove the hole under the electrical panel. Use a grinder to make cuts along the edges of the niche and a number of horizontal and vertical cuts in the middle. After this, you need to use a hammer drill to cut out the middle, trimming the dimensions with a chisel.

Open the sockets, and drill the distribution boxes with a hammer drill or impact drill with a crown attachment. The diameter of the crown depends on the slightly larger one below the mounting box.
Strobes are cut behind the previously marked lines (in line with the installation diagrams). For whom do we vicorize the wall murals? The grooves are drawn strictly vertically and horizontally. Where you need a lot of depth, use an angle grinder with a wall chaser. The saw cleaner will help you avoid excessive sawing during the hour of work.

After these steps, knock out the core of the groove with a puncher and a chisel, and level its bottom. It is necessary to control the size of the grooves by periodically fitting the cable or corrugation.
To pass the cable between rooms, break through technological openings in the walls and ceilings.
Once the gating is completed, open all the niches, clean the saw, and treat it with a deep-penetration primer.
Connections adapted to the area of energy consumption
In the electrical certificates, the generator is indicated by the connection diagrams. Regardless of the type of electrical circuit, there is a terminal block to which the electricity is supplied and connected, as well as the internal circuit. When connecting cables to the terminal block, it is necessary to switch the phase and neutral conductors in their place, maintaining polarity.

The lower contacts of the automatic transfer machine come out. As on the top ones, the left contact needs to be connected to phase, and the right one to zero. To connect an electric heater, it is better to put darts of the same cut to live.
How to connect the wiring to the sockets, select the height for the sockets
Select the optimal method for connecting the socket to the electrical wiring, which should be based on the instructions given on it:
- Connections to another socket. For which type of connection is planned, there is no need to overestimate the permissible voltage, which is valid for the first outlet.
- Connections via a distribution box. The wiring required to install this box requires sufficient space to install a new outlet.
- Connections from the head shield. Suitable for connecting electrical appliances with great convenience.
In the first two cases, choose a cable with a cross-section of 2.5 sq. mm, and in the remaining cases, one that comes from the needs of a particular electrical device. Often, an overcut of 2.5 sq. mm is not enough.
There is no standard that determines the height of sockets. Therefore, the choice of height of installation depends only on the comfortable handling of electrical appliances.

For example, in the bedroom, the height of the sockets is often chosen to suit the aesthetics, so that there are no marks. Therefore, they should be installed with a 30-40-div window as a base.
For electrical appliances that are often in the cleaning mode, sockets should be mounted on flat bases - near baseboards. In the kitchen, for connecting additional appliances, select a height of 30 cm above the countertop, for the main household appliances - 20 cm above the base.
How to connect the wiring to the chandelier
The simplest method for connecting a chandelier is to give two darts to the lamp itself. Meet them in pairs in any order. Since there is only one lamp in the lamp, the neutral wire of the life is connected to a similar wire in the middle of the junction box. The phase wire from the distribution box is connected to the vimikach, and from this to the phase wire of the chandelier. You need to connect the javelins with screw clamps.
If the lamp has a number of lamps, all the zero points in the new one are connected together, and connected to the phase point from the terminal.

For a chandelier with two keys, the connections are similar to those of a single key. The few darts from the chandelier are divided into two groups, then one bunch from each group of lamps is added to the zero dart.
Features of wiring in different rooms
For different rooms, electrical wiring may have its own characteristics:

Verification and commissioning
Before you begin processing the wiring after installing the wiring, you need to check its feasibility.

To detect tampered wiring, you need a dialing device - a multimeter. The groupie machine is guilty of buti vimkneniy.
To check for damaged wire insulation, use a megohmmeter or check visually. After checking to see if there is a short circuit, connect all the wires. It is necessary to close all chemicals. Then short-circuit three circuits - phase, neutral, ground on one of the sockets. The third cycle is the ringing of all sockets and lamps, which may indicate a short circuit (basically 1-2 Ohms). The remaining stage is testing the wiring to the maximum possible extent.
Once the testing has been successful, you can begin putting the electrical wiring into operation, documenting it with the relevant authorities.
Variety of self-installation
We can cover the cost of electrical wiring for self-installation of electrical wiring:
| Vitrati | 1-room apartment | 2-room apartment | 3-room apartment |
|---|---|---|---|
| Wire for lightening (5-6 m per skin lightening device) | 500 rub | 600-800 rub. | 1000 rub. |
| Wire for sockets (3 cores with a cross-section of 2.5 mm, 10 meters) simultaneously from the main wire (10 m, cross section – 6 mm) | The norm is 4 sockets per room. Therefore, the average cost for 1 room, kitchen and sanitary facility in a warehouse of 100 m2 is 5000-6000 rubles. | The average requirement is 180 meters, the price is 7000-8000 rubles. | You will need approximately 220 m (kitchen + living room + 2 bedrooms + bathroom), costing 9000-10000 rubles. |
| Automats, shields, distribution box | 1500-1700 rub. | 2000 rub. | 3200 rub. |
| Sockets, devices | 400-500 rub. | 600 rub. | 1000 rub. |
| AT ONCE | 7500-8700 rub. | 10200-11400 rub. | 14200-15200 rub. |
In addition to these materials, do not forget to protect the fasteners, adhesives, gypsum plaster, electrical outlets and other consumables. However, with this independence, the installation of electrical wiring will be more visible, less difficult. The average price for electrical services from cable installation is 60,000-70,000 rubles.
Videos about the activities at the apartment
Do-it-yourself installation of electrical wiring in an apartment:
Technology for electrical wiring before plaster:
Installing electrical wiring with your own hands can be an overwhelming task for an inexperienced master. In this situation, it would be better not to take a risk, but to turn into professional electricians. If only minimal skills are present, along with practical benefits, you can carry out independent electrification of your life, thereby protecting everything.
It is impossible to see your apartment without electricity. It is completely possible to install wiring using power.
To do this, you need to stock up on terpenes and learn a little about the methods and procedures for wiring electrical installations.
This article lets us know how to create, understand or install (lay from scratch) electrical wiring to a switchboard in an apartment with your own hands.
The main regulatory document that regulates the activities related to the inspection of electrical connections is Rules for wiring electrical installations (PUE). First of all, before starting your own installation, you should familiarize yourself with the PUE and especially carefully consider the sections that relate to the choice of equipment, installation rules and safety equipment.
Basic rules to follow when lining electrical wiring:
- , entrance panel, sockets and others key elements of the fence should be installed in easily accessible places.
- The vimikas are located on the side of the porch, in the middle of the room. Installation height – 60-150 cm from the base. The animal will be escorted to Vimikachi.
- languish at a height of no less than 50 cm from the support, the maximum permissible height is 80 cm. Wire to the sockets from below. The sockets must be extended more than 50 cm from heavy-duty appliances, gas stoves and grounding elements that are located before other communications.
- Sockets are installed from 1 pc. 6 m² of living room, including kitchen. In the kitchen, the number of sockets corresponds to the number of electrical appliances. It is not possible to install sockets near the toilet; the socket group near the bathroom must be connected through a separate transformer, or a stationary stove with a plug must be installed, which is plugged into one of the sockets in the kitchen whenever needed. In this case, you need to see the entire connection group.
- The routes for laying the dart can be vertical or horizontal.. Turn the corner just under the straight edge. Removal of all cables is on schedule.
- Cable laying routes are laid out along the entire route from load-bearing elements of the ceiling, pipes, and edges of openings.
- Lay the wire so that stench does not stick to the metal elements everyday constructions
- The distance between the wires laid in one channel is not less than 3 mm, otherwise the individual protection (channel or corrugation) is to blame for them.
- The wires are routed and connected in separate boxes. All joints are insulated with viscosity; the use of copper or aluminum is not allowed.
- To fasten the dry and neutral conductors to the fixtures, tighten the bolted connections.
Pokrokov's electrical wiring diagram
Let's take a closer look at how to install electrical wiring in an apartment with your own hands. Correctly designed and thought out - securing the security of apartment dwellers. In the process of developing the circuits, it is possible to optimize the layout of the elements of the internal borders, correctly determine the required quantity of materials, and select the type of construction. The availability of the scheme and implementation plan will ensure that repairs are carried out in the near future, including the risk of fall damage during repairs.
An example of a do-it-yourself scheme for an apartment can be seen in the photo:

If there is no information at this stage, it is better to contact qualified electricians, otherwise you can create the connection diagram yourself. The plan for the design of internal electrical systems improves the efficiency of energy inspection He will have to overpay for the obviousness of rude pardons.
How to properly organize electrical wiring in an apartment with your own hands from scratch, watch the video:
To prepare the diagram you will need a chair and an apartment plan. The plan includes the refurbishment of furniture and large household appliances. Based on PUE, there are lighting points, sockets and lights on the chair.
In current practice Connections are labeled in groups of dots. In the living room (behind the kitchen) there are two such groups: light and socket. In the kitchen there may be more connections, since other heavy electrical appliances are recommended to be connected to the same group.
To save materials, connection groups may look different:
- Lighting group of rooms, hallway and kitchen;
- Lighting group of the sanitary unit;
- Rozetkova group in the corridor and room;
- Rozetkova kitchen group;
- Electric stove.
At the design stage, the structure of the compressed tension and the transferred force to the struma is carried out. This is necessary for the correct one. In the event of extreme tension, absolutely all electrical components are insured, in front of the apartment, right down to the hairdryer and electric razor. The wiring must immediately dampen all living streams. To measure the strength of the abdominal muscles, the result is divided by 220.
It is necessary to install a device to protect against moisture on the line to the skin connection.Tools and materials
It is recommended to connect a separate apartment panel with the main one in the cabins with three-phase cabinets cable VVG-5 with crossbar 6 mm², in booths with two-phase food - two-wire VVG-2 similar to the cut.
The lighting part of the wiring is connected to dart VVG-3*1.5 (three-core, cross-section 1.5 mm²) For the socket part, it is recommended to conduct with a 2.5 mm² crossbar. To connect the electric stove, use a 4 mm cord.
At the panel, a 16 A ESV is installed for the lighting wiring, 20 A for the socket group. Install a 32 A machine on the electric stove, if its power exceeds 7 kW, you will need a 63 A device.The length of the cable is determined by simply extending the distance from the shield to the skin connection point. Approximately 4 meters of reserve is added to the final result. Approximately a third of the total consumption is spent on lighting, otherwise the socket connections are wasted.
A number of sockets, switches, distribution boxes and other elements are included in the diagram. What you need are socket boxes, terminal blocks, 3IZ covers, insulating tape, cable ducts, corrugated boxes and boxes.
The set of tools includes:

- A grinder with a stake on the stone and a wall;
- perforator;
- Bit;
- Fazovkazivnik;
- Screws with insulated handles (cross and splined);
- Passatizhi;
- Little things;
- Rhubarb;
- Portable lamp;
- Podovzhuvach;
- Putty knife.
Layout and gating of walls
For marking you will need rhubarb, tape measure, creed or olive. In places where sockets are installed, squares of 7x7 cm are painted As soon as the installation of a suspended socket is carried out, a rectangular strip 14 cm wide is applied to the markings. Then the routes for laying the cable according to the plan are applied to the wall.
In other words, the arrangement of devices is marked out, denoted by squares, like sockets. Place rectangles 9x20 cm under the separate boxes.
 The holes for the sockets are marked with a crown drill, then the grooves are cut along the marked lines using a grinder.
The depth of the groove is not less than 20 mm, the width of the groove must be equal to the number of darts that may be laid on a specific area. All the necessary parts can fit in absolutely freely.
After cutting the grooves, you can no longer knock out the grooves and open everything. Drilling is a laborious, laborious and gallant process, the robots should be planned for the working hour and ahead of the neighbors.
Laying of wires and fittings
Nasampered i PZV The number of types indicates the number of connection groups. The center of the shield is screwed with a 5 mm crossbar. Blue - fasten to zero, white - to the top contact of the machine, grounding (yellow with dark green) - grounding. The PZV is connected sequentially with a piece of white dart.
 It is recommended to start installing new wiring in an apartment with your own hands at the lowest connection point.
Carry out cutting into sections of the required length with an allowance for joining, stretch on the underside at the corrugation and then place at the groove.
To connect sockets, a wire with a cross-section of 2.5 mm² is used., from lighting equipment and chemical equipment – wire 1.5 mm². Until the end of the skin treatment, it is important to attach the tag to the designated indications and expand the group (points) of connection.
The wires in the separate boxes are connected for additional protection or simply better insulated. The main wire in the middle of the shield is connected as follows: blue conductor - to the zero bus, phase conductor, for red or brown insulation - to the ELV at the bottom, grounding - to grounding at the bottom.
After this, the wiring is called and if the wiring is installed correctly, you will no longer have to call an electrician to connect to the distribution board. You can watch the video below to see how to properly install and install electrical wiring in an apartment with your own hands:
All robots need only the right tools, the handles of hand tools are insulated. For additional protection, you will need wet gloves, when working on walls, and on dry eyepieces and respirators. Grooving at height is carried out from a trestle or from a frame with a butt stop.
This video has proven results and shows how to change the electrical wiring in an apartment with your own hands: