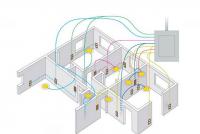
How to insert plastic windows yourself. How to install a plastic window using a wet hand - instructions for use. Selectable installed window
Good afternoon everyone!
Knowledge is power, you can’t interfere with it.
Having returned to me, I recently learned from the instructions that you can install the windows yourself.
Having decided to run a small cottage on his own, he will occupy himself in this way after retirement, and is preparing an information base for the skin stage.
And I, as a fakhіvets vіknakh, just appeared before the river. Having sketched out a short plan of action for him, and having finished taking a look at all the food he has.
Read below for all the principles and nuances of installing window structures.
 Do-it-yourself installation of plastic windows is not as easy as it appears at first glance.
Prote, in order to correctly install the plastic window, you need to know the steps, which you cannot do without.
Please read the instructions for installing plastic windows.
Technology and procedure for installing plastic windows with your own hands
The sequence of installing a plastic window consists of the following stages:
- Dismantling of old windows (as soon as replacement is carried out).
- Preparing a new window.
- Installation and verification of the standby profile before the next window.
- Fastening the fastening elements to the window frame.
- The creation is buried near the wall and in places there are fastenings.
- Insertion and placement of a plastic window behind the horizontal and vertical level.
- Fixing the window in the opening using additional fastening elements at the opening locations for them.
- Filling (filling with mounting foam) the gaps between the plastic window and the window opening.
- The windows have been installed and verified.
- Installation of slopes.
- Adjustment of fittings.
- The installation comes from the outside of the window.
The remaining point can be concluded at the end of all operations, if you have a cabin or a cottage.
If you live near an apartment, then installation must be carried out after inserting windows without glass packages.
For this purpose, before installing the window, the glazing beads are removed (a twist is placed between the glazing bead and the gum pad and the glazing bead is knocked out of the groove with light blows), and then the glass packages are removed.
In this way, it is easy to check and install the drain through the window.
Before installing the window, a support profile is installed.
 It’s as simple as that: place the profile at the desired location, align horizontally and save.
Before you start, it’s better to put it on your profile and wonder how it’s normal to get into the space that you’ve lost.
If the fire is deprived of even a lot of free space, then under the profile there is a trace of padding.
Simply insert the profile of the stand into the bottom groove of the window.
Since the profile of the kit does not have transfers, it is necessary to place blocks at the height of the window sill in order to secure the sill under the lower groove of the window. Once the installation of the stand profile is completed, we proceed to install the window.
To start from the beginning, you need to attach the fastening elements on which they will be trimmed. It is best to use flat anchor plates. The stinks of the culprit were spread perpendicularly to the surface of the window at a distance of 10-20 cm from the cutaneous side of the frame.
The fastening to the window is screwed with a self-tapping screw on the metal approximately 10 cm long (one self-tapping screw is screwed into the dowel at the end of the anchor plate into the frame from the outside side, the other at the other end of the plate into the wall and into the dowel).
If you insert a plastic window without glass packages (with empty frames), then the fastening screws are screwed from the middle of the frame into the wall behind the dowels, but not to the end, so as not to damage the frame structure.
 For the dowel, you need to drill a hole. If the anchors are fixed at the window, it is inserted at the window opening and is secure.
After this, in the next few places, the anchor fastenings are fastened to the wall, we punch a hole under the entire fastening plate, so that we can then cover all the fastenings with a crack and level the wall to install the miters.
After attaching the plastic window in the opening, turn it vertical and horizontal. Therefore, you should not immediately tighten the screws into the opening from the outside.
It is better to work double-handedly, so that one person will trim the window, and the other will put the bars for the cleaning. We proceed to fill the space between the window opening and the plastic window with mounting foam.
Golovna, so that the piping was hundred-hundredths. If the space between the window and the opening is more than 2 cm, it can be applied in 2 stages with an interval of 2 years.
 Increase your respect!
Important! Before washing, wet the surface with water (with a spray, for example). Only so the foam should accumulate as much as possible from the structure of the walls.
If you install the window at a temperature below 5 degrees, use an all-season or winter installation pin. If the temperature of the room is over 5 degrees, come on.
Pina may hang out for at least half a day. After which it is necessary to close the mouth and change the sun. You need to use either a basic mortar, or tile adhesive, or a non-penetrating drying agent.
 Installation of the sub-window requires the front cutting of the finished floor, leaving the remaining space behind the dimensions.
For these purposes, a jigsaw or grinder will work wonders. Then slide the window up to the support profile (whichever is included) and verify.
If after alignment there is a large gap between the windows and the opening, then it is better to fill it with a crack, having previously removed the windows.
It’s all fine, I just need a simple nap. Don't forget to put plugs on the windowsill. It is important to cut the windows so that the openings come out straight from the plugs. The plugs are best glued to the windows with super glue.
After checking the window, you need to change it to siding by pressing it with your hand in a few places.
Corisna is pleased!
If everything is in order, then you can start before finishing, first pressing the windows with important objects (for example, a bowl of water) to remove the bulging pile from the mounting stump. The next day, excess pine under the windows can be removed with a regular knife.
Before speaking, you can install a sub-window with a very small adjustment from the window (literally 2-3 degrees), so that possible condensation does not seep between the window and the sub-window.
Installing bevels on plastic windows with your own hands
Before installing the brackets, you need to remove excess stumps around the perimeter of the frame with a knife (be sure to work very carefully so as not to damage the window material). To install the slopes, PVC panels are taken and cut to the required depth (two - for the height of the opening, the third - for the width of the opening).
After vertical alignment, the fastening is aligned onto the mounting pin.
And so that the foam does not remove the panels from the wall, they need to be glued to the walls with masking tape (in three places). After flattening the stumps, it is necessary to create residual frames at the ends of the panels. For which there is an F-like profile (invariably, such a design is inserted between the wall and the plank).
Do-it-yourself installation of injectors on plastic windows
Installation is very simple: the head of the frame is inserted into the groove under the window, and then aligned, pressed, secured with screws to the stand profile and sealed.
After installing the plastic windows, the fittings are adjusted and the mosquito net is installed. Regulation of the law is a topic that will be discussed in the nearest articles.
Dzherelo: gold-cottage.ru
 Installing a PVC plastic window with your own hands is not very difficult.
You do not need any specific skills or special professional skills for these activities.
Of course, clear glass packages made of plastic cost quite a few pennies, but the cost of them can be reduced if you install plastic windows with your own hands.
At this point, the savings are approximately 40 to 70 c.u. (Dolars) and moreover, on the skin, a self-installed slop package.
Just like this article on our blog about everyday life and do-it-yourself repairs, we will look at the topic of self-installation of plastic windows.
For example, you will also find a thematic video of installing plastic windows with your own hands according to GOST.
Installation of a plastic window - stages:
- Installation methods - There are two methods for installing the window with and without unpacking.
- Fastening elements - types of fastening elements, diagram, depth of fastening.
- Insulating materials - what is PSUL and diffusion stitch, de-stuffing - diagram.
- Preparing the opening - how to properly prepare the opening.
- Installation of the drain - diagram, recommendations for fastening the mounting pin.
- Folding window - the window can be retracted after clearing the throat.
- Installing a sub-window - recommendations for practical reasons.
- Installation of mowers - installation of plastic mowers with your own hands according to the instructions, diagram.
 Today there are two methods of installing windows using metaloplasty:
- With or without unpacked containers.
The method of installation and unpacking is carried out with the forward process of disassembling the package:
- Remove glazing beads
- It is difficult to remove from the frame and place it in the place until it is installed.
After this, the frame is attached to the surface of the wall with dowels (through the hole), and then the glazing beads and glass panels are installed back. It is significant that this method of installing plastic windows has a number of nuances, which we would like to appreciate.
Therefore, we chose the most labor-intensive and safe method of installation (for plastic windows) for writing this article, and especially in the video, installing plastic windows with your own hands.
Corisna is pleased!
It is necessary to be very careful with the glazing package, as the fragments of careless manipulation of the glazing beads can lead to chips and rips on them.
The containers can suddenly break during the process of being removed and transferred, but if everything is done carefully, then nothing bad will happen.
If this process is carried out without unpacking, then there is no need to remove the folds and glazing beads, as the fragments of the base are attached to the wall with the help of the fastening parts previously installed on the outer surface.
However, this type of fastening is not suitable for large windows, which can be very heavy.
From this point of view, the use of first technology for installing a window with your own hands is simple and complete, but rather than finishing the theory, let’s get down to practice.
The window is made up of many parts. These parts may be deaf or represent a chair that opens up.
Let's take a look at how to remove the window pane from the blind part of the window and how to properly dismantle the chair that is opening.
Viluchenya sklopacket.
After the window has been delivered to you, before installation it is necessary to pull out the glass packages from the blind parts of the window that do not open.
 Make sure that when you deliver a new glass, the glazing beads (the glazing bead is not plastic, which immediately removes the glass package) are not hammered in completely and can be easily removed.
If, after all, at the factory the glazing beads are sunk to the end, you need to insert a small spatula into the seam between the glazing bead and the window frame and carefully tap the mallet (wooden hammer) straight from the center of the window to its periphery, try to glazing beads (4 pieces).
After the glazing beads give way and come out of the grooves, the plastic fasteners will fall out, they need to be removed, because we need them when installing the glazing beads back.
We don’t think it’s easy to guess that everything needs to be done very carefully so as not to break the expensive glass package.
The best way to do this operation is to work in two, so you can press in a glass package, which on average weighs 30 kg and work, so doing it in parallel is not easy.
One more thing, it is necessary to fold the removed glass packages onto a clean, hard surface, or better yet, press the glass package(s) to the wall, like a splint, then place a ball of clean soft gantry between them.
 In order to remove the chairs of the plastic window that open, it is necessary to open it to deny access to the hinges.
Dismantling a chair that opens must begin by dismantling the top hinge.
To do this, you need to twist the spindle (the shaft that wraps around the middle of the loop), the stem must be pressed onto a new animal (most likely with a twist), after which part of this shaft will appear from below.
Having secured the lower part of the spindle with pliers, we pull it out from the bottom.
After the top loop has been opened, you need to pull it out slightly from the horizontal axis, let the bottom loop work, then raise the chair approximately 5 cm.
After this chair, twist through the other bottom loop. To complete this dismantling, it would be good to call a partner who will insure you, the scraps of oil and chairs and glass packages, as we have already calculated on average, will reach 30 kg.
Fastening elements.
The fastening elements, in our version, including anchor bolts, are distributed along the entire perimeter, starting from the edges, and the maximum distance between the bolts is 700 mm, and the minimum is 150 (diagram below).
So the fastenings themselves must be removed from the imposts (an impost is a horizontal or vertical bar that divides the window into parts) both above and below to give rigidity to the design of the plastic window.
See the fastening.
 Based on DSTU, there are three types of fastening:
- Fastening with vikoristan screws for concrete.
- Dowel dowel for anchor plates.
- Fastening behind the additional bolt.
When installing plastic PVC windows with your own hands, according to GOST, we choose the method of fastening using anchor bolts. These are one of the most complex and at the same time important types of fastening, so you don’t have to worry about the size of the window.
Fastening behind the additional bolt.
- concrete - 40 mm
- target - 40 mm
- the target is rustle-like - 60 mm
- blocks of porous natural stone – 50 mm.
The installation of a plastic window according to GOST requires a mixture of special insulating materials, which is dictated by the fact that in the enclosed moisture of the fabric, lower on the street, then a portion of the moisture penetrates the middle of the seam of the window when installing steam. insulating line.
 If the outer contour of the seam is made as thick as the inner one, then moisture will gradually accumulate in the seam, which will lead to the loss of its heat-resistant components, so when lacing the assembly seams, it is first necessary to adhere to the principle in the middle and more low calls.
For these purposes, use PSUL (the stitch of the holder is compressed in front). If the distance between the bottom profile and the load-bearing wall is less than 40 mm, install the PSUL, if the distance is more than 40 mm, then use a diffusion stitch with similar authorities.
PSUL is just like a diffusion stitch that is glued to the window frame, it is designed to protect the mounting pin from the inflow of the external core, and also so that the liner can come out of the mounting seam during the operation of plastic con.
In addition, it is important to note that ideally it is necessary to attach the diffusion line at the bottom of the window, and the PSUL to the sides of the window profile.
An example with a diffusion stitch You can admire the video of installing a plastic window with your own hands, presented at the end of the post, and the installation of the PSUL is schematically presented in the small diagram below.
Preparation I will open the door.
 The cut must be cleaned with soap and saw. If necessary, the edge of the opening needs to be tightened and tightened.
After all these procedures, it is necessary to wet the surface of the opening with water to improve adhesion (Adhesion is the bonding of surfaces of various solids and/or rare bodies).
The frame of the window block is installed in the opening, during which the box does not have to be placed on top of the opening, but must be installed on supports that can be carried, for which plastic wedges can be inserted.
These wedges are installed under the protective joints of the frame and there are at least three of them.
To tighten it, apply rhubarb to the base of the glazing bead, since the seam part in practice is never straight, due to the fact that at the time of tightening it could be deformed.
After this, it is necessary to take a drill and drill an opening near the window frame and further away from the wall.
After this, it is necessary to insert the anchor bolts into the drilled opening, but not to the end, so that it is possible to align the frame.
After all the anchor fastenings have been installed in the opening, we re-check that the frame is installed correctly and that everything is normal, the anchor bolts are pressed in and the anchor is screwed in, at which point the wedging occurs, and the frame is already “dead” in" is fixed at the window opening.
I'm installing it.
The next step is installing PVC windows with your own hands - installing the outlet. You can now buy a vikna from a winemaker’s company, or you can vikorize an old one, as it is very good.
 It is attached to the support profile using a bunch of screws (drawn diagram).
This is the moment when it is necessary to change the mounting pin.
During the installation process, the temperature of the container with mounting foam is below 20 degrees C.
Therefore, in the cold season, when the temperature is below zero, it is necessary to wear special coats, both for the attachment of the applicator gun and for the balloon itself.
Increase your respect!
The mounting foam should be used for gaps ranging from 10 to 60 mm, if the width is more than 60 mm, it is recommended to change the window slot for less expensive waste material - for example, purpose or polystyrene foam.
Folding window.
After we have installed the window frame and completed all the additional work involved in installing the PVC window with our own hands, we are finished and we can turn the chair and the glass package back.
From now on we install the glass package.
To insert the glazing package into the installed frame, it would be good for your partner to trim the positioned glazing package, and at that moment you insert the glazing beads on the guides and, with careful blows of the mallet, put them in their place (don’t forget about the plastic clamps).
Then you need to install the window on the chair, for which you need to lift the chair and put on the hinges, then insert the spindle from below and push them in until it stops (here you can also use a mallet and gentle blows ).
When installing the sub-window, it is necessary to cut the front.
 Then come up to the support profile, after which we add a level and support different materials.
The window can be slightly damaged from the window to allow condensation to evacuate, but it is always not necessary to sag.
After 12 years, if the foam has become damaged, it can be removed and the excess foam must be trimmed.
Corisna is pleased!
Vantage is intended to ensure that the pin does not deform the windows during the drying process.
It is no longer necessary that there should be a gap between the windows and the frame, as if it had lost its sealing with silicone. You need to try to understand the creation of such a gap.
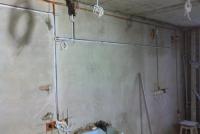
 The first thing that needs to be done when installing the bevels is to attach a wooden plank to the perimeter of the window (the inner perimeter of the open window, photo).
Fastenings are made with screws approximately 95 mm deep.
The plank is not to blame for sticking out of the window opening, but rather for being flush.
In order for the mowing to come out level, it is necessary to align the planks with additional level.
After this, a P-like starting profile is attached to the outer window frame. The fastener is attached to screws that are screwed directly into the window frame.
This profile will have bevels inserted, so the outer edges must be carefully joined.
The next step is to install an F-like profile and fasten it with a stapler.
The groove of such a profile is extended opposite the groove of the U-like profile, and the bevels themselves are placed in this groove. In this part, which is located higher than the window, the F-like groove is carefully cut either with a knife or with scissors along the slide, so that the groove overlaps the upper part of the window.
After the U-like and F-like profiles are installed along the entire perimeter, you can insert the miters. If you can’t finish the seams, you can coat them with white silicone.
Dzherelo: remont-s-umom.blogspot.ru
Today I will tell you how to install 8 plastic windows and entrance doors with your own hands in one day.
To start this robot, you don’t need any special skills or knowledge to master it.
 Ale, clearly, there are no nuances, which will surely gain respect. And, of course, there are a number of secrets that will protect you when making a deal.
I have chosen the optimal thermal characteristics of the window
- with a multi-chamber window profile
- and double-chamber glazing package
- as well as strengthening the entrance doors.
Before the speech, the doors themselves were filled with half the price of the preparation.
And the out-of-pocket expenses were 40 thousand rubles for a set and another 4.5 thousand rubles for delivery. About how to buy a window at the same price - for example, statistics.
1. Let's get started!
2. We have a newly built aerated concrete building that requires the installation of 8 windows and one entrance door.
 We take all the dimensions from the slots first.
As you remember, I made quarter trims around the perimeter of the openings on three sides (the bottom quarter is not needed - there will be a windows).
For the quarters, standard aerated concrete blocks with a thickness of 5 cm were installed, and the entire masonry was installed on a mounting pin.
The sinking of the windows when installed will be less than 1/3 of the thickness of the wall.
It is also important to note that it is not easy to work on opening the windows according to the standard window sizes - the technology of the current production is automated and there is no difference in the quality between the standard size and the window on production.
The end dimensions of the window are compatible with the management of the prevailing factors. From the side of the frame to the wall there is a gap of 1 to 2 centimeters from the skin side, which will be filled with mounting foam.
At the bottom of all windows from the factory there is a 3-centimeter high frame profile, which is required for manual installation of the sub-window.
Plus, under the installation profile there is also a gap of about 1 centimeter for the mounting pin. At the same time, roughly speaking, the internal dimensions of the opening will need to be 4 centimeters horizontally and 6 centimeters vertically.
It’s not good to squirm and push the frame into the opening without a gap, because It will be difficult to pour a mounting pin into a gap of less than 5 mm.
 3. It is important to know that the construction of any section that is being opened increases greatly. Therefore, in order to protect the meta, it is necessary to minimize blind windows that do not open as much as possible.
In a single-surface booth, there are no problems going out into the street to wash the window, and for ventilation you can create a transom that opens (due to the design features, it is much cheaper per turn) A drop mechanism, which means that the width is significantly greater than the height , more precisely, its height cannot exceed 50 cm).
The advantage of the blind section is also that you do not waste the core area of the panel. My window has 5 blind windows measuring 60x60 cm, two blind panoramic windows 1.4x1.7 meters, one turn-out window 0.6x1.3 meters and entrance doors with partial slopes 0.9x2.3 meters.
It has greater control over windows and doors (including hinges, handles and locks). I also needed to purchase additional anchor plates, dowels, self-tapping screws, reinforcement stitching, mounting pin, window support and add 3.5 thousand rubles to the purchase price.
4. We need: a screwdriver with a concrete drill, a mounting pin with a gun, a PSUL stitch, fastening plates, dowels for aerated concrete and screws.
Increase your respect!
Now I want to increase my respect, which is not possible with a virtual instrument.
5. There are two ways to secure the window frame: through fastening with unpacked glass packages and with the help of anchor plates.
 The first method takes more than an hour to get started.
You will need to carefully pull the window pane out of the frame and then place it in place.
The glazing beads must be fixed carefully and so as not to damage the edge, you will need a special spatula and clamp.
Plus, if we are talking about installation in two hands, then with great windows the problem will be that the removed glass package cannot be turned, on the side of the frame, in any case of installation.
This through-cut fastening ensures precise fixation when it is hard and tough, and requires an adhesive. Much simpler installation is carried out on a mounting plate.
Corisna is pleased!
This skin plate costs 10 carbons. They need to be installed from the opening 1 plate on the skin 50 centimeters.
The plate is installed by turning it in the grooves of the frame and secured with an additional screw and drill (to drill through the metal frame in the middle of the frame).
 6. Finally, on the outer side of the frame, on all sides of the base, the PSUL stitch is pasted - behind it, the stitching stitch is embossed.
It will be corrected when the window is installed in the opening with quarters.
The purpose of the stitch is to protect the mounting pin from ultraviolet exposure and, therefore, restoration. During the cold season, it is easier to install windows, because... The stitch is already widening in the cold.
7. A six-meter roll of PSUL stitching costs 140 rubles. When fixing the stitch on the outside side of the frame, it is better to extend 1-1.5 cm from the edge, especially if you have deep quarters.
It is important to ensure that when the mounting pin between the frame and the wall is poured, it does not get lost on the PSUL line.
8. Now we go to the window opening. Its geometric dimensions are ideal, and the base fits perfectly with the horizon.
This comes naturally when working with aerated concrete, as long as you follow the technology and set the next row of masonry to zero. I started the installation of small blind windows, and they are distinguished from others by the fact that they will not have a window. Well, we won’t vikorize the fake profile.
9. Apply directly and indicate the place before opening the fastening. We confirm and install special screw dowels for aerated concrete.
You have to pay special attention to the fact that it is not possible to score them in one blow, especially since the stinks are spread close to the edge of the block, and there is a risk of breaking the blocks of the block. After this, the screws are driven through the fastening plates.
10. Our instruction is to install the window strictly vertically.
It’s difficult to worry about other things, because... There will be no distortion of the window along the diagonal and it is enough to take measurements at any point in the frame. After this, tighten the screws on the fastening plates and remove the scrap of laminate from the base.
Increase your respect!
Either way, the plates will need to be fixed so that they can fit around the slot, including on the fastening plates.
The mounting foam is poured into primer to fill the empty thermal insulation, and not for mechanical fixation of the frame in the opening.
11. You will have to tinker with great windows. The skin weight is more than 80 kilograms and lifting into the opening will not be easy.
I got off the blocks and gradually raised the window 5 centimeters uphill.

On 3 skin sides, bottom.
Here you need to be more careful about the verticality of the frame and apply rhubarb to all corners.
On the great windows below, the profile that would have been installed would have been lost.
Directly below the profile, I also placed a plate of laminate, which was placed immediately after fixing the anchor plates to the wall.
12. The tilt-and-turn window is 2 times smaller in size, and for this purpose, install 8 anchor plates, because Opening the chair will add tension to the frame.
On average, the installation of one window requires about 30 pieces. And even serious washing, when more is allowed, the dry melt from the frame must be removed immediately after installation.
Corisna is pleased!
If you put the windows on the surface of the repair, the lining will need to be removed immediately.
If this is not done, then it will be more difficult to hold, and in addition, the plastic will burn unevenly (this is important for the outside side of the frame).
 13. We go to the entrance doors. This is a reinforced door with 3 hinges and a full frame around the perimeter. Seen from the middle - it’s much more convenient, no matter what.
But most people have a stereotype that doors need to be fixed. When the door frame is installed, it is important to ensure an even fit around the perimeter.
To fix the doors, I used 10 anchor plates. I especially appreciate the verticality of the side walls of the door frame at two levels.
For reliability, the fixation of the skin anchor plate can be supplemented with another self-tapping screw. As with the windows, the doors will be completely unusable when the anchor plates are tightened.
It is not your responsibility to distort when opening and you must press firmly around the perimeter of the closed frame.
14. Now we take the gun from the mounting foam. The presence of the pistol is obvious because It allows you to regulate the output of the pin.
Corisna is pleased!
Of course, there are nuances that you definitely need to know.
First, it is not afraid of ultraviolet radiation and it needs to be hidden from the dark light. On the outer side of the window, for which there is a line of PSUL, on the inner side, it is necessary to plaster the slopes or, as an option, fill them with farb. Once applied, it absolutely cannot be sprayed.
The shell, which is placed on it, protects the internal open-air structure from claying and further ruining. It is necessary to seal the seam between the frame and the wall so that excess does not protrude.
It is important to be careful not to clog the gun nozzle, as... Don’t forget that from the outside we have a line of PSUL and there’s no need to fall off with fresh foam.
Approximately 5-10 weeks after filling the seams with foam, visually check the seams and carefully compact them every time (until it becomes easy to work). When operations are carried out at temperatures below +5 degrees, a special winter precaution is required.
Best of all, not all coats have a frame that stands strictly vertically. It is possible to correct the adjustable hinges and lock.
16. Done! The windows and doors need to be sealed until the stump is completely caught. And we move on to the final stage.
17. Take a plastic windows with a depth of 20 centimeters.
All you need is 3 sub-containers: two 140 cm each and one 70 cm. A finished sub-container with a height of 150 cm costs less than 200 rubles. You can use an additional jigsaw to cut it and install it under the frame near the support profile.
It is important to remember that the depth of the pedestal near the frame should be 2 centimeters, which is important when choosing a depth.
Increase your respect!
Before installation, do not forget to remove the dry lining around the perimeter.
The sub-window can be installed either horizontally or with a slight (1 degree) overhang from the window.
18. The edges are covered with special plates, which are then glued with superglue.
As a support when the level is set, you can use a trim from the windowsill or a wooden block. After this, we place the animal under the window so that the mounting kick does not lift it.
I fill the entire surface of the base with foam from below. Also, as with window frames, you should control the expansion of the pins and prevent them from being cut with a knife. Just compact it, it won’t catch you.
 19. Final chord – insertion of extensions. We cut it down, fix it to the window frame using screws (after coating the stick with silicone sealant), fill the base with mounting foam and attach it.
20. Done!
Don’t forget to remove any dry melt from the frames, lining and drains. There is nothing foldable in the installation of the window and you can install it one by one.
Having made this robot with my own hands, I saved over 15 thousand rubles on the installation costs.
Installing windows is an important step that allows you to give your apartment or home a new look, preserve heat in the middle, and improve the soundproofing of the area. This work is of average severity; it takes approximately 3-4 years to install one glass package. If a person has minimal security knowledge and a tool, he can carry out the entire installation on his own, using only one assistant. Such an approach will help to save a significant amount of money, and will also allow special attention to be paid to it, so that all robots adhere strictly to the DSTU.
How can I remove the necessary steps to make a window?

In order to put the Euros in the booth, replacing the old ones with them, it is difficult to cope with the functions placed on them, then carry out the preliminary changes in order to install new structures.
- hacksaw;
- hammer;
- tsvyakhoder;
- installation;
- Sokyra.
You can remove the frame in two ways:
- It is very important to carefully decorate, trim and remove the frame.
- Chop the structure into pieces and remove it.
Obviously, there are surpluses of old mounting foam, cement, insulation, in a word, all the materials that were put together to secure the old window block. During the hour, the saw cleaner works well, in order to best save the wake-up saw, not allowing it to expand in every area. A compressor helps a lot, which you can easily see from all the crevices, then go through it with a special soap, for its obviousness.
Important! The mounting foam is more easily attached to a soft surface, which reduces the cost after completion of all work. With this fastening, it is tightly connected to the structure of the material, without interacting with the saw.
By choosing the method of dismantling, it is better to give priority to careful knocking. It is important to use an unprepared design that will open faster, so it will be easier to install and install a new block.
Preparation before installation of plastic windows

If the plastic windows are already sealed, it is necessary to clarify the terms of their preparation and delivery to the place of installation. There is no point in starting work until the construction is delivered. Only after the window system has been brought into the apartment, it is necessary to move on to the preparatory stage.
It includes the following obligatory actions:
- clearing the area before the window;
- display of all furniture in the room;
- covered with spitting material or fabric for scorching radiators, underlays.
Preparing the window profile
Installation work with the installation of polyvinyl chloride structures begins with the preparation of the window. If there is such a need, dismantling of glass packages is carried out, removing loose chairs from the surface of the frame.
To carry out this work, follow this:
- Use a chisel to pry up and remove the beads from the grooves: start working with the elements, moved vertically, then take the lower one, and the rest – the upper one;
- mark the glazing beads so that at the stage of the gate installation you do not confuse the signs of any removal (this will result in gaps of half to one millimeter);
- build a frame for the exit of the glass package from the grooves: here it’s better to work with a partner. Carefully place the package against the wall, leaving the corner, so that it does not fall in;
- remove decorative plugs from hangings;
- unscrew the clamping bolts;
- If the system is fanlight, open the upper part of the chair by turning the handle to the center (the chair may be open in ventilation mode);
- remove the cap from the bottom canopy.
Now you will no longer have a frame with imposts, which is necessary for the vertical and horizontal re-stuffing, which is necessary for the reinforcement of the chairs.
On the inner part of the frame, along the perimeter, there are openings necessary for fastening anchors. There are three of them on each side of the skin, on the top, and below. For comfortable drilling of openings, you need a special drill for metal, since there is a metal insert in the middle of the plastic profile, which promotes its precision. To fix the structure, stiffen the anchors, the depth of which varies from 8 to 10 mm. It is necessary to select the correct drill diameter.
If fastening is carried out behind an additional fastening eye, a front disassembly of the block is not required. The included fasteners are secured to the frame with screws.
Updating your fake profile with a new one

To check this box, you need to fill out your custom profile. Regardless of the fact that this parameter is not always enabled by the installers, the value is more important.
Important! This step is important for removing the thermal space that will be created in the lower part of the opening.
To prevent damage to the thermal insulation of the area, seal this part tightly with polyurethane. It is best to carry out the procedure for extracting the main components so that the surface of the warehouse is hardened and fills with itself all the necessary space.
Dismantling the old window. Preparing the opening

The day it is planned to install a new glazing unit, it is necessary to rebuild the old window system. If saving frames is not necessary, remove the chairs from the hangings or remove them at once using the screws that held them in place.
The box and frame are trimmed in different places, then the cutter is used to lift the bottom surface and look beyond the openings. Under the box there is a softener, a heater, and they need to be tidied up. Then, using a spatula mounted on a hammer drill, remove part of the miter or dismantle them completely. Here everything lies in wait for the ruler’s further plans until these elements are formed.
Now it’s time to lift the sub-window; use a hammer drill to remove the lining from the cement that is located at the bottom of the opening, under the sub-window.
Be sure to take away the packages in advance of preparation, especially the excess of the old window from the room. It is necessary to prepare a safe place for the upcoming operations. It is absolutely necessary to straighten the ends of the saw, the beam, and carefully level their position, one at a time. The surface extends the priming.
If the windows are replaced on wooden booths, a waterproofing ball is additionally laid. It is necessary to pass along the entire perimeter of the opening, which is important to prevent penetration of moisture from the wooden structures that have been made up. Here it may be necessary to strengthen the entire structure by installing a box made from solid wood.
Whenever installation work is carried out, be in the center of the place, so you should first check the possibility of changing the external appearance. It is clear that changing the size of the window openings on this façade may result in a fence. Here, the need for restoration work may arise from updating the dimensions of the opening by additionally replacing the cement screed on the sides, as well as on the bottom.
Correctly installing plastic windows with your own hands
There are two main methods for installing glass packages:
- From the analysis of the window.
- Without sorting out the window.
With the first method, it is necessary to drill openings through the frame, which will then drive in anchors. This method is prone to complexity, but this type of fixation is highly reliable.
If the installation takes place without first unpacking the block, metal plates are fastened to the frame, after which they are fixed to the walls. This method works richly more quickly, but does not undermine confidence. It is clear that when severe wind damage occurs, the frame may sag or become warped. To eliminate this shortcoming, experts recommend vikorystovy products, wide plates, which are used for fastening blood systems.
Important! In regions where strong winds often blow, it is recommended to use a different method, which includes front unpacking of the structure.
Technology and procedure for installing plastic windows with your own hands
The stages of installation of plastic window structures follow the following sequence:
- Dismantling work and collection of old units (if they are being replaced).
- Preparing a new window.
- Installation of the current profile, its verification.
- Fixation of fastening elements to the frame.
- There is an opening in the wall, in place of the future fastenings.
- Inserted structure.
- Places a block behind a line, horizontally and vertically.
- Fixation of the structure with fastening parts.
- Filling with foam the gaps between the window and the opening.
- Installation of a sub-window, its installation.
- Creation of mowing.
- Adjustment of fittings.
- Installation on the façade of the extensions.
Important! If you install the structure near the apartment, then it is necessary to remove it after installing the frames, from which the glass package was previously damaged. In a private booth, the installation of injectors is carried out in the open room, which means it is possible to get to someone else from the street.
DIY plastic window installation

Before installing the block directly into the middle, the support profile must be fixed:
- place the profile where necessary;
- align the horizontal direction;
- check what is going through the opening;
- for obvious reasons, there is a large number of places in the mountains, place bars under the profile;
- Securely attach the assembly warehouse, vikorist nozzle, which is pressed onto the gun, to ensure deep penetration of the foam.
Direct installation includes the following stages:
- Attach the fastening parts to the frame (anchor plates), extending them perpendicular to the surface of the window. They are fixed at a distance of 10 to 20 cm from the skin.
- The leather screw is screwed into the dowel on the end part of the anchor plate. This is made from the outer parts of the frame. Another screw goes into the other end of the plate into the wall, also through the dowel.
- If it is possible to insert it without packages, place the fasteners in the middle of the frame using dowels. It is important to not start them all the way to avoid any harm.
- To insert the dowel, drill the hole.
- After attaching the block, check the level of its horizontal and vertical lines.
- Verify thoroughly with a mixer, which will be used to lay the bars.
- The drying process must be carried out in the same way: if the space takes up more than 2 cm, the procedure is carried out in two stages, with a two-year break in the drying warehouse. Before applying the foam, wet the surface with water from a spray bottle, this will advance the fixation stage. When fixing the structure at minus temperature, the winter or all-season foam should be frozen.
- The warehouse is left to dry for half a day, then the outer side is covered with tile adhesive, adhesive, or non-penetrating tiles, in order to protect against the influx of ultraviolet radiation.
DIY window installation for plastic windows
To install the sub-window, you need to collect the excess supply from behind. As a rule, manufacturers supply this object with significant changes in parameters. For this you need a jigsaw or grinder.
The process works like this:
- put in a piece of the element;
- slide the window up to your profile and select it;
- if there is a significant gap, it should be filled in (the windows should be tidied up);
- they check the device for sifting, tightly pressing the animal with their hands;
- If the structure is standing correctly, seal it by pushing in the plugs in front (gluing them with super glue);
- Place important words on the top of the object to ensure it adheres to the surface;
- The excess dried up stumps are cleaned up for the next day.
Installing bevels on plastic windows with your own hands
The installation of the windows is carried out directly after the installation of the mowers, which should be done as follows:
- use a knife to remove any excess stumps that have been lost along the perimeter of the wound;
- cut the required half of PVC panels (two for height, a third for width);
- create vertical fastening;
- fix with mounting foam;
- Before reaching the warehouse, attach the panels with masking tape to the wall, or else to their walls;
- insert an F-like profile between the wall and the plank for residual framing.
Do-it-yourself installation of injectors on plastic windows
As an important storage part of the window system, they are distinguished by one feature: if the installation was damaged, it is possible to reveal too much damage. And it will take a long time to eliminate such clearings. To ensure that such problems do not occur over time, you should immediately take the maximum possible steps to seal the joints, paying particular attention to how the frame adheres to the side slopes.
Please make sure to install the injectors:
- Keep the horizontal position as level as possible: installing it under the floor or having a level surface will lead to the accumulation of water flow, causing low-impact marks to appear on the wall. If everything is done correctly, the board drops step by step, which reduces the level of wetting, speeding up the process of drying the walls;
- under pressure to work the base and cement and sand, mitten, and tar. Vikoristannaya pіni cheaper, speed up the process, but have a negative impact on your yakіst. Periodically moving the outer parts of the windows, with the legs standing firmly, will lead to the destruction of its geometry and value. So the structure will have to be reinstalled;
- The side edges of the element should be sculpted strictly before cutting: if the cuts are made from plaster, they can be cut into them to a depth of up to a centimeter (this is not necessary, as it is unlikely that it will come out without using too much sealant).
Do not settle for lowly important functions. Correctly installed structures ensure that water does not penetrate onto the wall surface. They carry water, and when securely secured, are absolutely silent, resistant to strong winds and boards.

Extrusions can be made from various materials, the simplest and cheapest being galvanizing. Also sold are plastic structures that do not show any great benefits, even though they quickly lose their potency due to the influx of atmospheric fallout.
The aluminum elements are highly concentrated and are about a millimeter thick, as well as thick. The stinks are prepared using powder filing, which guarantees their durability.
Polyester viruses are prepared from prepared galvanized steel, and they appear already at the final stage of fermentation. These elements were extracted through cured fabric, which has a polyester base. The coating is treated with carbon dioxide, and after heavy use it does not lose its original appearance and does not crack. These visors are cheaper for aluminum in many cases.

When combined with plastisol visors, the stench increases in resistance to changes in air temperature and the influx of atmospheric precipitation. In addition, their external appearance is neat and aesthetic.
The installation process of injectors is carried out as follows:
- prepare the entry of the element into the window system;
- PVC structures are made with a special profile, molded at the bottom, to which the visors are attached;
- fixation is carried out by fastening screws and rivets;
- Any space that is missing under this element must be filled with mounting foam to ensure thermal insulation, sound absorption from the board, and also reliable fastening;
- So that the foam, before it dries, does not lift the pressure, which should be fixed with a tight squeeze.
It is very important to properly arrange the approach before the outer mowing. For this reason, cut down the sides so that the visor reaches the surface of the mows. This approach should be done in such a way that the water immediately drains from the window and the mowing to drain. Therefore, install this track before installing the bevels, rotating the lines, on the façade.
PrikhovatiPlastic windows are becoming very popular. Smells are good at protecting rooms from cold and wind, and they can easily remove the warmth in the middle of the room. It is important to know how the glazing packages are installed, and to ensure that they are installed correctly and that the window functions as intended. If the glass package is damaged, the entire package can be replaced independently.
What needs to be prepared before installation?
Preparation robots play an important role: without them it will not be possible to establish all the rules that can lead to damage to the seal of the window.
If you have an old window installed and you want to replace it with a new one, you need to start dismantling it, then you need to clean it from the dirt, if necessary, check it. If you want to replace only the glass package, it is enough to carefully pull it out of the frame of damage: they are secured with special glazing beads. Any excess broken glass must be carefully removed. Make sure to keep the mark on your mittens so that the edges may show up.
Before installation, it is necessary to correctly select the values that indicate horizontal and vertical offsets.
Which design should I choose?
The installation begins not with installation, but with death. The smells may be accurate, otherwise the new design will not match the size. If you are afraid of completing the survey incorrectly, ask for a surveyor. You are welcome, since you will be from the same company that will prepare the package for you.
To give advantage to more reliable producers, the quality of their products has proven itself well in the market.
The configuration is selected based on the number of chairs of the new window and the method of fastening. Where to lay it down, how the glass package will be attached. Consider sharing in two ways:
- Fastening through the frame at the same mounting surface.
- From stagnant support reinforcement. Such fittings are already in the frame and are placed there by the distributor.
Most often, when the vicor is installed, the first method is used, since it is easier to do it yourself, the structure changes, and installation takes less than an hour. If the chairs are solid, it is necessary to remove the internal seals. In combination with the reinforcement, the design itself is slightly foldable, so, regardless of this, you do not run the risk of sealing the package during installation, causing damage to the frame or breaking the edge. You can install the glass packages hermetically, so that they will not come out again if you installed them yourself the first time.
As it is under warranty, it is not possible to change the glass package yourself: this will save you warranty service. Once there was a problem with the company, it was afraid of installation.

How Vashtovano Vіkno
How to install a glazing package?
The work consists of several stages. We first need to prepare the place: clean it, remove it from new furniture so that it does not interfere with the work; If the opening is uneven or has smudges, it will need to be cleaned and repaired using cement.

Dismantling the old window

Opening the door
After this, you can move on to preparing yourself. For this purpose it is necessary to remove the chairs. U The installation of the glass package into the frame may not be done on a vase; for installation it is necessary to pull out the glazing beads, for which you can quickly use a chisel or a hammer. Handle the work carefully so as not to accidentally break the edge.
Beads need to be placed in the same place where they were located before, so it’s better to number them right away.
Pull the lower and side elements together, and the upper one into the rest of the drawer. The bead must fit tightly, but not tightly, if it does not fit in place, try another: you may have mixed up the elements in places. If the consistency is destroyed, the glass package will be trimmed, and other gaps will be created, which will destroy the tightness of the window. There is no need to remove the frame to install the glass package.

Installation of the frame in the opening
After that, as the first stages of the installation, you can proceed to the final installation of the glass package. To be honest, you will spend very little time on this. The installation proceeds as follows:
- In order for the installation of the frame to be smooth, place special blocks of wood or plastic in the lower part of the window. Most often these elements are sold there, where there are plastic windows. The upper edges of the linings are to be moved horizontally, this can be checked using an additional level of a straight line or vicorized using a laser level. If the line is slanted, it is likely to become skewed and will not be able to function normally.
- The structure is then secured using anchor bolts and mounting pins. Don’t rush to twist the bars: this will need to be done two weeks after it has been secured.
- To prevent the frame from bending, place pegs on the sides or in the center. The smell is reduced by the design in a vertical position.
- If you horizontally rotate the glass package, check it with additional care. If the structure is uneven, it is necessary to add rods to level the structure to the required surface. In order to find out whether the window is standing vertically, use a living hanging.

Installation of glass package
Attach the frame tightly from the bottom, along the sides in front of the corners. After this, you can move on to other attachment points. If the fastening is supported by anchor bolts, tighten until the end only until the structure stands perfectly level. Otherwise there is a great risk of deformation.
- All structures are secured using metal lugs that come with the kit: they can already be opened under the anchor bolts. Quilt this so that the holes in the wall open with the opening on the back, and the metal element itself fits to the wall more thickly: this will reduce the gaps.
- After which the window frame of the chair is installed, the glass package is already inserted into it, and the cracks are sealed.
Knowing how to install glass packages, you can completely save yourself if necessary, replace the part and start working on your own. For this you don’t need to have a lot of basic skills or buy expensive tools.
Previously, only wooden windows were installed in the booths, but in our time they are letting out not only wooden windows, but also windows.
And in the current world, people often begin to install plastic windows in their cabins and apartments. Axis and you, if you decided that wooden windows no longer retain heat so well, freeze and look, let’s say, not very attractive and for this reason you decided to change the windows from wood to plastic.
Installation of plastic windows is not easy; it is best to trust this work to the facists. If you are sure that the building will install the windows yourself or you have clear evidence for installing the windows, then you can proceed with the installation of the windows yourself.
The axle itself should be correctly inserted into the plastic window and it will be obvious from there.
Positive installation of windows made of plastic is easy, and you will be able to do it more carefully, without the need for specialized technicians. Still, if you are new to installing such windows and have never bothered with how to install them, then it is best to use the services of specialized robots.
What is the best time to install plastic windows?
Installation of plastic windows can be carried out even in the winter, or in the event that the outside temperature is at least minus five degrees. Otherwise, you will need to install a special heat shield.
Zamir Vikon
Before adding a new plastic window, you need to make a modification of the window opening and, after removing the data, you are ready to buy the window or work out the instructions for making the window. If you keep your window size in mind, it will definitely fit perfectly into the opening of your window.
It is not necessary to insert into the slot, there is a small gap between the eyelid and the opening, as they need to expand or sound, but are not susceptible to temperature changes.
Vimogi until the gaps
The minimum dimensions of the gaps may be as follows:
- For up to 1m 20 cm, the entrance is required to be 15 mm;
- For windows up to 2 m 20 cm, the inlet should be 20 mm;
- For windows up to 3 m, the inlet should be 25 mm.
When you replace the window, it is necessary to twist it so that it fits only a few centimeters into the window opening. It is necessary that the glass package is not near the wall in order to create mowing.
All data has been deleted, all aspects have been restored and, as a result, the required size of the window profile has been eliminated. Now you can go to the company and make a payment according to your parameters.
Dismantling the old window and preparing to open it
After you have already purchased the product and the weather permits its installation, you can proceed with its installation. It is necessary to ensure that all the work will be powdered, so it is better to remove all the words or cover them with spit.
After you have completed all the preparations, begin dismantling the old window, and in order to remove the old window, use a chisel, a mount and a hammer.

Before installing the plastic window, it is necessary to carefully remove the window slot from the wood and add a little of it.
Then you can print out the preparation of the window before installation.
Installation of a plastic window
Before installing the window profile, remove the chairs from the window and remove glass packages from the blind parts of the window. Then it is necessary to glue the dry lines to the profile and install the dry cups in the opening for the liquid. The screws securely fasten the mosquito net.
Insulation of the profile
If you wanted to create an anchor, then the profile would be drilled through and the chambers would be depressurized. Also, attaching windows to anchors requires more labor and effort, and therefore such fastenings are not suitable for beginners. If you do not secure your profile correctly, you can post it, and if you post it, it will definitely be zipped.
Otherwise, the anchor fastening may have positive properties, for example, the design will be of value. However, the negative quality of the mounting plates means that they will not ensure good value of the structure. Ale mounting plates are the easiest type of fastening of plastic windows. Very often the fakhіvtsy vikorists are offended in a type of strengthening.
- Therefore, the fastening begins at the end and at a distance of 120-150 mm, remove the first fastening and then, from a distance of 700 mm, remove the fastening step. Three fasteners are installed on the skin side.
- First, install the profile at the slots, you must check all the surfaces to the correct level, then, using wooden blocks, you must raise the profile and adjust it vertically.
- It is necessary to start vertically from the upper part of the window opening and lift the profile from below using additional materials. The next step will be to align the profile horizontally. Secure the profile in the opening on the side and let the beast shoot from blades made of wood. After you have completed the verification from all sides, you need to create a profile and if everything is in order, then you can fix it.
- As soon as the window profile is fixed to the mounting plate, they are first fixed to one dowel. The next step is to check the window profile for the correct level and then fix the mounting plate with a different color.
- If you want to fasten the window onto the anchors, then through the openings, which are drilled in front and then using a special tool, make openings in the wall and screw in the anchors without tightening them.
- Do not tighten the anchors in order to check the alignment of the installed window and only then you can tighten the anchors, but not as much as possible, so as not to damage the alignment of the profile. Once the profile is fixed, we remove the blades from the wood from the sides and the animal, and the lower blades are lost, because the stench is the basis of the window profile.
How to install a spout on a plastic window?
In the next step, installation will begin.
After using an additional metal knife, find out the required size, then glue a special stitch in the lower part of the frame, which is required to seal the seam between the wall and the lower part of the window.
After the stitch is glued, place a ball on it. It is also necessary to apply a ball of mounting foam to the edge of the slab in order to ensure sealing of the outlet. It is necessary to go into the grooves of the profile and fasten it with screws.
Seam insertion
Then, with mounting foam, we close the seam between the wall and the window (on one side then on the other side). After the foam has dried, another insulating strip is glued on the animal. It is necessary to remove the dry stitch from the inside of the window and apply special linings before installing the glass package.
Behind the additional slats, remove the glass package, hammer the slats into the grooves and install the chair, fix them in the hang, then fasten the handle and adjust the chair horizontally and vertically. After all work, install a mosquito net.
How to properly install window sills on plastic windows?
After all work is completed, the installation of the subwindow begins.
- First, fill the bottom assembly seam with foam, and apply a stitch to the animal.
- Then they install wooden blocks on which the window sill will be attached.
- Wooden blocks must be no less than ten centimeters. So the windows itself may be lowered by five degrees at the location, and so the windows themselves do not need to dim the battery.
- It is necessary to check that the window frame is securely attached and it is necessary to solder it at the bottom and, most importantly, with mounting foam.
This article tells us how to install a plastic window and we assume that the information given was helpful to you. Good luck and patience!
Those planning to replace the old windows with new ones, many of them are asked about food, how difficult it is to put them on their own. The answer is a robot of average complexity. In an hour, replacing a medium-sized window with dismantling the old one takes about 3.5-4.5 years. This is for people without shame. Employees of companies that deal with this on a regular basis spend less than a year. Unless the rulers installed plastic windows with their own hands, there is no comparison with the hasty work of “professionals.” They simplify the process to the point of obscenity, arguing that prices have not risen for 6 years and they spend an hour on the details of it. If you are lucky enough to know the truth of the masters, then you can trust them with the installation. Either way, you’d rather spend your weekend and install it yourself.
Construction of plastic windows
In order to proceed normally during the installation process, it is necessary to understand the design of the windows. Let's take a look at the materials and the name. Plastic windows are made from polyvinyl chloride, commonly called PVC. The other name is PVC window.
The main element of any window is the frame. For plastic windows, the frame is made from a special multi-chamber profile. They are divided by partitions into a number of chambers - chambers. The more middles you have, the warmer it will be. If we talk about how many cameras there will be in a plastic window, there are many differences in the profile.
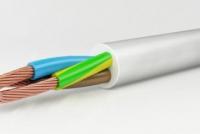
In the middle of the structure, near the largest chamber, you can see a blue color insert. This is a reinforcing element of increased hardness. Vin gives the profile the necessary importance. Plastic windows have an insert made of plastic, while metal-plastic ones have an insert made of metal (that is, aluminum). The axis and everything between them.

There are also more profiles for classes: economy, standard and premium. The optimal choice if you need normal windows is the standard class. In economy class, the partitions are too thin and begin to freeze almost from the moment of installation. Premium charges a high price for a set of options that are not really needed.
If you want the finest profile for plastic windows, take the class standard from the factory. There is no particular difference between viruses from different companies. The smells have long been standardized, and all the managers’ reports about achievements are fairy tales. Since they are manufactured at the factory, there is no difference between them: all factory profiles have long been standardized.
Profiles for windows in the standard version have a white color, but they can also be brown - to match the color of any tree, or russet - for cleaning. Windows with a color profile are more expensive, the bottom is similar in white.
Budova vikna
To understand what is described in the description of the installation process, it is necessary to know what the skin storage structure is called.

It consists of:
- Rami. This is the basis of vikna.
- Since it can be folded into many parts, the frame is divided into parts by an impost - vertical storage. If there are two parts, there is one impost, if there are three parts - two, etc.
- The part of the window that opens is called a stool, and the part of the window that opens is called a wood grouse. They have a glass unit inserted - two, three or more glasses, hermetically sealed together. A foil line is placed between the edges to ensure a tight seal. Є glazing units with special powers: with reinforced glass, tinted and energy-efficient, such as behind the sealed vents, it reduces heat loss through the windows. There are also glass packets, between which inert gas will be pumped. It also reduces heat loss.
- The containers are pressed against the frame with a cap - a thin plastic strip. The tightness of the connection is ensured with a humic agent (usually black color).
- Locking fittings are installed on the chairs. A complete set of mechanisms to ensure opening and closing. The smells can be different, so they provide different functionality: aeration, aeration with ventilation, aeration + ventilation, micro-ventilation.
- To ensure tightness on all parts - frames, imposts and chairs - gum seals are installed.
At the bottom of the outer side of the frame (the one facing the street) there are drainage openings that are closed with special cups. Through them, condensation is discharged onto the street, which settles in the middle through the temperature difference between the street and the surrounding area.

It’s still raining - the daughter is calling, so you can remove the fallout from the window in the middle. The banks and the upper parts are on the side of the street and the premises. They can also be made from plastic or produced using other technology.
How to measure a plastic window
When making a window, you have six sizes available: the height and width of the window, the top and the width of the window and the slope. To figure everything out correctly, you need to know whether you have a quarter of your wealth or not.

You look around the opening. As the outer part of the window is narrower, it opens at the quarter. Who needs to worry about the most important thing: the slots rarely have an ideal geometry, so they will die at a few points. Find the smallest value, add 3 cm to the next one. You convey the height as it is.
If the opening is equal, the opening will proceed differently. Adjust the width and height. For the measured width take 3 cm, for the height - 5 cm. This will be the height and width of your window. The width is 3 cm, since the required gap is at least 1.5 cm on both sides under the mounting pin. The height is 5 cm, so the animal will need 1.5 cm, and below - 3.5 cm before installing the sub-window.
The additional amount for the window and window opening is taken from the reserve - 5-10 cm more than the width of the window opening. When installing the windows and windows, “sink” the particles into the adjacent wall, where the excess will go. The width of the inlet is standard, so the closest larger one is selected. The situation below is different. Its width is chosen sufficiently - according to the ruler’s preferences. Whoever needs it is wide - so that you can put it anywhere you want level with the wall. There are also no rules here.
Even when you have made the request, you will need to indicate how many and what parts you will have in your window: what kind of capercaillie, how many chairs, from which side, how guilty to open up. It is necessary to indicate the type of fittings (ventilated, micro-ventilated).
Preparation
When you change the windows, installing plastic windows with your own hands begins with dismantling the old one. There are no problems: there will be no lamati. After dismantling, it is necessary to inspect the opening: remove everything that could fall out. If there are any protruding parts, they must be removed using a hammer, chisel or power tool. If the area is cleared, you need to clean up everything as quickly as possible. Ideally, accommodate everything, right down to the saw, otherwise, when installing the pin, it’s bad to “crowd” with the wall.

If there are large holes or cavities, it is better to cover them with cement. The closer the opening is, the easier it will be for installation. If the material of the walls is fluffy, they can be treated with the following materials: penetrating adhesive primers.
How to install correctly: select the installation method
There are two different methods: with and without unpacked windows. When unpacked, drill the openings through the frame and drive the anchor through them into the wall. This method is foldable, but the fastening is more reliable.

This is installed on an anchor bolt. Place three pieces on each side
When installed without unpacking, fasten the metal plates to the frame, and then to the walls. This, of course, is worse, but the fastening is even more unreliable: in case of significant wind damage, the frame should be warped or sagged.

If you don’t always want to disassemble, you can mount it on a plate, or select not narrow and thin ones, but thick and wide ones, which often get stuck when installing a blood system.
In principle, small windows installed on a mounting plate, due to significant wind considerations, can stand normally. If you live in a region with strong winds and the smell is important to you at the window, if the apartment is located on a high level, in these cases installation with unpacking is required.
It’s better to marvel at the emotional and intelligent video, which shows why it’s better than vikorystvuvat anchor.
Installing plastic windows with your own hands: instructions
Let's describe the method: you will need a way to mount it on a plate. The windows are installed in booths made of foam blocks, the building size of which is not large and it is necessary to place the windows on a large surface. Another method of installing plastic windows is necessary because of the “shaky” technology. For example, there is concrete in front and behind, and between them there is a ball of insulating material. If it can always stand on its own in a soft ball, then it needs to be secured with plates. Installation of PVC windows in clay, cinder block, panel, etc. budinka bazhano on the anchor.
Installation out of the box
Installing plastic windows with your own hands starts from scratch. Freeze the frame and the window opening, rewind, the stench is crazy. After this, you can start working. The process of disassembling (unpacking) the PVC window begins. Axle croqui:
- Take the chair out of the window:
- Close the window (the handle is turned down).
- Removes the plastic covers on both hinges. The stench is twisted.
- There is a pin on the top hinge that will ensure a secure connection. The wine is in the center and a little protrudes. The dots are pressed onto it, the dots do not sink in (you can take a metal plate, press it against the pin and lightly tap the plate). The pin is hanging from the bottom. Now you can grab it with bokoriz or pliers and, pulling it down, pull it out.
- Holding the chair up, you open the lock. For this purpose, we place the handle in a horizontal position. Having squeezed the upper part of the crumbs on yourself, lifts the chair, removing it from the lower pin.
All chairs are taken. So that you can marvel at the video more intelligently. The new report describes how to remove and place the chair on the plastic window.
- On the capercaillie he removes the squeegee. He pulls at the frame of the glazing beads. They do not need to be removed, then the package itself will come out without any problems. Remove glazing beads like this:
- At the gap between the glazing bead and the frame, a small piece of paper is inserted. As there is no special tool, it’s better to use a small spatula. The investigation begins from one side or another.
- Carefully roll the spatula into the crevice and insert the offal into the glazing bead from the frame.
- Without holding the tool, little bits are pushed through, and the glazing bead is removed again.
- This is how it goes throughout the whole dowzhin. As a result, the glazing bead is already at risk of reinforcement and can be easily removed.
- With the short side, everything is simpler: the edge is pulled up, and by turning the spatula it is pulled out of the groove. Grab the edge that is twisted with your hand and pull it uphill.
Now you can try to remove the glass package. Just be careful: the wine is heavy. If you don’t want to leave, remove another one from the glazing beads. Just make sure it stays cool and the bag doesn’t leak. Now, if necessary, you can replace the glass package yourself. Watch the video about how to remove glazing beads from PVC windows.
- Take the chair out of the window:
- The linen frame along the outer perimeter is covered with a special stitch so that it is self-adhesive. This installation is recommended by GOST. It’s not always the same with her.

- Take away the bad line from the campaign logo. If they are removed, under the rising sun it will melt away from the frame and removing them will be problematic.
- Insert the prepared frame at the window opening. For this purpose, mounting wedges are installed. They are easily installed along the edges and under the impost. Place others if necessary. It is placed strictly behind the level at three levels. First fix the position of the window. The axis for this can be removed from the mounting plate.

- Take a drill and a drill bit to ensure the dimensions and diameter of the anchors. Open the door under the fastening. 150-180 mm extend from the top edge. The first one opened. The lower one is located approximately at the same distance from the lower kut. Between them, another anchor is installed in a standard window: the maximum distance between two fasteners should not exceed 700 mm.
- Having opened, check that the frame has not been damaged (even in all three areas), then hammer in the anchor and tighten it. You can’t overtighten: the profile is not to blame for bending. Repeat this operation as many times as necessary.

- Install call extensions. For this purpose, vapor permeable waterproofing (it is self-adhesive) is glued to the outer part of the frame. From the sides of the window opening, cut small grooves, in which you will then insert the edges of the openings.

- Apply a ball of penny onto a part of the window opening, where it will fall onto the wall. Sometimes, if the difference in height is large, a lining profile is installed here. And then add olive oil. Versions of different sizes should be placed under the ledge of the frame and secured there to the frame with screws.

- There will be some wrinkles along the bottom edge.

- Then close the opening. When plastic windows are installed, spray the space between the frame and the window opening with water from a spray bottle. This is necessary for rapid polymerization of the pin.
- Glue vapor-permeable heat-insulating smudge along the contour of the frame - it is also recommended by GOST.
- Take the balloon out of the way and fill any gaps 2/3 full. If the size of the gap is large - more than 2-3 cm - apply foam at several stages. The required gap between two balls is 10-15 hours. If the first ball is dry, you can sprinkle it with water and apply another one. Repeat this until 2/3 is filled.

When installing PVC windows with your own hands, sealing can be done in a number of stages - depending on the size of the gap.
- Without further polymerization, glue the outer edge of the heat-insulating strip to the window opening. It is important to remember that when cutting the cut, the mowing will need to be made of plastic: the plaster will not “stick” to it.
- Collect all parts of the window. They've lost their jobs, but they don't care about the stench.
- A vapor barrier line is also installed under the windows near the lower part (as per GOST recommendations). The sill rests on a support block made of solid grades of chipped, seeped wood. Stand 40-50 cm between them. Place them in such a manner that the ceiling is a little close to the other place (about 5°).

Watch the video about how to correctly install a windows and install a plastic window. There are a lot of secrets.
The rest are installed and mows are laid. From which drive is another video.
Installation without unpacking
The main subtle descriptions of the thing, so this section is small. The installation of this option begins with the installation of fastening plates. There are two types of stench: P-like and linear. It is important to choose the most reliable metal.

They are installed at the same height as the anchors: 150-250 mm from the edge and no more than 700 mm between the middle. Simply screw them to the profile with screws.

Then installing plastic windows with your own hands with mounting plates is identical to the described system, starting from the moment the window is placed behind the opening. Just fasten not the frame, but the plates and not to the anchors, but to the dowels. Drill the hole, push out the plate, insert the dowel, place the plate on the spot and tighten the dowel. All other actions are identical.
Now it’s clear why installers give priority to them: it’s much easier to get a decent piece of work with disassemblies, anchors, etc.: it’s much easier to tighten the self-tapping screws. It’s true that if you take the plates tight, the stink will be reduced. No worse, no anchor. For example, like the video.