Installing a toilet in a country house. Installing a toilet with your own hands: features of installing toilets of different structures. The main list includes
The work of installing new plumbing is causing fear among the rich mayors. The diversity of design solutions for plumbing fixtures and the methods of their connection is reflected in the knowledge of the delicate process.
The main thing to try is to open and remove them, as you can correctly install a toilet with your own hands without the help of plumbers.
The range of sanitary ware available on the market varies widely. Any ruler may be able to choose a presentable and functional possession for the smoky relish and gamanets.
In addition to traditional models for substation, the generators offer a rich selection of suspended and built-in devices. The cistern in them can be attached to the wall or connected to the base of the plumbing fixtures.
The version of the bowl of suspended and suspended models can be, for example, a plate-shaped, light-like or visor modification
New models of toilets are evolving based on the design of key components.
The weekend rage is:
- horizontal;
- vertical;
- with a scythe.
The type of exhaust outlet must be selected according to the choice of model. If your plans do not include the reworking of the sewer pipe, then the model is based on the same principle as in dismantling.
It is practically impossible to install drains and plumbing fixtures that do not correspond to one another, for sinks that do not have a toilet with an outlet, and it is practically impossible to connect them as tightly and clearly as possible.
Fixation of plumbing fixtures before installation requires the use of specially mounted two or four fastening points. Alternatively, there are also models in which for fastening to the base the rolls will be put in place, which will come complete with the device.
A new plumbing fixture can be installed in place of the old one, or you can choose a different “hole” for the new one, making minor re-planning in the bathrooms.
Preparation of tools and materials
To connect the tank to the water supply, you will need a flexible hose. Vіn zavichay go u kitі. For connection to the sewerage system - a rigid wire or a bent corrugated cuff.

It is clear that installing a toilet with your own hands is impossible without a minimum set of necessary tools, such as in any ruler’s booth
For a folded structure and connection to communication, the following is required:
- hammer drill or impact drill;
- a set of screws with a flat and cross-shaped “tip”;
- set of nut wrenches;
- daily rhubarb;
- simple olive chi marker;
- stationery Nizh;
- roulette;
- chisel;
- hammer.
If the installation of plumbing fixtures is carried out on tiles, it is also necessary to prepare a “ballerina” or a similar drill bit for cough work. To prepare the openings for installation of fastening elements, you will also need an 8 or 10 mm drill.

Additional materials are also required:
- metalizing tape;
- silicone sealant;
- FUM stitch;
- polyethylene melt;
- hair-absorbing tissue;
- Capacity for collecting juice.
Depending on the type of model that is connected, and the installation method, cement grout may also be required.
Removing an old toilet
Removing an old toilet is one of the most difficult operations.
The work ends in a number of stages:
- Turn off the tap.
- Connect the hose from the water supply to the tank and pour out the water.
- When the tank is empty, remove it from its mounting.
- Unscrew the nuts located on the back side of the toilet and lead it to the drain. To get angry, you need to steal the toilet from side to side.
- They pour out any water from the toilet, tilting the bowl forward.
- The sewer opening closest to heaven is cleared out of the pond and sealed at any hour with a gancher gag or a wooden stopper of suitable diameter.
The easiest way to remove bolts is to loosen the head with a spanner and tighten the nut with a separate wrench. The threaded connections are heavily slagged with salt deposits or rusted.
To ease the problem, use universal oil "WD-40" to help fluff up the building. Through this, you can quickly get rid of it or gas.

The sewer outlet must be closed in order to prevent toxic hot gases from spreading beyond the boundaries of the pipeline.
Under the dismantled toilet, taffeta was found to be rotten, otherwise it would have to be removed if there was any other support. This can be done using a hammer drill, a nail puller or a chisel.
In old buildings, drains on sewer pipes are often secured with cement coating. The easiest way to beat dried wood is with a chisel, chopping it in several places. Read detailed instructions for dismantling the old toilet.
Gallery images
Option #2 – with horizontal outlet
Plumbing fixtures with a horizontal outlet have become one of the most popular in our country. The relevance of installing such equipment is explained by the specifics of the sewerage system in Russian apartments.

The main feature of toilets is that they have a straight horizontal outlet pipe - for proper installation, a strictly fixed connection point is required before communication
Horizontal release of rotations at the rear part of the bowl or the base and straightening back. Models with such constructive fittings are installed against the wall, similar to any type of sewer riser.
The connections must be connected to additional pipes of the appropriate size. The connection is sealed with a hole placed in the middle of the humidifier pipe.
Direct connections are a waste of time, since the sewerage system is made of plastic. To connect to the pipes, which rarely have an ideal shape, cuffs and eccentrics are used.
Option #3 – with oblique outlet
In models with an oblique outlet, the pipe is expanded at 45° to the surface of the substrate. Models with a decent release play on the aphids of their counterparts in those who are less likely to laugh, since this vykonanny allows you to create less support during the time of drying out solid waste.

We pour the device with an oblique outlet at the points where the pipe joins the sewer pipe, which may develop cracks if installed incorrectly.
The connection of the device with an oblique outlet to the sewerage system can be terminated in one of three ways:
- There is a direct connection through the drainage pipe. Choose if there is no need to destroy the plumbing fixtures, and all elements are strictly avoided. The toilet outlet is coated with a mile of rubbish and sealed at the outlet pipe, which has a cuff.
- Request for help from an eccentric. A pipe with a center offset of 5 cm, equipped with a drainage gasket, is installed in the sewer outlet and is wrapped in a way to move the toilet to the right or left side.
- For additional installation of corrugated outlets. The tightness of the corrugation allows the device of the drainage oblique outlet to be opened and the sewer outlet to be directed at 90°.
A flexible outlet is a simple, but not the best option for connecting toilets with an oblique outlet. It is impossible to confuse his warto in extreme cases, since it is impossible to vikorize in other ways.
To find out in more detail how to install a toilet with an oblique outlet, go to.
Gallery images
The simplest option for connecting a toilet with an oblique outlet is a vicorized corrugation, which will ensure perfect tightness.
If additional corrugation is carried out not in a time-based, but in a long-term connection, then it is necessary to select a reinforcement version of the corrugated pipe
Vikorist corrugation, a toilet with a suitable outlet can be connected to an outlet located in the underside or in the wall.
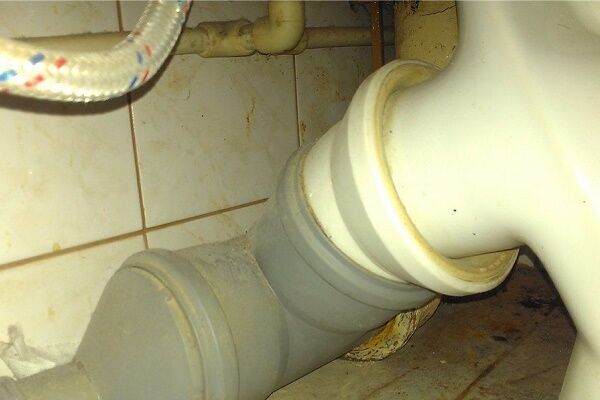
If there is a possibility of rapidity between the toilet and the sewerage system, instead of corrugations, it is recommended to install a sealed cuff and a plastic outlet
Vikoristan corrugation connected to the sewerage system
Reinforced corrugation for reliable operation
Connected toilet with waste outlet
The cuff at the knot is attached to the sewerage
Features of installation of compact models
The technology for correct installation of sub-mounted toilets of compact models includes seven main stages:
- Press the toilet as tightly as possible until it opens the drain and check to see if it is being discharged from the sewer pipe.
- If minor damage to the device is evident, proceed to the sewerage system using a corrugated pipe.
- The plumbing fixture with the connected corrugated pipe is pressed to the wall, stitching behind it, so that strong creases and wrinkles are not created on the pipe.
- The ends of the desired element are covered with a thin ball of silicone sealant.
- Having adjusted the position of the jig, the outline between the soles of the jig and the points where it is planned to drill the openings for embedding the dowels is planned.
- The toilet is flushed. At the designated points, use a diamond drill to cut out holes with a diameter equal to the size of the vicorized dowels.
- There are plastic plugs stuck in the opening. The toilet should be “delivered” in the right place. When ready to open, tighten the bolts.
Porada: to make it easier to tighten the corrugated pipe at the outlet, it is necessary to coat the inner walls with rare mil.
If you open the door to work in the stove to minimize damage to the surface, first manually thoroughly drill the upper ball, and then turn on the hammer drill with impact drilling mode.
To ensure the tightest possible fit of the toilet sole to the base, apply silicone to the intended installation counter. The toilet itself should then be placed in the correct place, following the intended contour.
To fix the plumbing fixture, open the washer in the heel and tighten the screws carefully. You can’t drive them in every time!
Photo reference book for collecting and installing the compact
Let's take a look at the process of installing a toilet on the butt of a folding and fastening Chinese PORTA sanitary ware. An excellent product with a 25-year manufacturer's guarantee and at an even greater price.
Gallery images
Before installing a new toilet, the old plumbing is dismantled, the substrate underneath is cleaned, repaired and refurbished using a dry cement mortar.
At the sewer outlet, a new plastic adapter is installed, until either a corrugation or a rigid plastic bend is added.
For consumption, the cold water supply pipe in the area behind the toilet is changed. It is most often necessary to avoid changing the pipeline through one river or two after installing new plumbing fixtures
From the toilet to the sewer line, plumbing fixtures are installed for fitting in order to identify the fastening points and frame the bottom
Lesson 1: Preparing the base for installing a new toilet
Lesson 2: Replacing pipes and connections to the sewerage system
If you have first thought about installing a toilet, then this article is for you. Moreover, it’s better because you’ll be able to read it even before you go to the store for a new earthenware friend or before the start of finishing in the adjacent toilet.
The fact is that daily toilets are so different that they vary greatly in the type of fastening, flushing, sewerage, etc. So, ideally, planning which toilet you will need to install with your own hands should begin at the toilet design stage.

What to do if there is an old “throne” in the toilet - how to take it after the global flood? We’ll also talk about this at the statistics. Particularities of the installation process, careful care and a number of parts from the masters will help to protect your skin and install the toilet with your own hands without any special problems.

It is impossible to plan a manual toilet without considering the specifics of the toilet that will be installed there.
To understand what you need to do, you need to know:
- if you need to dismantle the toilet, which has served its purpose, and carry out major repairs to the toilet (including lining, repairs and sewerage connections and screeding);
- what are the dimensions of the new plumbing fixtures - which will not restrict the space and which will allow your doors to open calmly;
- how to fasten your new toilet;
- what a way to get angry in the toilet;
- At what height do you want to install the plumbing fixtures.
If you know the power supply, there is no need to dismantle the old one (if necessary) and install a new toilet.

It is clear that plumbing equipment is divided into several types. It is distinguished by its form and its structure.
Classification based on bowl shape:
- leucoma-like;
- tarilchasta;
- Kozirkova.
The outlet drain goes into the toilets:
- horizontally-mow;
- Let's arrange it vertically.
The sluice tank is connected to the bowl of the toilet and is independent (wall-mounted).
Attach the toilet to the bottom: for 2 and 4 attachment points, for heaps.
Get rid of the old toilet!
Of course, your toilet, which needs to be dismantled, is not wall-mounted, which means it cannot be attached to the frame. You can clean up the toilet for just 7 kroki.

- We turn on the water and pour it from the tank in the toilet.

- Screw on a thin hose until it reaches the tank.

- Unscrew the fastening of the tank. If the smells have rusted or “boiled”, you can water them, removing them for 5-7 minutes in a special way, which can be easily removed. Or you can simply grab the bolts, screwdrivers, and wrenches. Also, in order for the bolts to give way, you can spray “WD” on the fastenings from behind, with a gas warehouse, etc.
- Next to the tank bolts, you need to tighten the toilet mounting. The stench of the nut tightened on the anchor starts to stink. To simplify the process, follow the methods themselves as you work with the fastenings of the tank.

- You will then need to drain the toilet from the sewer pipe. If the toilet is old, then the place has a fastening for the purpose of melodiously coating with cement. It needs to be beaten with a hammer and a twister. You first need to spread the coating across the seam, and then you can mechanically grind the cement. The flood is still in danger of becoming overwhelmed, or else losing its place.

- The toilet is flushed several times on each side, pouring out water so much that there is no more water in the knees.

- Ready. The old toilet can be removed and proudly carried to the waste disposal station, not forgetting to plug the open sewer hole with a plug made of plastic, fabric or wood.

If there are no plans for the old toilet, and you spend it in the rest of the ways, then after it is opened, you can chop it with a sledgehammer, so that it is not important to carry it out. It also happens that the fixings of old plumbing fixtures are cemented.
After dismantling the toilet, evaluate the size of the pipes in the area. Chavuns create no problems; before installing new plumbing fixtures, it is recommended to replace them with plastic. Also, plastic pipes will make the process of installing a toilet and draining sewer lines much easier (you can also read about installing plastic pipes with your own hands on our website).
Do-it-yourself installation of plumbing fixtures “step by step”
For normal operation, the toilet requires a smooth surface, veneered or a specially prepared surface of the wall and base.
- At the beginning of the toilet there is a corrugation connected to the drainage pipe-riser. You can also use a thicker pipe. The shortest option is to enter the toilet at the riser without under-the-shoulder corrugations. To strengthen the bitterness, add a ring with a humic lining. It is important to ensure that gum is not tolerated on the surface of cement or similar coatings. And the axle sealant is completely gone.

Installation of a toilet - cuff
- To introduce the required water, add a long hose that connects to the tap that supplies the water supply to the plumbing tank. Check the input diameters to select a hose with two connectors. Obviously, there is no way to screw a 3/4” thread onto a 1/8” diameter pipe.

We take the cuff and apply silicone sealant and install it into the pipe


- If the connections are not properly made, the plumbing fixtures can be damaged.


Fastened to the base: 3 types of fastening

It is possible to secure the toilet to a wall-mounted cistern without screws using only one resin. However, for this method of fastening, you first need to clean the surface of the tile so that the adhesive can be easily removed. When applying epoxy, it is important to allow the newly installed plumbing to dry thoroughly and adhere to the surface of the substrate.
Fixing the toilet to the wall

Wall hung toilets are being used more often. Their installation is not very complicated at first (you can read about installing a toilet with your own hands on our website). The wall-mounted toilet, as its name suggests, does not make contact with the surface of the substrate. The wall is suspended behind a metal frame, which is attached to the very supporting wall. The tank and pipes of the toilet in this case are located behind a false wall with plasterboard. If the plumbing fixture has a closed tank, secure it to the wall itself, or the sewer pipe will be in the middle of the wall. The structure will be supported by the same anchors, embedded in the wall or in the supporting frame.

After fixing the toilet bowl on the wall or on the base, it is impossible to remove the toilet bowl. The tank is placed on the base, which is already securely fastened, or a pipe is brought to the tank hung on the wall.

All I had to do was check whether the toilet was working or not leaking. Turn on the cold water, wait until the tank is full, and adjust the flow until it is full. The locking mechanism is adjusted according to the instructions. We are amazed and amazed that the anger does not flow.
The only thing left to do is screw on the toilet seat. Alas, here you are, singly, you can handle it yourself.
- Before purchasing plumbing fixtures, first identify yourself with a specific type of plumbing. If you do not plan to change the sewer riser, you need to select the same type as in the toilet that you used for yours. Remember: no adapters will allow you to clearly connect a toilet with a different type of connection.
- Do not forget to select the toilet fittings until the final stage of the repair: it is better to prepare the toilet area in advance to make installation of the plumbing easier.
- Do not damage the nickel-plated bolts and anchors for fastening the toilet to the base or to the wall. The stench does not rust, which means that there is no risk of leaks or sticking of bolts.

The toilet has long become an invisible sign of an orderly apartment or hut. We went near the “exit place”. Nowadays, everyday supermarkets and online stores stock a large assortment of plumbing fixtures: traditional compact toilets, fixtures with attached tanks, wall hangers, and usually for children and so on. In principle, installation of any kind can be done with your own hands.
Do you need to install the toilet yourself?
Of course, you can call for the installation of a facifier from any service organization that suits you, either a professional company or an office that provides services from the installation on the principles of outsourcing. However (applicable to the most advanced toilet models), installation of such equipment does not pose any particular problems and is entirely accessible after following a few short instructions. In addition, understanding all the subtleties of installing toilets will help you clearly follow the work of the hired facists, and allow you to identify defects and deficiencies in their services.

Types of toilets
In large supermarkets, display cases with toilets take up an hour and ten linear meters. However, despite all the diversity in the assortment, practically all toilet bowl designs are in no way differentiated from the same type. A modern toilet is made up of several main parts.
- Vlasna bowls. It can be of different shapes (with or without a police), with different technology of water circulation (straight or circular), with a different design of fastening to the load-bearing supports (underframe, suspended or sheathed), with various additional features (for example, with the occurrence of trouble and turn on with heating).
- Sewage from the toilet comes from the water from the flush tank at the same time sewer pipe, which can also connect the toilet bowl and the sewer line using different configurations of pipes and adapters.
- Water for drainage of sewage accumulates in to the health tank. This device can have a variety of installation options (either attached directly to the toilet bowl or placed in a sliding manner behind decorative partitions).
Ensure that plumbing fixtures are provided with installation and operating instructions. However, the important nuances of installing such equipment are not described in the documents.

If you do not install plumbing fixtures in the new building, the first step in your work will be the dismantling of the old fixtures.

We remove the old toilet on our own
Dismantling work seems simpler, but the installation is simpler, but when they are carried out it is necessary to follow certain rules.
Krok 1. It is important to clean the toilet and adjacent area with disinfection methods. You can buy the cheapest ones, for example, chlorine compounds (“Bilizna”). Before starting the cob, try to tighten the dry gloves and, possibly, dry eyepieces. Prepare a basin and a bowl to remove excess water.
Croc 2. We turn off the water at the tank. On single-important shut-off valves, when the pipeline is closed, it is important to turn perpendicular to the pipe. Pour any excess water from the toilet tank.
Croc 3. Disconnect the water supply hose. If the model is equipped with a hose, it can reach the tank from the bottom, side or top. Vicorize the adjustable or nut wrench.

Krok 4. We tighten the screws that secure the toilet until it is fixed. In old toilets, the bolts can boil tightly, so you will have to cut them off or end up breaking the toilet bowl. You may have to lift the toilet and connect it to the sewer pipe. Stock up on terpenes and prunings. If you intend to remove the old tiles from the base, then be very careful - the sharp and important details of the toilet and the application of the screws can damage the ceramics.
Krok 5. If your old toilet is attached to a plastic sewer pipe, dismantling it will be very simple. Hang the toilet on yourself and pull the toilet outlet out of the contact sewer pipe.
Now you have been denied access to the toilet installation site. Let's skip the installation of the plastic sewer (noting that the opening of the inlet neck of the sewer pipe under the toilet can connect the pipe to the toilet outlet) immediately before installing a new plumbing fixture.

How to install a compact toilet with your own hands
To install a standard compact toilet that folds into the bowl of the cistern, the operation is carried out in the following sequence.
Krok 1. We check the inlet pipe of the sewer pipe. For consumption we clean it. To eliminate the aroma, cover the neck with gantry or polyethylene sponge.
Croc 2. We place the toilet on the base. If there is no drainage from the toilet outlet pipe to the sewer neck, then a corrugated pipe of the appropriate size is likely to be purchased.
Croc 3. The toilet set may come with “heels” - a soft lining under the base. If this is not the case, you can prepare the lining yourself, for example, from unnecessary scrap of thin linoleum, cutting it along the contour of the base.
Krok 4. Carefully place the compact toilet at the place of your upcoming cleaning, checking the symmetry of the spreading along the walls, up to the pieces of furniture, up to the outlet neck of the sewer pipeline.
Krok 5. It is important to mark the contour of the base of the toilet-compact on the underside and the localization of the possible openings at the underside under the fastening screws.

Krok 6. The compact toilet is blown out and we begin to drill the opening.
- That's the same thing as you tiles have already been laid on the underside, then the upper ball is drilled with a special drill without perforation. Then the opening is sealed with an impact drill.
- How the toilet is installed on a wooden surface- The openings are shaped with a standard wood drill.
- Where do you lie by the toilet? linoleum then the opening can be cut through until it closes with a sharp knife.
Krok 7. At the drilled opening, dowels are installed.
Krok 8. We place the base of the toilet on the seat and tighten the screws in the dowel. The perimeter of the toilet base can be sealed with sealant in order to prevent moisture penetration.

Krok 9. We remove the seal from the neck of the sewer pipeline from the gantry or polyethylene and connect the toilet outlet and sewer together. The joint between the corrugated hose and the sewer pipe is also sealed with sealant.

We attach the cistern to the compact toilet
There are models of compact toilets in which the cistern is a chemical element. In order to install the tank, it is necessary to complete the next steps.
Krok 1. Select the bolts to secure the oil tank. It is possible that the bolts that come with the equipment are not protected from corrosion, it is better to use bolts with anti-corrosion coatings (galvanized) or made of stainless steel. Also, at least two reinforcement washers may fall on the skin bolt. We twist the entire structure. Strengthening washers will also protect the toilet ceramics from being damaged by the bolts.
Croc 2. A flexible inlet hose is included. First, the fixing nuts are applied and tightened by hand, and then with a nut or spanner. Between the pipe of the tank and the hose, and between the hose and the water supply pipe, insert protective gaskets made of silicone or a vicoristic fum-stitch.
Important! After completing the installation of the toilet and cistern, wait for about six years to ensure that the sealant on the base is completely sealed.
We install a toilet from a attached cistern
The most widely available types of toilet tanks on the market are: base-mounted or attachment-mounted. It is important to select the installation instructions for the model.
Installation of a hang-type cistern for an attached toilet

- We install the toilet on the base, as described above.
- In preparation, we install a waste tank. Make sure it is screwed on like a standard compact toilet.
- We install a frame for a decorative wall. Consider this metal profile on which the plasterboard sheets are fixed. The top of the plasterboard is lined with tiles.
When installing plasterboard sheets, a hole is provided to remove the drainage system. When installing a barrel with a fixed button, carefully open the area from the tank body to the next decorative wall. Please ensure that these dimensions are specified in the chair instructions. In addition, at the decorative wall it is necessary to place an inspection opening for servicing the attached tank. - The control panel is displayed on the surface of the wall, and the finishing of the decorative wall is carried out.

We install a wall-hung toilet using a hook
Installing such a structure gives you an excellent chance to re-plan the location of the bathroom, more efficiently to reclaim its area. Installation of a wall-hung toilet with a attached cistern is carried out on the building's accessory wall, as required by all engineering communications. The show is in the next sequence.

Krok 1. We are creating a project for a future sanitary unit. The addition of a cistern is a huge task, as it is necessary to repair it before designing a new wall. You can install a control system (button) that is directly attached to the tank body or attached to the tank.
In addition, when designing a load-bearing structure of a pedestal wall, it is also necessary to transfer a load-bearing frame structure that supports a wall-hung toilet. Here you cannot get by with a thin aluminum profile, which is used for installing plasterboard partitions. The power structure is welded from a metal bundle. Well, remember, the metal structure for hanging the toilet is already included with the accessories. This finished metal structure is called installation. The fonts are attached to it, which is how a toilet is usually installed.


Croc 2. Once the project has been completed, welding work begins with the molding of the support frame and the frame is assembled from the profile under the plasterboard wall, or the finished frame is installed. The frame is empty for the installation of sewer pipes.
Croc 3. We lay sewer pipes leading from the main neck to the outlet pipe of the hanging toilet. Do not forget that the sewer pipes were damaged during installation.

Krok 4. The cistern is located in the open space behind the large wall of the hallway. This is connected to the drainage pipe for the toilet. If the oil control button is located directly on the tank, make sure that its outer vertical surface extends beyond the surface of the next decorative lining of the plasterboard wall. Connect a hose to the drain tank to supply it. Then we connect the “first” hanging toilet and the attached cistern, tightening and fixing the toilet on the pins and connecting pipelines for the delivery of water and waste. Do not forget to check the validity of the entire structure, the value of its fastening before covering the frame with plasterboard.
Krok 5. We remove the wall-hung toilet from the pins. We install plasterboard sheets. Make sure you simply screw it with screws with countersunk heads to the profile. The opening under the drain button of the tank is formed. Robustly open the toilet fittings, the water supply pipe and the sewage drainage pipe. The gaps between the sheets of plasterboard are filled with putty. To make it easier to form the openings, the wall-hung toilet kit comes with a special template on which all the main contours are marked.
Krok 6.At the final stage of the work, a fine finish, for example, tiles, is laid on the wall.

Prices for toilets with attached cistern
toilet with attached cistern; cistern with attached installation
Installation of a toilet on a pedestal
As it was written above, toilets vary depending on the configuration of the outlet pipe. With a horizontal or low outlet to the toilet, the main sewer pipe is mounted on the same level as the base of the toilet bowl, and the main pipe is straightened horizontally or beveled upward.
However, there are also toilet models with direct release. The inlet pipe is straight down vertically. As a result of this configuration, the sewer main pipe is connected to the lower base of the toilet. This design of sewer lines is not found in all cabins. What else is there to work with, since this model of toilet is worth more to you than others?

The way out is to install the toilet on a pedestal (this pedestal can also be called a podium). It is necessary to defeat low-level workers.
- Lay the main sewer pipe. It is important to determine the height of the pedestal and, obviously, the level of expansion of the base of the toilet.
- After selecting the necessary dimensions, we proceed until the end of the day. It must be installed on a concrete base. However, the main toilet pipe of such a design can be placed between the finished and black wooden base. When placing a toilet with direct outlet on a wooden base, sewer lines must be laid before laying the finishing subfloor.
- On a concrete base, the p'edestal can be used for purposes. Form a rectangle with an opening for the entrance of the sewer pipe. The whole can be laid directly in a row, one by one, filling the entire internal space with the pedestal, eliminating the niche for the sewer pipeline.
- The top of the walls began to be plastered and covered with finishing coatings, for example, with tiles.
- Next, we will use direct outlet in the same way as described in the section on installing a standard pedestal toilet.

We install a toilet toilet
There are models of toilets that are installed in kitchens. It differs from the classic pedestal or hanging tank in that its heavy tank forms the back wall in the appearance of a triquet. With such a configuration, the structure itself can be installed in the kitchen.

The technology for installing a heated toilet, in principle, does not differ in any way from installing a direct toilet with a ducted structure. The only thing that can cause the toilet to collapse when installing a toilet is the connection to the main sewer pipe. The tank is installed in such a way as to ensure the drainage of waste water, possibly by turning the pipeline.
In addition, the design of toilets with attached tanks and a straight back wall allows them to be installed at the same place. For this purpose, a wall is installed diagonally to the compartment, behind which a hanging tank is installed. This design can be extended at 45 degrees to the walls, creating the isosfemoral tricumus, as well as under other curtains, shaping the space of the toilet according to your needs.
To become more familiar with the technologies for installing a toilet yourself, watch the video first.
Video - DIY toilet installation

For the need to replace an old one or install a new one, people immediately rush to contact a specialist for help. It’s not easy to make hasty decisions, even if it’s very difficult to quit your job on your own. Be sure to carefully read the instructions for the attached device, take note of the nuances of installation and use of your power hand. These modern elements allow you to quickly and easily connect the toilet to the sewerage system. By spending just a few hours, you will save significant money, and the performance of a professional plumber is practically equal to the performance of the attached toilet.
Classification of toilets
Many people believe that the toilet is a daily waste, but that’s not the case. Already at the end of the 16th century, there were victories for the Queen of England, but through the presence of centralized water supply and sewerage, without stopping widespread stagnation.
Daily toilets are produced in various modifications and vary in bowl shape, installation method and type of drainage system. To make the right choice of such a device, you first need to become familiar with the basic proposition and determine the parameters of the toilet that you need.
For the method of fastening
The main classification of toilets is based on the method of fastening:
- forgeries. The most affordable and best suited for spacious toilet rooms. The installation of such a vibrator is mounted on an anchor bolt, which allows, if necessary, to carry out its dismantling without damaging the surface;
Subframe models are mounted on anchor bolts and can be easily dismantled if necessary
- wall This is one of the different types of pedestal option, intended for installation in small bathrooms. Due to the design of the system, such toilets practically do not sacrifice anything to wall-hung ones. There are new models of wall-mounted devices that are ideally suited for installation in small toilet rooms;
The wall-mounted toilet is removed from the ringworm so that it is installed against the wall.
- pendants. Also suitable for installation in small areas. Although such models are even thinner and louder, they are rated for weights up to 400 kg. Moreover, they are even more valuable and reliable. Installing a hanging structure makes it easier to tidy up the bathroom, and also provides some free space. Such a toilet is fastened using a frame or block method.
A wall-hung toilet allows you to enjoy more space
Behind the design and release
The type of water discharge into the sewer system is determined by the toilets:
- With a vertical outlet. Such a solution rarely occurs here, but, for example, in America it is even more popular. Therefore, in Russia, communication is often not fixed to the wall, but carried out under cover, so the toilet can be installed;
A toilet with a vertical outlet can be installed in any necessary place, for which it is enough to install sewerage pipes there
- with horizontal extensions. The toilet flush and sewer outlet are routed on the same line. Most current models have this design;
A toilet with a horizontal outlet is used for quiet flushes when the sewer opening is located near the wall.
- With an oblique release. Set the temperature of the toilet to 40-45°. Such models were popular in the 80s of the last century, and stinkers were installed in rich apartment buildings.
Toilets with an oblique outlet should be installed if the connections are close to the lower part of the wall
By type of tank mounting
If we talk about the type of cistern mounting, then toilets can be like this:
- From a separate tank. In this type, the tank is secured under the frame, and connected to the bowl behind another pipeline. This allows you to eliminate the high fluidity of the serpentine, but the external appearance of such a design is not too attractive;
The tank is located at a distance from the toilet bowl and is connected to it by a pipeline
- From a single cistern, which is attached directly to the toilet bowl. The structure can be detachable, bolted or monolithic;
In most toilet models, the tank is installed directly on the bowl.
- From the cooled tank. This solution allows you to incorporate different design ideas into your life. The cistern is fastened using a frame method;
The bowl is missing, and the tank is in the middle of the toilet
- without tank. Consider such models being installed in large toilets, or they may be used in everyday life. In this case, pressure from the bowl is supplied directly from the water supply, and the flow of water is controlled by an electronic or mechanical valve.
In a toilet without a tank, water is supplied to the bowl directly from the main line.
For the type of zmivu
Understand the power of toilets and the direct flow of water when flushing:

Most modern toilets have two flush modes - a new one and an economical one, which allows you to practically change the amount of water used twice.
The current market offers a wide selection of domestic and foreign toilets. Our models are cheap, and the remaining parts are not included in the cost of transportation and delivery. The main parameters that must be considered when choosing include:
- Yeast coat the bowl. In order to make it comfortable to use the toilet, it is your mother's fault. And for this reason, the bowl must be covered with a yellowish glaze - since it is porous, the waste will gradually accumulate and will be more often crusted with a yoghurt.
- Fluidity of the filled tank. The toilet is responsible for the immediate shut-off valve, since a small number of people live in the booth, and there is no need to constantly check for new efficiency after the toilet is used by other people.
- Availability of economical mode. Since almost all apartments are equipped with water dispensers, in order to change their consumption, it is necessary to add a model with a push-button. This time it is possible to convert externally or economically.
Economy mode uses half as much water
- Bowl shape. It can be different: round, oval, square, which means it is easier to sit on the toilet and to evaluate its comfort.
- Material type. When preparing toilets, porcelain and earthenware are vicorized. Porcelain beetles are brighter, and their price is higher. Externally cutting porcelain from earthenware is practically impossible, so you need to carefully submit documentation to the manufacturer. You can also add metal, glass models, reinforced plastic toilets, natural or pieced stone.
Toilets are made not only from traditional porcelain and earthenware, but also from natural stone, for example, marmur
- Yakiness of the crust. It is tough, made of duroplast and has an antibacterial coating. Don’t wash the crack with foam rubber, the fragments will become a breeding ground for bacteria. It’s handy if the lid has a microlift. This ensures smooth closing, so there is no noise or impact.
It is best to bathe toilets with a lid made of duroplast and filled with microlift
- Additional functions. It’s time for a lot of vibrator to equip their vibrator with different options, but be sure that this will lead to the failure of the device. Before you buy such a model, think about whether you need lighting, music from the toilet or heated seat.
Effective choice of toilet, you need to optimally meet your needs and financial capabilities. You can sacrifice some points and choose a larger budget model, or buy a device with additional options.
Video: choosing a toilet
Preparation before installation
If you wanted to install the toilet yourself, you will need to complete the preparatory work before doing so. First you need to determine which model will be optimal for your situation and then select it.
Please ensure that the installation of the toilet is completed before the repairs are carried out at the sanitary facility. If there is a need for replacement in another situation, then you will now need to remove items from the area that are important to your work, turn on the water supply and prepare all the necessary tools.
Necessary tools and materials
In order to install the toilet, you may need the following tools and materials:

If you replace the toilet, you will immediately need to dismantle the old device. The process of conquest will begin:
- Znyatya tank. First you need to connect the water hose and then turn off the water. Then open the lid, tighten the fasteners and remove the tank.
- Dismantling the toilet. Screw the toilet fixture to the bottom and connect it to the sewer pipe. You don’t have to go into it right away, it takes a little bit to steal the cup. To make the robot handy, you can cut off the toilet bowl at first (since it no longer has any problems), and then proceed to dismantling the fasteners.
First remove the tank, and then dismantle the bowl.
- Cleaning the sewer opening. It is necessary to clean the entrance to the sewer opening, and then close it with a gantry so that foreign objects do not get lost there, and toxic vapors do not penetrate into the apartment.
The opening of the sewer pipe should be cleaned from the pond and the drain.
Preparing the surface for installation
The choice of method for preparing the surface of the substrate depends on how the old toilet was installed. Previously, to install a toilet, a board (taffeta) was parched in the base, after which the bowl was attached to it using additional screws. If the taffeta is in stock, it can be taken away. If you wanted to remove the board, then the area that is left needs to be filled with rubbish and covered with tiles.
The surface for installing the toilet needs to be cleaned and leveled
If the toilet is installed on a tile, simply unscrew it, so that the cover will not be damaged. After this, you can mark the place for installing a new toilet.
Folding toilet
To ensure the integrity of plumbing equipment and save time during transportation to the store, please visit a dispenser. There is no need to be afraid of anyone, since the instructions for collection are delivered to the skin, and it will be difficult to get through these tasks.
How to connect a toilet with a cistern
The main attention must be paid to the correct installation of the floater, since it regulates the top of the tank with water. The process of assembling a toilet consists of the following stages:
- Installation of the mechanism. If the shut-off valve is already selected, you will not have to install it at the tank. Pay special attention to surfaces that are sticking and watch that there are no scuffs. Insert a rubber bandage into the sac, then use an adhesive device and fix it with a nut.
The drainage mechanism in the assembly is installed on the drainage chamber, which prevents water from leaking into the drainage area.
- Connected tank with a polish. Place the collection tank up to the floor on the toilet bowl and connect them using the additional bolts and nuts included in the kit. Don't forget to install the washers to ensure a tight connection.
The humus washer ensures a hermetically sealed tank and bowl
Before installing the shut-off valve into the tank, tighten all the nuts by hand, without much force.
Install the toilet in a place where it is not standing, and use plastic or gum gaskets. Then mark the place of fastening, open the opening in the socket and use dowels to fix the toilet.
Connections to sewerage
After installing the toilet, you need to connect it to the sewerage system. There are special features when connecting models with vertical, horizontal or oblique exhaust.
Installation of a toilet with a vertical outlet
Connections to the toilet sewer with a vertical outlet are activated immediately with your installation:

Installation of a toilet with a horizontal pipe
This type has a backward direction and a special cuff is used to connect it to the sewer pipe. This form should be stored in the exit from the riser. If the holes are horizontal, a straight transition pipe of the same diameter is installed. If the drain pipe comes out under the cover, break off the supporting structure from the swivel bends or from the corrugated hose.
To connect to the toilet sewer with a horizontal outlet, a transitional structure with rotating elbows or flexible corrugation is installed.
Installing a toilet with an oblique outlet
Quite often, a slanted toilet outlet is removed further or lower behind the sewer pipe. There are two ways to install such models:

Transition from iron pipes to plastic pipes
The old cabins no longer have dirty sewer pipes, and as they stink in good condition, they need to be replaced, as they can be connected to the new plastic filters.
There are a number of installation methods:
- For additional help, gum pads. This option is better to be taken into account, since the chavunya pipe is on the right side. Seal the cuff with sealant and insert it into the socket, after which insert a plastic pipe or adapter into it. In the chavunnu, the plastic pipe is inserted 3-8 cm - if everything is done correctly, the connection will reliably serve for a length of 6-8 pipes.
Reinforced plastic and chavun pipes can be sealed with the help of a gum cuff
- From stagnant linen preparation. If there is no sealant, the liner can be refinished. This is a simple method: a plastic pipe is wrapped in linen, then inserted into the pipe, and the liner is carefully tucked in using a narrow spatula. Then the seam is coated with a ripple of PVA glue and a dry stretcher.
The gap between the plastic and chavun pipe is filled with shreds and filled with rubbish.
- Combination method. To create the most airtight connection, if the gap between the pipes to be connected is large, use a combination of installation methods. Immediately seal the caulking with additional preparation and install a gum gasket, after which coat the stick with silicone sealant.
- For additional help with press fitting. This is a special element, which on one side has a groove for a pipe, and on the other side there is a pipe for a plastic element. At this point, the edge of the old pipeline is cut, after which it is coated with solid oil and the sections are cut. Then wind the scraps or FUM stitch, cover them with sealant and screw on the pre-fitting. Insert a plastic pipe at the outlet pipe.
Using an additional pre-fitting, you can reliably connect the plastic pipe from the pipe.
When sealing a chavun and plastic sewer system, it is important to follow the rules of the drainage system so that a clear and tight connection can be made.
Connection for help corrugation
One of the most common methods of connecting a toilet to a sewerage system is using a plastic corrugation. I first need to account for the required size of this plant. It is better to use corrugated material reinforced with wood or mesh - it will be more valuable and last longer.
Toilet connection procedure:

Connections can be made using additional plastic pins, but the corrugation does not cause any stiffness. Such a decision must be made carefully if the sewerage system was planned for a specific toilet model.
Harsh connections are important and long-lasting, but when replacing the toilet or the need to remove a little bit, you will have to change the adapters or twist the corrugation or eccentric.
To connect the toilet to the sewer, you can either use a straight adapter or an eccentric element
Installation proceeds the same way as with a corrugated fitting, but requires the removal of horizontally extended adapters and straight pipes. These adapters are cheap, but they smell bad from a white toilet.
Video: installing a toilet
Connection to water supply
There are a number of ways to connect the toilet tank to the water supply:

To connect to the water supply, you can use:

The connection procedure will be the same regardless of the following:

Video: connecting the toilet to the water supply
Features of connection of the “monoblock” and “compact” models
The versatility of “compact” and “monoblock” toilets depends on the type of drain tank connection. Whereas in the first type the tank is attached directly to the frame placed on the bowl, in the other type the bowl and the tank are mounted in a single body.
In a “monoblock” toilet, the bowl and cistern are in a single body
Most types of toilets are mounted on a support, and the method of their connection to the sewer depends on the type of drain. Installation proceeds in the same way as shown above. The same difference lies in the fact that the “compact” needs to independently install and regulate the shut-off valves, while the “monoblock” has to be already selected and regulated by the switch.
Wall-hung toilet: installation features
If the area of the toilet is small, and you want to preserve the free space, fakhivts recommend installing a wall-hung model of the toilet. The installation of such a device is based on an installation - a special support frame.
The technology for installing a wall-hung toilet includes the following stages:
- Select installation. It is supplied with a tank, a release button, the necessary pipes and adapters. The bowl can also come as a set, or it will have to be washed separately.
Before installation, please include the tank, adapters and pipes
- The height of the seat is determined. Installation of the installation can only be done on a permanent wall, which can carry a load of approximately 400 kg, but it cannot be installed on a plasterboard structure. The toilet seat should be installed at a height of 40-48 cm, everything should be kept in place due to the growth of the toilet - it is necessary to work in such a way that everything is done manually.
- Layout. The entire installation is central and stands in front of the adjacent wall. You can ensure manual connections to the water supply and sewerage systems, so make sure that the height is no less than 14 cm. The tank should be placed at a height of 1 meter from the base.
The height of the wall-hung toilet above the level of the base may become 40-48 cm.
- Long opening. At the designated places, open the doors to insert the dowels.
- Installation of the installation housing with a plastic tank. It is necessary to install it at the vertical and horizontal planes, therefore it is obligatory to vikorist the daily rhubarb. Adjustment consists of changing the height of the installed legs.
For additional adjustment of the legs, place the installation behind the level
- Adjusting the angry button. It can be either mechanical or pneumatic.
- Communication. When connecting to the water supply system, be sure to install heavy pipes, as the smells are mild and reliable. Fix the tank pipes with clamps and install the sewerage pipe under the 45 o line.
- Set the bowl. A shock-absorbing gasket is attached to the studs. Pull the bowl and pipes of the tank together. Check the robot toilet.

The installation structure is most often covered with moisture-proof plasterboard.
Video: installation of a wall-hung toilet
Checking the feasibility of the system
Regardless of what type of toilet you installed before you start using it, you need to check the functionality of the system. It’s not easy to get started: you need to turn on the water and check to fill the tank. After this, the water stops flowing and all the places connected to the toilet with water supply and sewerage are looked at.
If there is no leakage, then everything is fine. If leakage was detected in some connections, it is necessary to check and correct the leakage and restart the control water leakage. It is also necessary to check the reliability of fixing the toilet, otherwise it may be fastened too tightly.
Characteristics of mercy and methods of their removal
When installing the toilet yourself, home masters can use standard toiletries that you can also install with your own hands:
If you have not secured the toilet properly, this may result in the seal being damaged and causing damage.
Video: mercy for editing
It would be practical for any home master to install a toilet on his own. For this purpose, choose the right type of toilet and its appropriate installation. If you carefully follow the instructions and recommendations of the technicians, you can install the toilet yourself quickly and reliably complete the necessary functions.
A lot of private booths, awakened by the Radian clock, did not provide the installation of a warm toilet, but little more than an object that was difficult to get to in the cold or on the edge. Therefore, it is necessary to resolve this situation and install a warm toilet with sewerage in the village house on your own.
Choosing a place for the toilet
In order to provide a minimum amount of effort for using the toilet, it is necessary to find a ready-made accommodation that meets the standards of everyday life. There are small spaces, less than 3 m2 in area to accommodate the toilet and all the necessary accessories. The ideal option would be to place it near one of the external walls to ensure minimal exposure to the sink or local sewage system. Since such a location is located in the middle of the cabin and does not intersect with the outside wall, then connecting the toilet to the sewerage system will only have to fit behind the pipe laying structure in the basement.
Wooden toilet and shower with sewerage system
Another option would be to have a toilet in the middle of the living area by installing partitions and connecting all communications. The advantage in such a situation will be the creation of enough space and the expansion of it in any handy place. However, with this, living space will be wasted and the implementation of the project will be even more difficult.
The main considerations that need to be taken into account when choosing a place for a toilet.
- The minimum distance is up to the point of waste disposal or the local sewerage system.
- It is not necessary for the premises to be located near the place when going or sleeping.
- The toilet can be easily installed with cold water pipes, have sewerage and ventilation.
If sewerage and water supply are introduced into the cabin, then it is possible to install a sanitary unit and a bathtub in one location near the injection point. This allows for protection on installation robots and used materials.
Basic nuances of connection to sewerage
The laying of sewerage to the toilet is clearly divided into two stages: external and internal. The outer area lies near the laid sewer pipes to local, centralized and storage systems. The internal pumping system includes installation of pipes and plumbing.
 arrangement of a warm, flanked toilet with sewerage
 The external laying of pipes may be carried out in accordance with the following factors:
- The clay is frozen to the ground. It greatly affects the operation of the sewerage system and therefore must be strictly inspected. For medium smog in Russia, set the height to 0.8 m. Additionally, protect against severe frosts and insulate the pipe.
- Get up to local cleansing disputes, on the one hand, minimally, and on the other - comply with sanitary and civil standards. The minimum extension is 15 m, and the pipe extension per linear meter is no less than 30.
- The choice of pipe type depends on the heaving and thickness of the soil. In areas of high crumbling soil, it is necessary to seal the chavun pipes, and in other cases plastic pipes are recommended.
With internal communications established, the main problem will be choosing the method of installing the toilet. This is due to the fact that it is based on a rigid and soft base, as most rural booths have a day, and installing them on wooden bases is insufficient for the same reason that they cannot be laid on I give you warmth. Therefore, having paid for everything, it is necessary to fill the concrete foundations with a lot of expenses and labor costs.
Filling the toilet liner
Before completing the installation work, it is necessary to drain and clean the area. This allows you to accurately evaluate the position of the wall and the wall. If any defects are evident, they must be removed.
 sewerage system installation near the toilet
 If wooden supports are laid, they will need to be dismantled. Then, along the perimeter of the premises, it is necessary to dig a pit to a depth of 40-50 cm with leveled bottom and rammers. It is important not to damage the main foundation. After this, you need to cover the bottom with a ball of sand, 30 cm thick, and press it firmly or spill it with water. Place a ball of crushed stone with a grain size of up to 10 mm on top of the sand, level it and compact it.
At the next stage, lead the sewer pipe through the foundation. For this purpose, it is necessary to freeze the installation for diamond drilling in order to avoid wasting the non-structural base due to cracking or partial ruining. The diameter of the opening is not less than 100 mm. The depth at the outlet of the outer part of the pipe is responsible for freezing. In the middle of the placed height of the pipe it is necessary to add 15-20 cm to the middle of the pipe. To prevent third-party objects from entering the middle of the pipe, it is necessary to close it with a strong plug.
Then, a waterproofing material is laid at the bottom of the trench, overlapping with reel sealing of the joints. After this, lay a reinforcing mesh with a reel diameter of 4-6 mm and a center size of more than 5x5 cm. Pour concrete grade M300 on top of it. To remove the soggy bulbs, you need to remove the stirrer. The surface is thoroughly smoothed. Until the break occurs, create places for fastening the toilet and insert vertically steel bars with cut holes into them.
After this, a system of electric heating pads is installed on the prepared surface in accordance with the manufacturer’s recommendations. If there is a scorching water circuit in the toilet, then you can connect instead of the electrical system to water, and in this case the heating of the toilet will be greater, and the height of the floor due to the laying of pipes will appear at approximately 5-10 cm lay down depending on the laying technology and diameter, which Vikorist. pipes
On top of the warm underlay, lay a screed and lay tiles.
Insulation of walls and ceilings
It is necessary to prepare the walls for concrete repairs before installing lathing for plasterboard sheets. The position between the nearest slats is chosen such that it is 1 to 1.5 m high and the lathing is spread evenly along the walls. Special metal profile slats should be used. They are placed in a strictly vertical position flush against the wall and secured with screws at intervals of 15-20 cm. Then the entire surface of the walls is laid with hydroisolating foam overlapping at intervals of 15 cm and glued Use a special stitch or tape. In the middle of the spaces between the slats of the grating, carefully lay the wool. A vapor-insulating ball is laid on top of the mineral wool ball in the same way as a hydroisolating ball. Since the walls are thin, it is necessary to add additional soundproofing material. Then install sheets of plasterboard with a thickness of at least 12 mm against the joints coated with putty and on the surface. The stele is insulated in a similar manner, except that thin sheets of plasterboard with a thickness of up to 8 mm are insulated.
 connecting the adjacent toilet to the outside communication system of a private booth
 After this, the inner surface of the walls and ceilings is plastered, and then laid with tiles or covered with waterproof plaster.
Toilet installation
Installation of the toilet in a wooden booth is carried out directly behind the installation of a steel beam in the base at the time of pouring the concrete base. For this installation, it is necessary to lay a strong cork or gum gasket to ensure strong contact between the heel of the toilet and the surface of the substrate. Then take the toilet bowl, place it on top of the gasket and tighten the bolts. At the same time, ensure that the nuts are properly pressed to prevent distortion and damage to the heel. Therefore, the nuts need to be tightened through each other when tightened to approximately tensile strength. The moment the toilet becomes completely stable and indestructible, confirm its correct installation. Then special fasteners are used to install the drainage tank on the top of the bowl.
The connection from the toilet to the sewer pipe is connected to a flexible corrugated hose with a thickened reinforcement. The outer part of the successful sticks must be coated with a silicone-based sealant. After this, the toilet tank can be connected to a pipe with cold water, which is extended to the nearest point.
Laying external sewerage pipes
A toilet near a wooden booth with a sewer system transfers connections to the toilet before laying internal communications and does not require external work. Otherwise, it is necessary to install earthen robots and, possibly, install local purifiers or connect to the centralized system.
 framed wooden cabinet for the bathroom
 The excavation of the trench is consistent with the layout of the external sewerage system, which was thought out at the planning stage. Its depth is no less than 0.8 m, and the bottom of the water is drained by sewage water under a well of 30 per linear meter.
A thick cushion 30 cm thick is placed at the bottom of the trench and carefully flattened and compacted. Then, from the withdrawn pipe from the booth, the sewerage system is laid directly to a local or centralized waste disposal point. For installation, it is necessary to install metal-plastic pipes with a diameter greater than 100 mm and as long as possible in order to minimize the number of sticks and reduce the fluidity of leakage.
If all pipe connections are connected, it is necessary to check the functionality of the toilet. To do this, turn on the water supply to the tank, follow the surface step by step and adjust as needed. Turn on the heating system and set the required heating level. Then shake out the water from the tank and inspect the mouths of the pipes and the area connecting to the toilet. Once some shortcomings have been discovered, they will immediately disappear. External communications are looked at in a similar way. Once the leak is complete, install the insulation pump on top of the existing sewer pipes, and then fill the trench.