Do-it-yourself instructions for lining the wiring in the panel near the apartment. We assemble and select the correct electrical wiring diagram for an apartment Electrical wiring diagram for a three-room apartment
The statistics will tell you how to install an electrician’s booth with your own hands; wiring diagrams will also be reviewed. Since a decade ago there was little pressure on electrical lines and power lines, then today the picture is reversed. There are a lot of high-potential household appliances - washing machines, multi-cookers, split systems, etc.
The demand for electrical lines has increased many times. And since the little ones have a large supply of songs, there is no such thing in the conduct of a private booth, hence the increased pressure to lead to the fact that the parts are not visible and begin to crumble. Well, there is a post about those who can not only repair the electrical system in an apartment or a cabin with their own hands, but also change it outright.
Previously, they installed the wiring in the booths using a simple scheme - beyond the socket for each room, and in today's minds there is little of that - you want to turn on three chargers, a laptop, a TV, and so on. To install wiring in a booth yourself, you need to know the rules and standards that need to be followed before installation. So you will know how to work out the wiring diagram, how to wire it with your own hands correctly and how to get it done.
Regulatory documents
In fact, all the activities of civil servants are regulated by the rules and regulations, called GOST and BNIP. The Electrical Installation Regulations (hereinafter referred to as PUE) apply to electrical wiring in booths and spores. This document itself, which regulates, prescribes all the possibilities for electrical installation, thoroughly indicating how to work with it and in what manner. All electrical equipment in the apartment and cabin is connected to voltage with your own hands after all checks have been carried out for the presence of a short circuit.
Vimogi to electrical wiring in private booths and apartments

If you decide to independently prepare the electrical wiring for your cabin, you must carefully consider all the possibilities before it. Ale, the main respect should be given to the coming moments:
- The main components of electrical wiring (distribution boxes, terminals, sockets, dispensers) must be accessible. It’s easy to install the wiring in the booth with your own hands. Electrical equipment, however, is extremely safe from the looks of it. All norms can be easily met.
- According to the PUE, chemicals need to be installed at least 0.6-1.5 meters above the surface of the substrate. Moreover, we must pay respect to those who, when the doors are opened, are not to blame for the stench. For example, if the doors are opened with the right hand, then the machine needs to be opened with the left hand. And if the doors are turned to the left, then the device is installed right-handed. The cable must be laid to the animal's terminal.
- Sockets are installed at a level of 05-08 meters above the surface of the substrate. On the right is that on such a level it is necessary to take precautions in case of a flooded cabin. Moreover, gas or electric stoves, radiators, scorching pipes (and other objects that can be grounded) must be kept at a distance of at least 0.5 m. All sockets must be reached from the bottom up. Do it yourself with your own hands. The dilution schemes have been established by the statistics.
- On the skin 6 sq. There is only one socket per square meter of the room. The culprit is a kitchen in which as many sockets are installed as necessary (consisting of the number of household appliances that can fit in it). The installation of sockets near the toilet is prohibited, and the axle near the bathroom is allowed, except for the sink, which is disconnected through a transformer (220 Volts are supplied to the primary winding, and the insoles are removed from the secondary winding). The transformer installation is located outside the bathroom.
- Before starting work, it is necessary to draw up an electrical wiring plan, clearly marking the layout of the walls. Please note that all parts are laid out either horizontally or vertically - not diagonally or in a laman. So there is no harm in trying to wire the booth with your own hands. The connection diagram for all devices may ensure this feature.
- In the event of blockages, pipes and other faults, there may be a problem. For example, in front of the beams it is necessary to install a 5-10 cm distance, and in front of the cornices - stilts. The height of the ceiling needs to be approximately 15 cm, the depth of the base - 15-20 cm. As for the vertical surface, then from the door and window openings at least 10 cm is required. And the axis between the gas pipe and the wiring must be positioned at least 0.4 m.
- External or installed wiring is not subject to sticking of metal parts of any structure.
- If a number of wires run in parallel, it is necessary to move three millimeters between them. An alternative option is to tie the leather wire from the dry box or corrugated wire. This is how you install the electricity in the booth with your own hands. Schemes are looming as you look at it.
- Collect and spread the traces in special separate boxes. The whole place needs to be carefully insulated, and it is important to note one feature - it is protected from the middle and aluminum particles. If you are doing the wiring from a copper mine, then you are doing it from a new one, no aluminum plots are required.
- Grounding (zero wires, among other things) must be secured to all fixtures using bolted connections.
This is what all electrical equipment relies on. You can create diagrams with your own hands, just to comply with all the rules and regulations.
Electrical wiring project for a budinka

First of all, you need to create an electrical wiring project, and from there everything begins. The appearance of the new fittings is shown during installation. Of course, it will be much better if we give you more evidence of the technology that more than one country is doing this right. If you have proof, go ahead.
Please be assured that since the project has been completed, your security will remain in place. It is important for you to know what mental tasks are involved in the development of schemes and projects. It is important to note that Russian standards are already diverging from European and American ones, so it is not good to vikorize foreign schemes in the minds of our country. All the electrics in the booth are designed with your own hands (schemes are provided by the statistics) at the initial stage.

Draw a plan for a cabin or apartment, designate a new location where sockets, lights, chandeliers, etc. will be installed. A little less has been said about the quantity of electrical devices. At this stage, the main thing is to create a diagram that will outline all the places for installing accessories. The other part is to plan the place for laying wires around the apartment. Of course, you need to know where commercial equipment is available.
Distribution of wires
Then disconnect all the wires. And how to create schemes for the expansion of co-workers is simple on the right, at which stage the work is carried out in a more detailed manner. You can choose three types of connections and connections:
- Sequential.
- Parallel.
- Mixed.
The third one is most important from the point of view of saving materials.

An electrician can work in a booth with his own hands (using mixed-type circuits) for the highest possible efficiency. To make your work easier, ungroup:
- Lighting of corridors, living spaces, kitchens.
- Bath and toilet (lighted).
- Sockets in living rooms and corridors.
- Sockets in the kitchen.
- Electric stove socket (for consumption).
Please note that this is the simplest option for grouping electricity. The smaller the group, the fewer materials will be wasted. The aiming butt is the simplest and most economical. It can be folded: literally to the skin outlet, for example, to supply electrical wiring. You will begin to learn a little about how to install electricity in a private cabin with your own hands.

To simplify the installation of electrical wiring, they can be installed under a base (for sockets). In case of top lighting, installation can be carried out on re-crete slabs. Ideal for the “linear” method - there is no need to groove the walls and stele. Moreover, on the plan diagram this type of wiring is indicated by dotted lines.
Rozrakhunok struma spozhivannya
Obviously, it is necessary to increase the strength of the stream that we pass along the edge. For this there is a simple formula: the strength of the stream is the ratio of the total tension of all the members to the voltage (we can say that this is a constant, since the voltage standard in our country is 220 Volts). Let's say you have some companions:
- Electric kettle with pressure 2000 W.
- A dozen roasting lamps, 60 W each (600 W in total).
- Microhair stove with power 1000 W.
- Refrigerator 400 W.

The voltage at the limit is 220 V, the total voltage is 2000+600+1000+400, or 4000 W. Dividing this value into the voltage at the limit, we get 16.5 A. If you look at the practical data, then in apartments and buildings the maximum current flow rarely falls below 25 Amperes.
Following this parameter, you must select all materials for installation. Zokrema, in order to keep the stream in storage. Restore respect to those who will need to take the reserve from 25% in the future. In other words, once you have calculated the strum of the acquisition of 16 A, it is not possible to establish a zabozhnik with such very meanings of the spree. It is necessary to select a higher standard value, lower value.
Brands of wires for vikoristanny in budynkas

Now about how the electrics are installed in the booth. The cable (PUE rules regulate all of its parameters) must be selected based on the flow characteristics. It is important that the wiring in your apartment be made from the following materials:
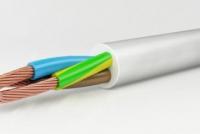
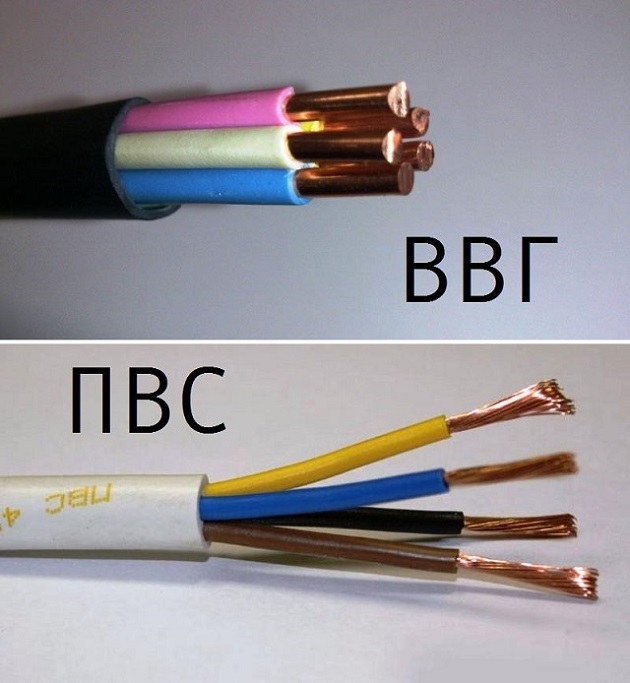
- Wire brand VVG-5X6. This wire consists of five cores, the skin has a cross section of 6 square meters. mm. It is widely used for booths that create a triphasic boundary to connect the light shield with the main one.
- VVG-2X6 May two lived with a 6 sq. m. mm. It is widely used for booths with single-phase housings in order to connect the lighting shield and the main one.
- The wire of the VVG-3X2.5 brand has three wires, the skin has a cross section of 2.5 sq. mm. It fits together to connect the lighting panels with separate boxes. The same goes for boxes to sockets.
- Brand VVG-3X1.5 has three veins, the skin has 1.5 square meters. mm. It is necessary to connect lighting fixtures and lighting lamps.
- The brand is three-core, the leather skin has 4 sq. mm. Suspension for connecting electric stoves.
Changes in quantity of materials

Now you need to consider what components (electrical and other) the electrical wiring of the booth is made up of. With your own hands, the design, installation, and installation will be completed quickly. True, you will have to try very hard to get the most out of the shot. For this reason, with a plan, go through the apartment with a tape measure. Having finished killing, give the beast a meter or more - we won’t have the reserve.
At the entrance to the booth, all the arrows from the house are placed to go to the next one. You can install automatic wins. Please note that automatic circuit breakers have a maximum output of 16 or 20 Amperes. You can connect through our automatic link. For voltages up to 7 kW, a 32 A circuit breaker is used, and for higher voltages - 63 A.
After that, you are aware of the large number of separate boxes and sockets, there is nothing complicated in this, so work on the diagram that was folded earlier. You will need a variety of “drugs”, for example, insulating stitches, lugs, tubes, cable ducts, boxes, thermal insulation and others. Now let’s talk about what tools to use to install the wiring in the booth with your own hands. The diagram has been reviewed and reported.
Tools for carrying out work

Before you start, please follow the safety rules. So as not to get lost, it’s better to end on your own, since you have a partner, then the help may be minimal - give it, bring it, don’t bother. You will need an offensive tool:
- Multimeter.
- Perforator.
- Chernivtsi.
- Screwdriver.
- Pliers.
- Little things.
- The twist is shaped and flat.
- Rhubarb.
If you are renovating an old apartment and at the same time changing the wiring, you need to pull out all the cables so that the stench is not affected. For this purpose, a special electrical wiring detection sensor is needed.
Layout of darts reshaping
Place marks on the wall, behind which you will place darts. Restore respect to the rules of the wiring position. After the location of the passage of electrical cables has been determined, you can identify sockets, boxes, shields and devices. In new apartments there is a niche for installing a shield. And in old booths the shields are simply fastened to the wall.
Wall groove

First of all, you install a special attachment on the hammer drill and drill out the openings for installing spacer boxes, sockets and sockets. To lay the darts, it is necessary to make grooves in the walls - grooves. The stench of shying away from using an angle grinder or hammer drill. Whatever method you choose, wood and saw will be enough. The groove has a depth of 2 cm. Once the width is correct, it can be machined to fit all the arrows. As you can imagine, installing electrical wiring with your own hands is a simple and easy installation from a physical point of view.
Surrounding the history and history. If you plan to work overhead, simply install all the wires at the intersection. This is the simplest way. It’s easier to make a shallow groove. And another one - grab it from the perekritti. For example, panel booths have the same overlaps as those that have internal empty parts. So he needs to unwrap two of the doors to insert the darts. I will stop - by punching the openings in the corners of the rooms in order to bring the darts to the central panel. Then proceed to closed (you will have to chisel the walls) or open methods.
Visnovok
The most important thing in the installation of electrical wiring in cabins and apartments is to comply with all norms and rules according to GOST, SNiP, PUE. This way you will not only be able to achieve maximum efficiency in electrical wiring, as well as reliability, durability, and, most importantly, safety. Be careful when installing only clear materials. For example, darts should be compared to honeydews - they have a much longer service life (shorter conductivity, heat up less).
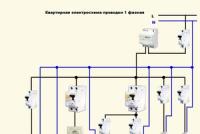
We recently looked at it, and now, to your respects, a complex project will be submitted - for a three-room apartment with a loggia. We immediately destroy your respect for those who don’t have the butt of a chair. On the design diagram of the apartment electrical wiring, you can change the number of sockets with circuit breakers or change their location.
Well, now I’m ready to start with the electrical wiring diagram for the three-room apartment, after which we’ll talk a little about some of the important issues that affect your food. The current project for wiring the wires in the rooms looks like this:
This project of a 3-room apartment may seem a bit simple to you, so let’s look at the main points.
- Each room has its own separate box, which contains supplies for the electrical outlet, lamp and sockets. Due to electrical safety, the bathroom junction box may be moved into the corridor.
- Three sockets in the kitchen are installed above the counter for connecting a micro-fiber oven, a kettle and any other kitchen appliance (multi-cooker, toaster or blender). One more tip - before the electrical cutoff. In your electrical wiring diagram in a three-room apartment, you can design more sockets, if, for example, you need to connect a range hood, hob or dishwasher.
- There is no electrical connection to the loggia, because... the owner of the apartment will not require it. If you need, connect the cable to the junction box of the bedroom, which is the living room.
- Since the height of the installation of sockets in Khrushchev is not standardized by GOST and rules, with your own scheme you can place them as you please, so it’s easy and safe. Read the report on the placement of sockets near the apartment in the article: .
- We recommend that you create a project on a photocopy of the plan of a three-room apartment of a panel or single-purpose booth. This document adjusts all the dimensions of the rooms exactly to the actual ones, so that you can easily determine the layout of the walls during the installation of electrical wiring.
- It is obligatory to display a number of groups of darts for lighting and sockets from the distribution panel. For example, one group of lighting is equivalent to light in the toilet, bathroom and kitchen (in the left wing diagram). Another group is serviced by a lighting line near the bedroom, bathroom and children's room. Similarly, “split” the cables for the socket group of wires. This version of the electrical wiring diagram in a three-room apartment allows you to remove electricity in certain rooms when repairing the wiring (for example, replacing a light or chandelier). About how to divide electrical wiring into groups, read the statistics:.
- Don’t forget to indicate on the diagram the exact placement of the lamps on the stele. About how to place the sconce lamps, the statistics reported: .
In addition, when creating a wiring diagram, it is important to correctly design the distribution board and select the required automatic control system that will be installed in it. The video below shows one of the options for a folding shield in a three-room apartment.
Handiness and comfort of everyday life lie in abundance in electrics. At the skin of Chi, the apartment for oblivious overtolenn, Garyacho waterfront, Obigrev, Zberezhennya of the product of the Kharchuvannya, the valve of the ventilation boti vyraza Kilka object of the evolving Electric Techniki. For reliable operation of electrical appliances, it is necessary to have competent electrical wiring. Every householder has the right to decide how his household will have household appliances, and whether there will be sockets and electrical outlets available for its connection. Is it possible that when installing electrical wiring you can quickly use the services of professional electricians or install electrical wiring in your apartment with your own hands?
Why should you install electrical wiring in your apartment?
Work on the installation of electrical wiring in the apartment and other residential areas will inevitably begin as soon as possible - according to the established electrical wiring plan. I axis why. Let’s say you carried out repairs without particularly thinking about the final result. As they wanted, they did it.
We set up furniture in the place and removed everyday electronics. And what happened to us? Catastrophe! All the sockets were in cold reserve: one was blocked by the wardrobe, another by the sofa, the third by the chest of drawers, and the fourth by the bedside table. There are no sockets within a radius of 3-4 meters to connect to a TV or your favorite stereo system.
And this is where a very cheerful and squealing game begins, called “Throw blankets all over the apartment.” The power is on: have you installed new electrical wiring so that you can then walk around and trip over the footwear? See how many pennies and nerves can be wasted for nothing.
Wiring plan
Let’s say you have an apartment in Novobudovo, which needs some repairs before you move in.
The electrician in the apartment is ready to work ahead of us. Before starting the electrical installation work, please take a look at the electrical wiring plan. The simplest option is to put your hands on the paper's arches.
Drawing the electrical wiring plan
Well, you were glad to see your household and showed up. Now it’s time to transfer all the ideas and plans to paper. We draw the plan of your accommodation. How can you earn money? Let's take a standard one-room apartment as a starting point.
- For the wicon scheme we need:
- zoshit;
- ruler;
- pen;
- colored olives or felt-tip pens.
The diagram shows the layout of the walls and door openings. Specific dimensions are not required, just a hidden picture is required.

Example of the electrical wiring plan for the apartment
- On the trace diagram, display the following elements as clearly as possible:
- Sockets.
Stinks can spread in any hand, but no less than 15–20 cm from door and window openings, as well as from heat and gas pipelines - 40 cm. m 2 area is usually installed according to one socket. - Lighting equipment.
The standard plan is for one great lamp at the center of the stele. You can also create additional lighting fixtures (spot lights, sconces, sconces) by transferring the wiring. - Vimikachi.
Please install them on the right side of the door opening and at a distance of 60 or 150 cm from the base. - Routes for laying cables.
When placing them in your seat, remember that the wiring must run vertically or horizontally. Zigzags are not allowed. It is planned to lay the wires in the middle of the walls, coming out of the overlaps and slots of 15–20 cm. - Separate boxes.
They also need to be shown on the plan because all the main cable connections are loose. A box is placed on the skin area near the main line, and no more than one per room. - Rozpolny shield.
Call, security guards are installed behind the boundaries of the apartment in the back corridor. All actions are planned to be completed on the internal placement of the shield, which will have to say goodbye to the problem.
Razmіchaemo
So anyway, between the formed plan and the beginning of the rough work there is a procedure called “marking”.
Scientifically speaking, marking is the operation of applying lines (marks) to the surface of the workpiece, which indicate the contours of the part or place from the chairs, which support the samples.
At the initial stages, the work is carried out from the distribution of electrical energy into the located markings in the following order:
- In front of us, the points for relocating sockets and devices, as well as the location of replacement cables for household appliances, are marked on the walls;
- Here are the lines that will vibrate;
- a place for separate boxes is designated;
- select the location where the apartment electrical panel will be installed;
- After this, the routes of cable routes from the electrical distribution panel to a specific electrical point are outlined.
Most often, changes to the electrical wiring diagram of an apartment are easiest to make at the initial stage of the work, at the layout stage itself. At this time, financial resources will be at risk, and changes may result in additional costs.
- If there is an electrical panel near the apartment, the groups see:
- lighting of living rooms, kitchens and corridors;
- electrical supply to living rooms;
- power supply in the kitchen and hallways;
- lighting and power supply of the sanitary unit.
If you have an electric stove in your apartment, you need to see it in close proximity.
Do not forget to move the safety on the skin group (PZV), so called differential struma. The same applies to the electrical wiring of the bathroom and kitchen.

After the groups are designed, it is necessary to determine the location for connecting all the main electrical supplies. Main machine, electric stove, air conditioner, water heater, oven and dishwasher.

Now you can determine the location of installation of circuit breakers, lamps, distribution boxes and sockets, and then apply them to the rough electrical plan of the apartment. Carefully connect all the lanyards and insert all the wires.
It is necessary to obtain an apartment electrical plan from two examples and take one of them from the family archives with documents. You will need wine more than once.
Now the final electrical circuit is being formed. And this shows an exact plan for all the placement of the sheets in all sizes.
All electrical points on the electrical circuit are placed behind the conventional meanings and are connected by lines that indicate arrows. For better readability, it is recommended that lighting, grounding and power cables be marked with different colors.
It is important to identify all the dimensions: linear dimensions of the rooms, ranges from the darts to the walls, tables, beds, as well as scorching systems. Such a scheme will not only be carried out in greater detail, but it will be possible to carry out all the necessary developments.
Vimogs, rules, norms
When the circuit is assembled, remember the important steps before electrical wiring in residential areas.
It is not possible to connect the grounding contacts of sockets to zero darts, as well as to the water supply or scorching system. This is not safe for human life. This method involves a dry grounding wire.
If the apartment does not have a gas stove, but an electric one, then the main circuit breaker must have a rating of at least 63A.
The wires are laid only vertically and horizontally, spreading strictly under a straight line, one to one.
It is not advisable to change their trajectory, otherwise this can lead to an increased likelihood of wire breakdown with a wire or drill when performing small repair jobs. The trace of the darts is unique. If this is not possible, then the distance between them may be more than 3 mm.
When setting the dimensions on the plan, it is necessary to ensure that the cable extension to the underlay or the frame is not less than 150 mm, to the window frames, doors and curtains - not less than 100 mm. All devices and sockets should be installed at the same height.
In this case, install a left-handed handle at the entrance doors at a height of 800-900 mm, and sockets - 250-300 mm. In certain situations, for example, in the kitchen, your position may change. The gap between the pipes and wires should be at least 30 mm. Lead to the sockets from below, and to the animals.
Features of installation of electrical wiring in areas with moving moisture
Until now, it was important that the socket installed near the bathroom was blocked. In truth, the fence was in place until 1996. Bathroom - a room with a hollow core, water-drawn structures, a large number of jet-conducting pipelines and a steel bathtub that is equipped with electrical safety.
The fence has long been laid down, and in some cases it has been removed due to the wide expansion of current electrical safety features.
- Thus, the connection of electrical devices in a location with a moved area is no longer possible:
- through the dry connection device (DCV) with the flow supply no more than 30 mA;
- The electrical wiring is responsible for the connections; the grounding contact (zero TN-S);
- sockets must be spaced no closer than 60 cm from the doors of a closed shower stall;
- at a height of no less than 130 cm above the level of the substrate.

How to properly install electrical wiring
- It is necessary to put together a plan for the electrical distribution of the apartment in two examples:
- On the first track, lay out a plan for the development of chemicals and illumination equipment;
- and on the other - sockets.
After this, divide the electric stake clients into groups.
- Or like this:
- lighting fixtures for living areas, kitchens and living rooms (automatic 10A);
- sockets in living rooms (25 A circuit breaker);
- sockets in the kitchen and living room (25 A circuit breaker);
- Lighting fixtures and sockets near the bathroom (these clients are united in one group, the fragments work in the minds of the vagina, and serious dangers are imposed on them).
For everyday use, there is one group with a machine for 25 or 32 A. The installation is divided into groups according to various details.
If all the equipment that generates electricity is connected to one circuit breaker, then you will need a very strong cable, which will be suitable for the purpose. You also happen to buy an automatic machine, the insurance costs are high, but the price is too high.
If there is a breakdown of one of the elements of the fence, then the entire apartment will have to be demolished to start new work.
Once the electrical wiring diagram for a one-room apartment is ready, it is necessary to calculate the amount of available electrical energy. You will have to calculate the required number of sockets, based on the obvious technology of how to live without electricity, as well as install future appliances.
Then it is necessary to correctly unplug all sockets and wires.
- For this purpose, speed up with these rewards:
- Wires and sockets should be placed left-handed at the doors;
- in living areas and front rooms, the electrical sockets are located at a height of 0.4 meters, in the kitchen at a height of 0.95-1.15 meters;
- vimikachі guilt are installed at a height of 0.9 meters;
- It is necessary to determine the location of the wiring of the circuit breakers and sockets.
Then carry out the darts in the electrical outlets and sockets (depending on the plan). If you connect to separate boxes, all cables must first go to them, and then to the electrical panel.
- For proper breeding, it is necessary to follow the following rules:
- cables run horizontally or vertically;
- more beautiful than the uniqueness of darts;
- The cable must be installed at a distance of 0.15 meters from the ceiling and 0.1 meters from the doors and windows;
- The cable to the power supply is brought to the animal, the cable to the socket from below.
The main thing is to keep an eye on the length of cables and the number of automatic machines. When adjusting the cable meter, it is necessary to maintain the dimensions of the rooms, and when adjusting the number of machines, it is necessary to come from a number of groups. Also remember that all machines are connected to one, which is high-pressure insurance.
If you are already cleaning or planning to add an electric stove, then you will need an automatic machine that is rated at least 63 A.
Main types of breeding
If you believe that you can handle the electrical wiring in your apartment correctly, then you first need to choose the appropriate method.
There are three types of dilution:
- for more separate boxes;
- zirka;
- plume.
"Through separate boxes."
This is the most common type of dilution. The electrical panel is installed at the exit gate, and not in the living area. This is where the life cable comes in, and the shield itself contains a doctor and a number of chemicals (usually 1-3). At the edge of the room, electricity flows through a separate box located at the entrance.
"Zirka".
The skin light point or socket is located around the cable line that goes up to the electrical panel, and the automatic power supply often leaks.
This dilution makes it possible to gain greater control over the skin element of the electrical shock. Among the disadvantages for the hairdresser is a significant increase in the amount of unnecessary wiring and labor costs, a high risk of adding a large panel, which leads to a significant increase in the cost of the project.

Breeding "Zirka"
"Plume".
The principle is similar to the “mirror” one, but differs in that on one cable there is not one element, but a string. The project will cost less up front.
It is rarely possible to choose one of the options in a “clean look”. For specific skin conditions, stench must be taken into account to achieve the most effective results.

Combination dilution method
Nuances in a one-room apartment
- In a one-room apartment, electrical wiring is most often divided into two groups:
- kitchen and sanitary facilities, as the right is concentrated in a large number of electrical devices;
- living room.
This is done in order to remove the reserve of tension by dividing the lanyard into two lanyards, and also in order to prevent one line from being cut off or cut off in the working stage.
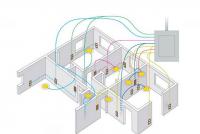
Electrical wiring diagram for the apartment (example)
A diagram of the apartment electrical wiring of a standard two-room apartment has been drawn from the layout of the electrical panel from the entrance to the Vikonian apartment in a simplified view. Here we present only the main lighting devices, such as chandeliers, simple one-key switches, and sockets with a wet contact for grounding.

So, as you know, the electrical circuit can be compiled independently. Fakhіvets clearly shows this work, but the owner of the apartment is responsible for correctly identifying the place where the wires should be passed in order to avoid any sudden damage from a nearby hammer or drill bit.
Installation of electrical wiring in the apartment

Do-it-yourself electrical wiring in the apartment is on the right, which demonstrates increased attention to work, careful adherence to safety standards and installation rules.
The smallest cuts can cause a short delay. There are a number of simple rules that can be followed to create accurate electrical wiring.
Carrying out electrical work does not pose any particular difficulties for those who handle the tools.
Installation can be done in one of two ways. Before the chosen method of laying, the wiring is embedded in the walls, ceilings and floors, under the covering for the underlay, behind the plasterboard sheets.
Before the open installation method, lay the cables in special boxes, cable ducts, using staples and clips. Resentment and ways to achieve success. To complete the installation, it is first necessary to remove all furniture and household appliances from the walls and, if major repairs are being carried out, remove everything as soon as possible.
Let's talk briefly about these stages.
Methods of laying electrical wires and cables
- There are 2 ways of laying electrical wiring in apartments:
- vkrity;
- hobbies.
- The rest can be divided into:
- laid along the stele;
- laying on the walls;
- and underlay gasket.
Prihovany method
This technology is the most sawed and rough, so you have to chip the walls and ceiling or tear up the covering for the lining. Therefore, it’s time to get rid of it as soon as possible before carrying out a major overhaul.
If in the electrical supply project it is planned to distribute along the walls, then we put a place for wiring on them, take a hammer drill or grinder in our hands and cut out grooves of the desired width and depth. The depth is selected so that after laying the wiring or cable, the ball of plaster will be no more than 10 mm, the width will not be edged.
The place for sockets and outlet boxes is verified using a special crown. We remember about the load-bearing walls and make sure that the grooves in them do not need to be deep. In apartments with panel booths, there are internal empty bars between the tops, where wiring can be stretched.
Today's popular monolithic structures with integral inter-room ceilings, in such apartments, cut grooves on all walls, head, and do not seal the load-bearing monolithic beams.
The most economical option for pre-installation is laying it under a covering. Golovne - the presence of corrugation for skin dart. It is worthwhile to make repairs, replace wires and provide additional insulation.
Once the grooves are in place, proceed to installing the light distribution shield and laying the cable. The shield itself can be hung or embedded against the wall. New booths have a special niche for it, and in old ones they are secured to the wall using additional screws.
In the middle of the shield we install automatic machines, of which the VVG-3*2.5 darts are supplied to the sockets and the main line. VVG-3*1.5 is laid from the split boxes to the lighting fixtures. For stationary devices of great tension, it is necessary to terminate the line with cable VVG-3*2.5. At installation sites, the connection point is 15-20 cm.
Now the separate boxes have a single edge. The most favorable connections will be the SIZ. To avoid mixing up the darts, you can hang tags with different markings.
After using an additional tester, we check the entire measure of damage and damage. As everything is ready, it is walled up, installed on the place of devices, sockets.
Direct installation
For areas where it is fenced off or where it is impossible to install holes, install a closed installation (external wiring for the apartment). For these purposes, use boxes, cable channels or special clips. Laying is simple and is carried out only on the walls and ceilings.
First, it is important to mark the place of laying and seal the openings for fastening with a margin of 40-50 cm, if the place for the hole is less than 0.5 m, then we need a margin of 15 cm for two fastening points.
After this we fasten the boxes, cable ducts and clips to the wall. At the distribution points, external power supply boxes are installed, and the connection of wires, distribution and installation of the connection point is carried out in the same way as in the conventional installation method.
The advantage of open-air installation is easy access to all wiring, and not too much aesthetic appearance.

Make sure that the cables from the separate apartment electrical panel are laid on a slab (intersection slab).
An opening is drilled on the wall, then when the cable is laid, a cable fastener is inserted into the opening. It’s clear who I’m going to complain about, but I’ll just say that there are a lot of installation options (for example, a dowel-clamp, dowels with a screed).
Tools necessary for electrical installation
- Before you begin installing electrical wiring in your apartment, prepare the following tools:
- A wall chaser (or an extreme version of an angle grinder) for wall chasing, a hammer drill.
- Set of twists.
- Pliers, wire cutters.
- Budivelny rhubarb.
- Phase indicator.
- Drill bits, a crown for a hammer drill for drilling out sockets for socket boxes.
- A knife and a hacksaw.
If you need a professional tool, you can rent it in the future.
What type of event should you choose to conduct at your apartment?
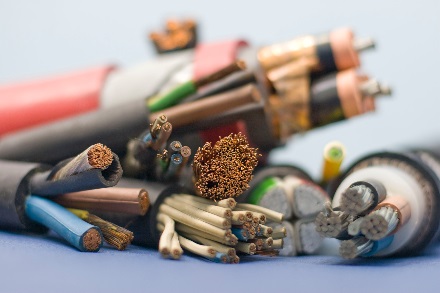
There is no food available at this time - any food is required for staying in the apartment. For the installation of home electrical wiring, cables and cables with copper cores are used. It is not possible to install cables with aluminum conductors for internal electrical wiring.
- Give priority to the copper wires because they stink:
- increased plasticity (less susceptible to damage when installed);
- corrosion resistance (more susceptible to oxidation);
- great service term for aluminum products;
- show great vantage with less cutting.
Wires and cables can be single-core or multi-core. Large-capacity arrows and cables are laid near the insulating shell, two and more reliably insulated, one type of one lived.
The butt of a rich-vein dart is a wire of the PRTO brand (a wire with a copper core with humic insulation, braided with bulk yarn, leaked from a rotten warehouse). The cores of single-core and multi-core wires and cables can be prepared in single-core and multi-core wires.
Cables and wires are divided into one type and one type of jacket and by name. The sheathing of wires and cables is used to protect the insulation of the conductors from the infusion of light, vologie, various chemical substances and their protection against mechanical damage. The cable can be armored to the warehouse, and the sheathing can be laid in more hostile minds.
The wires can be laid in a closed way, with a closed installation - only in pipes and boxes. Cables can be laid open.
The most popular cable for wiring in home electrical wiring is VVGng, followed by NYM cable and PUNP wire.
For connection to the surface panel, use the NYM cable as best as possible. This cable is used to connect the surface shield with the apartment or room shields (behind the sink, which are the same). Call for such shields to be organized in private cottages.
This can be used for individual connection of active partners. With such a cable you can work with all the power distribution in an apartment or a cabin, but since it costs more for the VVGng cable and PUNP wires, then for these purposes you should use it less often.
VVG – non-reservation theft cable with copper conductors, polyvinyl chloride insulation, polyvinyl chloride sheath. The cable may become stiff in dry and damp areas.
The VVG cable is not covered by insurance for untensioning. The insulated cable VVG is twisted and may be damaged. The inner lining does not fill the space between the veins.

VVGNG cable
The “ng” in the name of the cable (VVGng) means that the cable does not extend the length of the cable when laid in bundles (a warehouse based on refractory plastic is used). If you replace the VVGng cable with the VVG cable, then when one of the cables burns, the half of the other cables will expand, instead of localizing the fire.
The VVGng cable comes in a wide variety of shapes. It’s best to use VVGNG flat cable. In addition, there are also round, square, sector, and even tricut.
NUM cable (NYM) is manufactured according to the German standard DIN 57250. The cable can become stuck in the middle of the area when installed in a closed installation. The NYM cable can be stuck in the wind, or it can be done by direct infusion of solar light. NYM cable has reduced flammability and gas emissions, which is especially important for residential applications.

NYM cable
The NYM cable consists of copper cores, an intermediate shell made of chalk-coated gum and a shell made of polyvinyl chloride insulation, which is not exposed to heat. The intermediate sheath in the design of the cable makes it possible to easily and manually wrap the cable during installation, making it safer and more flexible.
PUNP - standard flat wire. This is the cheapest wire from all the cable and conductor products that are assembled for installation of electrical wiring in the workplace. The PUNP wire is issued from two or three copper single-wire conductors and polyvinyl chloride insulation in a sheath with PVC plastic. Lived may be barred in different colors.

Wire PUNP
The PUNP wire comes out flat. These cable-conductor circuits are used as power and lighting lines. In another case, take darts of smaller cuts.
Quite often, when installing household electrical systems, vicorized darts with humic insulation of the brands PRN, PRI, PRTO are used. Conducting PRTO for installation in non-flammable pipes, PRI - can be frozen for installation in dry and dry areas, PRN (wire protection) - in open air, PRD, PRVD (double-wire twisted wire) - only in light Luvalnykh mezhdah dry places.
For open wiring, manually twist a flat wire with copper conductors and polyvinyl chloride insulation with a separate base of the PPV brand, as well as wires with polyethylene insulation PPP. It is a flat wire without a separate base - PPVS, otherwise it is not very easy to rustle with it.
Wires that have previously been stuck behind aluminum conductors (APR, APV, APRTO, APPV) are not to be disturbed during the everyday life and modernization of home electrical wiring.
Conducted with copper and polyvinyl chloride insulation PV. PV wires can be either single-drop or multi-drop. The wire is issued from a different color of insulation. In the current electrical wiring, the single-core wire PV1 is yellow-green and barred for the potential equalization system (DPSU).

Wire PV1
When choosing wires and cables, it is necessary to ensure proper insulation.
The insulation of the zero working conductor is a black color, and the zero zakhish color is yellow-green. The color of insulation of phase conductors must differ from the color of zero conductors. There are a lot of options here - brown, red, gray, white, dark, etc.
It is also very easy to select different colors of phase conductors for the electrical wiring section, as well as different colors of insulating conductors for power and lighting electrical wiring.
If you select and then carry out the installation of electrical wiring with wire or cable without touching it until the cores become barred, this will lead to significant difficulties when servicing and repairing electrical equipment in the apartment. Moreover, the installation process can be even more complicated, especially if there are a large number of devices and sockets.
For different groups of household electrical appliances, use darts with different spandrels.
- It is best to divide the power cables into groups and connect them to the following circuit breakers:
- Lighting - cut to 1.5 mm (automatic - 16 A).
- Sockets - the cut is not less than 2.5 mm (automatic circuit breaker - 20 A).
- The pressure on electrical appliances, such as electric stoves and cooking surfaces, is no less than 4 mm (25 A).
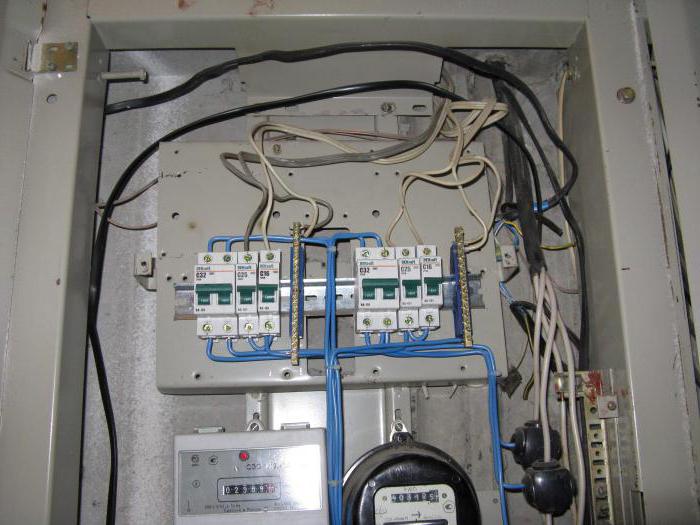
Installation of residential electrical panel
Before laying cables, it is important to mount the electrical panel against the wall. The size of the shield is selected based on the number of automatic devices, EPVs, and differential automatic devices that will be installed.
The shields come in the following main sizes: 4, 8, 12, 18, 24, 36, 48, 60, 72 modules (1 module = 1 single-pole automatic circuit breaker). The apartment has shields of 12, 24 or 36 modules.
In my practice of electrical installation of apartments in most periods, I install electrical panels for 24 or 36 modules (24 modules for a 1-room apartment, 36 modules for 2 or 3-room apartments).
One shield may not be enough if you plan to purchase equipment for telecommunications networks (router, media converter). In this case, it is rational to place these components in an additional electrical panel, which is installed next to the main (power) panel.
Current electrical panels are located near the wall and do not take up much space.
The advantage of installing an additional electrical panel is that it accommodates the minimum power necessary for the functioning of the TV station and the Internet. In this manner, the router, hanging at the front of the room on the “nail”, exits at the end. Finally, functional and ergonomic solutions come.
Installation of electrical outlets and separate boxes
After the marking, the locations of future sockets and devices became visible. Most often in our time, sockets are installed close to the base at a height of about 20-40 cm above the base, while sockets are installed at a height of 70-90 cm above the base.
This rule is not binding, but you can change it later. For example, people of high stature are more likely to benefit from the most advanced symbols, while people of low stature, however, are better off if the symbols are placed lower.
Sockets and devices can be installed in blocks of up to 5 pieces, and inodes - up to 6 in one line. Moreover, it is possible to install it both vertically and horizontally. All guilty moments will be insured upon acceptance.
And now it becomes impossible to drill out the holes in the wall for the electrical outlets. The standard European electrical outlet has a diameter of 68 mm. When several sockets are folded, the distance between their centers is exactly 71 mm. The depth of the socket boxes is 45 mm or 60 mm.

They are used in depth, for example, for installing a temperature regulator for a warm substrate or for switching electrical wires for different needs.
After this, the openings for the separate boxes are drilled. Place separate boxes (they are called doses) under a frame with a winder of approximately 15-30 div above the overlap. It is necessary to adhere to the following rule: the doses of guilt are located on the same vertical axis with sockets and/or chemicals positioned lower.
Not everyone likes it if separate boxes are visible on the wall. It is allowed to install distribution boxes under the rack for connecting wires that are welded or pressurized.
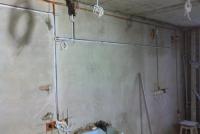
Wall slitting
Grooving is the process of cutting grooves (deepening, furrows) in concrete, clay or plaster for further installation of communications in it (in electricity communications, electrical cables and wires, plumbing - trumpet).
Before you start ditching, you need to determine the width and depth of the ditch.
- These parameters are determined based on:
- number of cables laid at once;
- cutting of cables;
- Rotating the cables in the grooves almost one at a time.
For the remaining point, please clarify: the cables in the grooves can be laid either flat or in the depth of the groove. In one type of ditch you should be careful, in another you should be careful. Here the skin electrician is in control.
It is not advisable to make a groove that is too wide (to spare) - during installation, the wires will constantly sag and they will have to be secured to the groove with special clips or “spiked” with plaster. Ideally, when conducting a 1.5 mm crossbar, use a groove 4 mm wide - the cable fits in there with tension and trims without problems.
I strongly recommend that you work on the grooves yourself using a commercial saw cleaner, and not use an angle grinder for this purpose. So, after such grinding, the particle-dispersed saw will sit for so long that you can ruin the entire work.

For professional electricians, all these tools (shaver and industrial vacuum cleaner) depend on this obviously. For self-assembly, they can be rented.
Distribution of wires
- The wire can be routed in 3 ways:
- along the stele;
- on the side;
- along the walls.
- Wiring the electrical system along the wall is, in my opinion, the best option:
- There is no risk of disruption of the repair line;
- It is now possible to continue until it is carried out.
If necessary, you can remove the tension rod, make changes before disconnecting the electrical system, and then install the tension rod in place. When dividing the underside, you will have to add a screed, which threatens with great costs.
Connection of wires at the electrical box
- The main options for connecting conductors in breakout boxes:
- twisting;
- soldering;
- cooking;
- depressurization;
- buckets ZIZ;
Ensure that walling according to the PUE can only be done by welding and pressing (as is most reliable).
Variety of electrical installations in the apartment
Price list for electrician services:
Average quality of electrical installations, turnkey
This is another approach for optimizing the quality of electrical installation work. The price per key is determined according to the number of installation points.
- All elements are marked with speckles:
- socket;
- vimicach;
- lamp;
- chandelier, etc.
Prices for electrical installation of one point range from 700 to 1500 rubles. (Of course, the materials are not available to the doctor).
Conducted in an apartment with your own hands using a shield
The installation of electricity in the apartment is one of the main stages of repair and maintenance work, which allows us to ensure reliable and uninterrupted power supply to all premises, up to the required level of PUE, PTB and PTEEP.
It’s not just your security specialist’s job, but the safety of your main’s, that will leave you with your own hands; it’s better to entrust the services of a highly specialized electrical installation organization with a lot of resources. good news. If you are concerned that you are dealing with this issue on your own, we recommend that you read this article in its entirety, which describes:
- Type of cable and wire products for skin use.
- It is recommended to stay close to electrical sockets and remove any substances.
- A number of automatic dehydration devices or dehydration devices for the protection of companions.
- Nuances for the time of wall slitting.
- Method of laying cable and conductor products.
- It is recommended to have a number of sockets in each room.
- There are still plenty of excellent manufacturers of electrical products, and plenty more.
Why is it better to print electrical installation work near your apartment?

As a rule, the electrical work for an apartment begins at the planning stage. What does this mean? In order to correctly replace the electrical wiring, installing a new wire is not enough. First of all, you need to consider the place of installation of sockets, plugs, household appliances, etc.
It would be unacceptable if, after the completion of daily maintenance and repair work, all sockets would be behind the wardrobes or beds, and the electrical connections would be either too high or too low.
Of course, in such situations there is a way out! By connecting the sub-chewers, natural nutrition is at fault - will it be necessary to replace the electrical wiring because you constantly worry about them?
First of all, what is necessary to decide before starting repairs is to develop a plan or complete a design project. Whenever you need to re-chair, you plan to re-arrange shawls, sofas, armchairs, couches, shawls, household appliances and so on.
Basic rules of the garnish plan

- All sockets must be installed at a height of 30 cm from a clean substrate.
- Vimikachi are obliged to grow no lower than 90 cm from the surface.
- Sockets above the work surface in the kitchen are placed at a height of 80-100 cm from the base.
- On the work surface you need at least 4-5 sockets for connecting household appliances (combines, mixers, blenders, etc.).
- In the kitchen, it is necessary to additionally supply sockets for a range hood, refrigerator, washing machine, gas or electric stove, range hood, and heating system (if obvious).
- In a bathroom without a mirror, it is recommended to install 2-3 sealed sockets to connect a hair dryer, electric razor, epilator, etc.
- Also in the bathroom it is necessary to provide sockets for connecting a boiler, a warm bed, a washing machine, and filters for water purification.
- In places where a TV will be installed (living room, bedroom, child’s room, etc.), it is recommended to install 4–5 sockets, 2–3 of which are supplied (TV, tuner, game consoles, etc.) 1 is used to connect the “Internet” cable and another one for connection antenna cable.
- The sockets in the bedroom must be separated in 2 pieces from each side of the bed for easy connection of a mobile TV or a lamp on the bedside table.
- Also in bedrooms, it is recommended to install a sconce on the side of the skin, away from the electrical outlet, to make it easier to read books.
- It is better for vimikachi to grow from the right side of the doors, as you are right-handed and from the left - as a shulga.
And so, the plan for placing sockets and devices went bankrupt. What are you going to do? Next we need to select the type of defense.
Vibir tipu zakhistu

Due to the current problems of electrical safety, the installation of electrical wiring in the apartment is subject to the following steps, so that the wiring in the electrical panel is stolen by stealing an automatic circuit breaker or a PPV (we’ll talk about this a little later). What does this mean? Let's look at a specific butt.
Butt design for a one-room apartment

Let’s say you have a wiring diagram for a one-room apartment. This is consistent with this diagram:
- The room has: 5 sockets for TV, 4 sockets (2 pieces each) for a bed, 1 electrical outlet and 1 air conditioner.
- In the kitchen: 1 electric stove, 1 air conditioner, 4 sockets on the work surface, 1 socket for the hood, 4 sockets for the TV (2 electrical outlets, 2 for the Internet and antennas), 1 socket for the refrigerator, and 1 socket for the TV either one-key or one-key).
- In the bathroom: 2 sockets for the sink, 1 socket for the washing machine, 1 socket for the boiler, 1 socket (more precisely, just phase and zero) for heating and 1 heater.
- In the hallway: one socket and 2 walk-through terminals.
Apparently, up to the possible DBN and PTEEP, the skin cable is responsible for its mother’s protection for additional EPV (sometimes they can be replaced with automatic vicinators). Based on these standards, a number of EPV (AV) units are installed in the electrical panel:
- The room has: 2 air conditioning units for 16 A, one with a protected air conditioner, and the other with a socket group and one automatic switch for 10 A to protect the lighting.
- In the kitchen: one EPV for 16–32 A (depending on the workload of the occupant) for the protection of the electric stove and oven, one EPV for 16 A for the socket group, one EPV for the air conditioner, one automatic breaker for 10 A for lanterns brightening
- In the bathroom: one EPV for the washing machine, one EPV for the boiler, one EPV for the socket group, one EPV for the heating, one AB for the lighting.
- In the corridor: one EPV per socket group and 1 AB for lighting fixtures.
Coming from the above-mentioned breakdowns, we will need an electrical panel with 24 modules, 20 of which will be occupied by EPV and 4 AB lighting (as the input machine will be installed in the panel board on the exit route and will not be in the electrical panel protect against overvoltage (Bar'er, ZUBR) If the input current and overvoltage protection are installed in this panel, then there are 36 modules (7 modules will be reserve).
What is the difference between DEV (dry-connection device) and AB (automatic switch)

The main difference between these devices is the method of application. What does this mean? Without going into detail about the principle of operation and power of the skin devices, I would like to say one thing: automatic alarms only trigger when there is a short circuit on a controlled section of the electrical wiring, and EPV triggers when the insulation of the wire is damaged ів or vindication of the flow on the metal body of a different piece of stoneware.
To be more reasonable, the device of a dry connection serves to protect people from electric shock, and the AB easily protects everyday installations.
Why should you connect the washing machine and the boiler to the PZV okrem
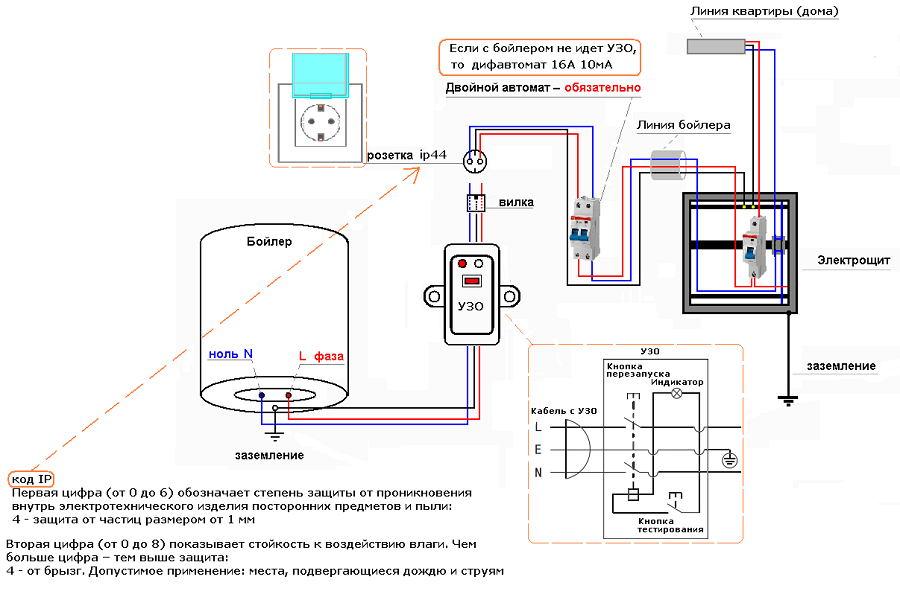
The main source of electricity in the boiler and in the washing machine is the electric heater, which is in contact with water, which quickly leaks onto the body, and since there will be no power supply from the surrounding EPV. , then the whole apartment will lose light.
Selection of cable and wire products
Subject to all regulatory documentation DBN, PTEEP, PUE and PTB:
- To power socket groups, a boiler, a washing machine, an air conditioner, and hoods, it is necessary to install a VVGng 3x2.5 mm or PVSng 3x2.5 mm cable.
- To connect the electric stove and oven, you need a VVGng 3x4 mm or PVSng 3x4 mm cable.
- For lightening lances, VVGng 3x1.5 mm or PVSng 3x1.5 mm is sufficient.
- When replacing the wiring in Khrushchovite, the input cable from the power electrical panel on the runway to the electrical distribution panel of the apartment must be connected with a VVGng (PVSng) 3x4 cable for the sink, since you do not have an electric stove, or with a VV cable Gng (PVSng) 3x6 yakscho na kukh dukha Shafa or electric stove.
What is the difference between PVSng and VVGng
There is a common identity between these brands – this is a method of branding. The VVGng cable (for example, 3x2.5 mm) consists of 3 monolithic wires with a 2.5 mm crossbar, and the PVS cable consists of 3 wires, which are woven together from the absence of copper darts.
What does the “ng” marking in the cable name mean?
The addition "ng" means that the cable is not supported by the mountain. In this way, due to a short circuit in the electrical wiring, it will go out on its own, thereby saving your apartment from the fire.
How to install cable and conductor products (electrical cables)

- In the event of a short circuit in the electrical wiring, the cable is damaged, you can replace it without dismantling the casing; you can easily remove the cable from the corrugation and replace it with a new one.
- If the electrical wiring in a Vikonian apartment is installed in corrugation, then the cable will have additional protection, and there will be a fallout, if you flood the neighbors, then the electrical wiring will not be damaged, the fragments of the corrugation will be sealed.
- When pulling the cable through the metal profiles on which the plasterboard is attached, only the corrugations may be damaged, but the protective sheathing of the cable will not be damaged.
How to disconnect the electrical wiring in the surrounding rooms

Let's take a look at the butt if you install the electrical wiring in the apartment with your own hands. Let’s say you have already removed the electrical panel and ran a new cable into the room. However, what can we do if 2 or 3 cables come to the room (lighting, sockets and air conditioning), and 3-6 cables come out of the sockets (depending on how many sockets)?
For this purpose it is necessary to install a separate box. In this electrical equipment all cables are connected to each other using welding, soldering or special clamping (for example, WAGO).

Important! If you connect the socket group, then with markings and correct switching in the electrical cabinet, the brown wire is the phase, the blue wire is the ground zero and the green wire is the ground.
What to do when replacing electrical wiring in an apartment
- Join the darts in a position with separate wiring.
- Connect the particles behind the twists (the splinters will soon contact the twists and may get burned).
- Repair fillings from the electricity supply (as in the installations in the middle of the apartment).
- Scratch the walls of the panel booths. It is allowed to make only vertical grooves in the plaster ball or to lay the electrical wiring in the corrugations behind the false wall with plasterboard.
- Vikonuvati repair of electrical wiring in the apartment for an additional shortened cable (TU marking). For example, if it is written on the cable with the TU brand that the cross-section of the cable is 3x2.5 mm, then in reality it can be cut within 1.5-1.8 mm.
- Install cable and conductor products closer than 10-15 cm to window and door openings.
- Vikoristovuvati not vologozahichene possession in the bathrooms. For installation in bathrooms, the socket protection level is no less than IP54.
- Install electrical wiring near the gas pipeline and water supply pipes.
- Connect up to AB 16 A to a cable with a crossbar of less than 2.5 mm², otherwise the cable will get dirty and the insulation will be wasted, and the automatic removal device will not work.
- Make horizontal grooves.
- Connect the property directly without any delay (AV, PZV, etc.).
- Destroy the integrity of the load-bearing wall structure.
Visnovki
Replacing electrical wiring in a Khrushchev-era building is a unique process that draws on new knowledge and knowledge, the remains of which lie in the vicinity of your homeland for the safety of not only you and your homeland, but also other everyday equipment and devices. If you want the electrical wiring in a one-room apartment to last at least 20-25 years, then it is better to trust the correct electrical installation companies.
Video on the topic
Carrying out work in an apartment with your own hands is not a myth, but a reality, for which you do not need to become an electrician or read a number of important volumes from physics.
It is enough to know a few rules in order to lay cables in the house and create the right project. However, it’s important not to forget about the hoods, even if it’s possible to deal with the electricity.
To carry it out, you need to be careful in theory and be careful in practice, not forgetting about side steps.
The layout of the electrical wiring in the apartment is an indispensable language for the master.
New wiring is required either for a major overhaul, if it needs to be replaced, or if the design needs to be done from scratch, most often at the construction stage.
Why not hire an electrician who knows all the ins and outs and can do the electrical work correctly? Golovne is worth the price.
Typical wiring in an apartment costs approximately 1,000 rubles per square meter, and in atypical situations the installation will be much more expensive.
On the other hand, the wiring in the apartment is done with heavy-duty wires - you will spend less on materials.
Before we begin the installation of electrical wiring in the apartment, pay attention to the cables.
Most often you can find an aluminum cable near your home. Previously, they were robbed of it through cheapness, but it is better to replace it with cheap darts.
On the other hand, after literally twenty years the aluminum cable becomes even more fragile, causing burnout and short circuits.
As soon as one dart is damaged, corrosion begins, and as soon as one dart is applied, the entire wiring circuit burns out. For these reasons, the vikorism of aluminum near the apartment is fenced.
Properly construct a copper cable - even if it turns out to be more expensive, then its operation will be safe.
Etapi roboti

You can make a replacement by following a simple plan:
- a scheme for the apartment is being created;
- a development plan is being developed, the feasibility of the project is being checked;
- cleaning of the repair station;
- The wiring is being laid out;
- Connection of machines, sockets, and devices is possible.
Don’t forget about grounding. A current apartment can immediately sell a few (or even more) devices.
All of us could at least once experience ice-like pricking with the help of technology. If you forget about grounding or it’s wrong to do it wrong, a blow with a strum becomes even more dangerous.
Therefore, the wiring diagram shows the evidence of grounding. Making it with your own hands is not important as long as you know the principle of work.
You can also say that each apartment is grounded - it is fed one at a time and is called zero. In order to do it correctly, you need to do the zeroing with your own hands.

This process is simple: the wiring is installed with a three-wire wire, one cable plays the role of grounding. It is connected to the outlets and to the singing equipment in the apartment.
Properly establish grounding in the middle of the shield - then the drying function of the elements will be close to 100%.
Wiring to points must be done at the very end when the mechanisms and fittings are installed.
The principle of folding the circuit
A diagram that you can make with your own hands is needed for a few reasons:
- you can easily cover the amount of material that is required for wiring in the apartment: necessary wires, their cuts, this means how many sockets and circuit breakers there will be in the apartment, as well as the removal of the shield;
- design allows you to know the right place for power elements;
- helps in the future repair of some parts of the elements that are being carried out.
The diagram and plan of the apartment and booth are displayed at scale with different groups marked on them. Without proper electrical wiring in the apartment with your own hands, it is impossible and generally unsafe.

Your apartment will need to have at least two panels: an external one and an internal one. From the inside to the room there are wiring pins.
The main groups look like this:
- sockets;
- lightening equipment;
- adjust tightly;
- sockets and equipment that need to work and connect in the bathroom and in the kitchen;
- Gospodar's arrivals.
It is important to carry out the project in such a way that all the wiring does not go to just one group of points - this will result in much greater interest.
Even at the stage when the project is being created, it is necessary to think about dry devices for the skin area and make them with your own hands.
The tension and loosening of the fittings is influenced by the choice of circuits, whichever master will do it quickly. Such data will help you select the number of sockets for your apartment and the cut that is to blame for the cable.

The rich may suffer from nutritional problems: how does the hut layout differ from the apartment layout? In reality, there are few rewards.
The main responsibility lies with the installed electrician - in the booth it is drained along external lines, in the apartment there is a cable from the distribution panel.
How to do the wiring?
The apartment most often has concrete or solid walls, either covered with tarpaulin or plaster.
The apartment electrical wiring project may be affected by the fact that the cable must be laid either in a combined way or in a pre-assembled manner. Which way is better?
Now understand that there are a lot of options, and everything that you can make with your own hands depends on the characteristics of the apartment.
The work can be laid on bare concrete walls, and the surface can be covered with plaster or tarpaulin.
The collection of necessary materials for completing the procedure with your own hands seems to be the next step: you need a pipe and a flexible sleeve (either metal or PVC).
Ensure that the trace is carried out in special channels.
Constructing a project with your own hands is based on a safety system.
For this purpose, in the middle of the electrical panel of the apartment, there is a presence of automatic machines that are protected from locking.
Some facists work on the device for dry connection instead of automatic machines, as when cutting electrical equipment, the devices get wet.
What kind of wiring is there in the bathroom and toilet, which choice of machines will be correct?
If you are doing the installation with your own hands, then try to avoid installing the distribution box in this room, and install it better not in the bathroom itself, but here, for example, near the corridor, near the doors to the room.
The socket can be installed only with additional hygienic mechanisms.

It is best to carry out markings using strictly horizontal or vertical lines.
The design is carried out in such a way that the lines do not overlap one after another, but the route is parallel to each wall.
If you decided to carry out wiring under the covers of the frame, then, from it to the wall, you will have to lose a small space.
How to properly vibrate the crossbar for wiring? This display is always subject to being larger, lower than the size of the planned space (more than 2 square millimeters).

The expansion of this scheme is allowed so that for different groups there are different cuts required. When installing in an apartment with your own hands, it is important to cover all empty parts with pipes and sleeves.
The cable and parts that will be connected must be equipped with distribution boxes with secure access, so that you can easily reach them for repairs if necessary.
There are one or two sockets in the hallway, and more sockets can be installed in the apartment's rooms.
The plan does not regulate how to install a socket in the apartment, but it does note that the optimal distance from the socket is at least 30 centimeters.
Rozrakhunok, de roztashuvati vimikac, transfers the installation in such a manner that every member of the family can reach the new one.
What else needs to be done before planning?
The plan is a useful guideline for any ruler during installation, especially since all work is carried out by hand.
He has all the rules that will help eliminate problems and carry out the correct distribution of materials throughout the apartment.
The electrical wiring diagram in the apartment is absolutely necessary both for work and for further repairs.
First of all, it is important to remember that from the doctor at the apartment to the skin room there are at least two pins - for electrical outlets and sockets.
I especially appreciate the addition of a bathtub, a project for which is a pain in the ass when done with your own hands.
The best option would be to install only a lamp on the wall and a boiler in this room, if necessary.
The plan can be worked out so that in the small rooms the sockets are located one opposite the other in the wall.
In this case, one hole is drilled for two groups, which allows you to lay one hole, protecting the cable for installation.
Before the project with the designated spotlights for the apartment, having dared to work with your own hands, you can add such elements as I would frame a chandelier.
Here you should cut the razor so that the heel extends to the center of the stele, then it will be easier to spread the razor.
A competent plan conveys that until the skin chandelier and the lamp are close to the nail.
If you think that the plan is not so important, especially when working with your own hands, then it is not so.
On the right, your plan and plan still need to be registered with the energy service.
This procedure is cost-free, but if the wiring arrangement is incorrect or unsafe, prepare for the fact that the plan will have to be redone.
That’s why the scheme is laid out correctly and is extremely important. Different nutrition - how to get it? Today it is not a hassle to go to the office and hire an engineer.
All operations must be carried out with a hand.
You are allowed to work on the project with computer editors: CorelDraw and Photoshop. You don’t have enough knowledge about how to create a project on a computer that you can put on a piece of paper by hand.
How to repair wiring yourself
Situations where wiring burns out or breaks are not uncommon. How to repair it? Electrical work can take a long time, but the work will take a lot of money.
There are plenty of people who choose to do the repairs themselves. Golovny, don’t forget to pick up your equipment: gloves, eyepieces, reference tools.
Repairs can be carried out either completely or privately. Basically, the apartments have the wiring installed, and there is always a plan at hand, where the pins are marked.
Once the project is completed, then the output is to check the wiring. This device depends on the type of scanner.
If the apartment, as a result of the project, has an aluminum cable installed, then it would be better to call a qualified technician to replace the wiring, or not to waste any parts at all.
If you are not sure that you can carry out such a procedure with your own hands, call the master. However, there are situations in which the same scheme applies to aluminum and copper darts.
Twisting in such cases is not possible. How about it? It’s really simple: choose clips and zatiskachi for such purposes.
Terminal blocks for electrical wiring in the apartment are equipped with a wide range of mechanisms that can be used to connect parts from different materials.
It is important to install such devices, and even construct them in such a way that the cables do not oxidize.

Every time, do not forget to repair the wiring and fix the apartment for an hour. However, how do you connect the tools that electricians do?
For this purpose, a special circuit for connecting the clock is developed. On a thin board or plastic strip we fix a socket and a 16 A circuit breaker with our own hands.
The doctor is sprayed with water, after which the apartment itself is destroyed.
For standard DIY repair work or replacing wiring, we need the following tools:
- grinder with a stake (either for walls made of stone or concrete, then with a special nozzle for stone);
- a hammer drill that can drill concrete;
- soldering iron;
- phase indicator;
- twists (handles are torn but insulated);
- light;
- lower for installation;
- daily rhubarb;
- spatula for attaching wiring with materials (for example, plaster);
- portable electric lamp.
In general, all the tools for electrical wiring in an apartment can be easily obtained from any master who is involved in apartment renovations.
(No ratings yet)
Tell your friends about us!