Prepared virobu enchanting kvitka. Master class “Charivna kvitka. How to make a food basket with your own hands step by step
Good afternoon, today I will find a vivant great collection of Master Classes on the topic of Paper Quits. Here you will find all the best ways to earn tickets from your paper. We use a variety of fabrics - flat and voluminous - from corrugated paper and from thick colored paper. I'll show you how to change your skin Pokrokovo in photographs and I will give as much as possible reporting instructions to the skin tissue, divided in one way or another. And also the wife stencils- Templates of silhouettes and colors. I have collected all the virobos and published them. in order from simple to folding. First of all, we will learn the techniques of folding paper papers that are as intelligent as possible (those that are easy to understand and repeat ourselves) ... and we will step by step move on to more foldable and compact instructions (to further detailed instructions) oriv and before the origami technique). And I also published a special article dedicated to various ways to earn a paper trojan - the axis of communication on it.
And also for teachers (readers and students) I made an article with simple children's skills, which can be done in classes at school and in a kindergarten with a paper and other materials:
I specifically wanted to earn money so big collecting paper tickets in one place - using this method, so that you can immediately find out the appropriate scheme for collecting tickets for the type of paper you have, and for the task you want to do with other papers their kvitiv (kvitkovy virib at mother’s gift, child’s registration National Day with voluminous flower compositions, colors of flowers, decor of leaflets or gift bags).
The only thing I didn’t write into the body of this article is ROSIE WITH PAPER. I found a way to make a volumetric trojan so rich, What I happened to bring in this article in the article on this site, that’s what it’s called “Trojands for paper - 20 ways to earn money yourself.”
Ale persh nizh proceed to the master classes themselves, I want to kill you at the very idea of Paper’s tickets. I want the quirky guests of this web site to have their hands itchy and their eyes to burn. And I want to awaken your desire to make a flower with your own hands. So that this magic fades away... so that your soul spreads its pellets and blooms...
Let's marvel at what little bits of life can decorate the card you've broken up. The main thing is that the initial table setting can become even more beautiful and harmonious with sweet butternut berries.

Also, large paper sheets made from crepe or corrugated paper are used for decorative purposes. for the design of tracts- a fun hall, a children's day, a celebratory party. They should be attached to the wall or the backs of the panels, tied to the window handles.

And the axis of such great volumes can be made from A4 paper (office format) or from a roll of corrugated crepe paper.
Photographers and photo studios also use paper to cover large areas exclusive props for staged photographs.

And you can easily earn such a great coupon from a paper - as a gift for Mother's Day, or on the 8th birthday. Your mother has definitely never given this to anyone before. It is remembered forever. And you can take a photo of your mother right away with this card - and be proud to post this photo on your page in social media.
Basic plastic combs, trims and metal pins can also be decorated with voluminous paper quotes. So we reject the dangers embellishments for haircuts for a fun or evening.

Miniature paper papers can be embellished handmade leaflets, and other developments in scrapbooking technology (like, for example, the lower brothers from corrugated paper).

Also, the paper card was cut with my own hands - it’s the most beautiful decoration for gift box. And it doesn’t cost pennies. The colorful gift stitch is richly more expensive, the lower pair of arches of colored and white office paper is a sliver of rukhi with scissors and on your packaging an orchid has blossomed from the paper or the lower erysipelas color of wild thorn.

And the results themselves can be As a unique independent gift. How to decorate your work with the appearance of a cat or a decorative panel (as in the photo with poppies from a colorful paper).

Once you learn how to make paper money with your own hands, you will be able to gain this talent in many spheres of life. It will become simple and easy for you to decorate a room for any saint, decorate your family home, or beautifully arrange gifts for loved ones and friends, or to please the courtiers who organized a great party with a master class.
SPOSIB No. 1
KVIT-PERELIKI with paper
Kviti, formed in this way, I decided to call "sharks" because its principle is the same as that leaf dough. Thin balls of flower silhouettes overlap one on one. And the skin ball is asked puffy obsessive(or faceted relief), and for the frame of which the flower looks rich and voluminous.
The axis in the photo below is the most important master class for the beginning of such a voluminous creation Georgina's cards. Georgina herself - do not confuse the astronomy, the aistry has a feminine petal and in the skin there is an edge (a raised fold like on pants).
So axis... let's respectfully admire the photo of the virobi-kvitka below. Here's a trick for the one who cuts from the paper contours of balls- the skin contour has six pellets, and is differentiated from its counterparts less in size. However, the shape of the stencil is the same - just a different size.
Before gluing the skins, the paper is scratched silhouette viginaemo The method is to give it its natural form. The gluing and folding of the paper georgyny begins kind of small middle balls to more and more.

You have a unique FOOD: And how to cut such evenly sized pellet circles-balls.
VIDPIVID: The axis itself the simplest and quickest way make such a quotation with your own hands, master of the cob. It does not require interference with the stencil template, but allows you to cut out geometrically equal pellet parts for the paper paper without any adjustments (compasses and rulers).
- Beremo arkush paper and glasses and bottles different radius. Let's circle them on the arch of the paper.
- We tear off the round skin, fold the round skin four times and again all the way around (as with twisted snowflakes). And on such a folded knitted sweater there are small circles outline two pellets (like a heart).
- We cut this contour with scissors (dazzling photo below) - we bury the ridge in the middle of the heart - we heat and remove the pellet ball.
So yak Our cola is of different sizes, so we take off the pellet balls differences by size. We set the relief, fold it all at once, add the middle part (about the parts below).

Such a delicate flower can be strung on a thread (to create a stem) and give a paper bouquet to your mother for Mother’s Day.
VIDPIVID: An original round stick (an olive or a pen, or a knitting needle) can be used as a stamp for stamping the relief on the pellets. How you can make it with your own hands is clearly visible in the photo below.
The scheme for collecting a ticket is the same as the one before (marvelous photo).

Technician has a PAPER SLUT You can work in a variety of volumetric plants (anemones, poppies, aistries, georgines, trojans). Confirmation in the photo below.
Bachite - one and the same method of "sharka" - but you will get completely different results. And all for a fraction of what silhouettes of paper's pelust balls.

And don’t forget about those that are important – not just the contour (silhouette, shape of the pellet)… but also the important RELIEF of the pellet. The relief itself correctly transforms flat outlines into lively rounded surfaces of the future flower.
For relief we need round sticks of knitwear (thin knitting needles, toothpicks, round-sided markers, felt-tip pens, small bottles of perfume or lollipop). Any objects that can help set the shape.
Place the relief carefully on a stiff paper- You may need to lightly spray it before work (sprinkle it from a remote control or rub it on a wet towel). Try it and be amazed at how much better it comes out - dry or wet.

And the axis is for you templates ready paper sheet paper. Stencils are available in several sizes depending on the size. You can right away place the paper on the screen so that it glows, and draw a circle around the silhouettes that shine through from the screen onto your paper (this is my favorite method Copy a template without any printer - no matter how many devices you use).


Or else you can do it yourself change the size of any template for help with a computer bear.
The axis of wonder is in the photo below, I give you a template silhouette. Silhouettes less than ONE size. Do you want to remove this silhouette? different sizes– to earn a multi-share ticket-virib from a paper.

To change the size of this silhouette, press on the keyboard with one hand buttonCtrl, and holding this button in a pressed position, use the other hand to turn the pinwheel - here and there. And as a result of your action, everything that is scrawled on your screen increases or changes, depending on where you turn the paddle - towards you or towards you.
Try the axle right now- Emboss and twist. Are you wondering how the image of the tiny stencil has changed its size? In this way you can directly on the computer screen, customize the template to any size And circle it with an oval on the paper on the monitor screen. This is the best way to cut out the contours of a flower stencil immediately in whatever dimensions we need.
Here are the templates for future paper colors - and you can change the size of the picture yourself. And you can design and create a paper flower with your own hands. 
And let’s talk more about the additional additions to such leafy colors.
Yak robot tichinku
at leaf colors for paper.
The axis below the tsikavyi pokrokovy lesson, de mi bachimo, as the larva for the rich-ball kvit with paper is gradually created.

How to arrange
great day
on one single stem.
And I would also like to show one more here cunning and simple trick, which allows you to earn money There are only flowers on one stem. In nature, there are often clusters of such flowers, where, without a person, the families of flowers nest in one place and dwindle underground central stem.
Such a bird itself is a vibrator and will demonstrate the breed’s master class in the photo below.
- From a green paper paper (or cardboard) we draw a copy of the stems from a round base. The round base is glued with double-sided tape.
- We twist a tube from newspaper and wrap it in green paper. We glue the tube-stem to the round base - twisting it around the stem.
- Robimo kviti (with two red balls and one black egg). The skin patch is glued onto its stem. A wider leaf is glued to the central stem-leg. Come out even better with a stem-bouquet from paper.

How to earn a leaf ticket
WITH ASYMMETRICAL pellets.
And the axis in the photo below is based on the shape of the balls to create the ORCHID paper paper with your own hands.
At the bottle with water bred green farbi droplets- We remove light green water. When wetted with this water, the white parts of the orchid turn white-green (just like in nature).
Dali while the pale green pellets are still wet, apply lines of violet paint on them - on wet paper, the lines themselves spread slightly - the staining appears unevenly (exactly like a real orchid).
The middle part of the orchid top ball It’s also very green... and along the edge (right along the paper’s cut) it’s bright purple. In this way, when the upper ball is raised up, the violet edges of the orchid are washed away with their color.

They follow the same principle Various asymmetrical bubbles. Guess what, the flowers don’t have circular symmetry around their calyx... that’s right, with PANSY GLASSES (photo below).
- Nizhny blue ball pelyustok (2 pieces in total, located at the top side).
- Then Blakitnyh ball pelyustok (also 2 pieces, split on both sides).
- І third top ball in sight just one white pellet.
- Then we smear the central part of the flower and paint the central rice with olive oil. From a crumpled paper, we are very careful to eat bags of larvae (or plasticine).

It’s simply virib, made with one’s own hands, so as to give birth to a child. Behind the head, prepare the templates that the child traced on the colored paper.
Volumetric ball bowl
from a thin paper.
Such acceptances as “various sizes of balls” and “work from a curved relief on paper pellets” work only if you choose the most HIGH COLOR PAPER
And from yakscho If you are making fabrics from CREPE, CORRUPTED, CRUMPED PAPER, then you don’t have to put the relief there. The very texture of the paper allows you to create a fluffy volume.
Moreover, The corrugated structure of the paper allows you to avoid fussing over the selection of RIGGY-SIZED BALLS. Tobto All balls may vary depending on the size. The axis of the Maister-class from the paper colors is lower precisely to bring it down.
Are you bacita? All balls are the same size. The middle of the balls, folded in half, is pierced with a hole punch (either with a needle and thread, or with a stapler). We warm up the flower and fluff the balls into a fluffy pom-pom. These are very beautiful great paintings from the paper.

This is perhaps the simplest and fastest way to make a card with your own hands. The wine will come out great, rich and flamboyant.
If we select a set of two colors - and apply them to the different colors, then we will remove a group of patches from the skin, and our patch will become similar to a triad.
Bachite, on the way below from the servers of two colors, however, the same silhouettes are created (behind the shape and size, like twin brothers). At the bottom we place a piece of cardboard with two holes (like a cord... however, the cardboard can be replaced with a cord). And the threads are inserted into the holes and the serving balls are passed through. We tie a knot in the middle of the flower - and with our hands we unravel all the corrugated balls into the bowl.

Think for yourself how you can understand and supplement this wind-servet quota. Can you add more color by region– for this image, mark the servet silhouette with a marker at the edges.
Unleash your imagination... and let it play around with the servers to its heart's content. Due to shortages, no one gets tea in serving dishes. And together you will publish your author’s vlasna.
And cut red cloves in the same way. Also cut from the serverets are new round ones with a toothed edge - and deep cuts on the pellet parts. And then they simply put one on top of the other with a dot of glue in the center... or replace the glue in the center with a stick (it will be a stem. A beautiful do-it-yourself vibrator for the 23rd anniversary of the Great Patriotic War, or for Grandfather’s Day of Victory.

And exactly behind this very principle, like carnations (on the bud crop) and double Lingerie daffodils. The axis of the stench is like nature - food and volume.

Spring flowers with paper - a sweet gift for mom on the 8th birthday. And now you discover how easy it is to make them with your own hands.
The first axis can be produced from prefabricated paper servers. We place a stack of servettes one on top of the other - folded into quarters - with a trikutnik - cut with a serrated edge. We cook the top servings in a bright yellow color, and the middle balls of the servings in a light yellow color, the bottom ball is filled with white.

Now about the material. Daffodils are gorgeous, you say, why should we take such colorful papers (blue yellow and bright yellow)? Here, I’ll tell you, there are just 2 ways - 1) prepare white paper servers from 2 shades of yellow... or 2) remove the pale yellow color from a bright yellow corrugated crepe paper.
INSTRUCTION No. 1. How to prepare a white paper server.
VIDPIVID: The serveret is prepared in a flattened form with prepared water. Place a glass of water and illumination on a plate set out beautifully. Check out the natural hanging of the servet (here you can get it).
INSTRUCTION No. 2. How to create a light yellow color from a bright yellow corrugated paper.
VIDPIVID: We take a crepe yellow papier - we put it on a wet towel - we put a dry white serveret for the animal. Ironed with sand - bright crepe papier gives its vola to dry servet, and at the same time the vola gives the color and texture. And we are already rejecting the PALE-YELLY crepe papier. In this way we can change the colors of the corrugated paper.
As you see, everything is going wrong - How to turn on your head and think and try to experiment. Zannaya often comes along the way (to say that this way is braided). One recent piece of evidence can be the source of many ideas. I somehow wet the crepe papier, sealed the virob - and then realized that when wet, the crepe papier loses its color. And once I spilled water for mitty penzlik on a paper server - and it sank into the lower color. So, for two reasons - I took two steps to change the color for delicate and subtle paper textures.
Well, that was all just about the first method of making paper papers with your own hands. I specially made this first section of our article so intense and reportable, so that you would immediately understand the simple and important truth:
In one single way you can have multiple extensions...numerous options...endless designs. And you yourself can become an author - and create your own card with a paper, a wiki, all in the same way of “curly balls, superimposed one on one” ».
Now let’s admire the easy way to make flowers from colored paper with your own hands.
SPOSIB No. 2
Kviti from paper
TWIST THE TUBE.
Through this method of creating relationships we know from childhood. All of us at school and in kindergarten were taught the classic quizzes. until 23 February - red cloves with crumpled crepe paper. They twirled the paper paper around a toothpick, wrapped the twisted paper in a small piece of green paper, and fluffed out the bunch of flowers.

And it never occurred to us that in the middle of this primitive method there is a recipe for more than just a modest clove.
This method " twisting crepe paper into a roll" You can get very different volumetric and flat surfaces. Everything should be left in place since we changed the shape of the edge of the paper paper. It is important to note the differences in the design of the paper paper.
Axle photo proof. Are you bacita?
Razny edge gives razny kviti- Rozpatlana aistra, neat chamomile, chrysanthemum. You can work against Trojans in this way (also about Trojans in addition to the statistics - report and report as well as to identify the Queen of Kvits).

And not only from soft corrugated (crepe) paper can be used to produce a roller in this roll technology.
The axis of the weasel in the photo is lower - the butt of the paper's kits roll rolling techniques FROM ONE-TIME COLOR PAPER (office double-sided color paper).

There is a simple operation and very simple instructions.
- A thin piece of paper was wrapped around a thin thread (or a toothpick) (so that the middle of the thread came out).
- And then, to this rolled center, they added a winding of a wide stitch, which was already cut along the edge into pleats.
- And the pellets push up the ubik - like a parasol-rose.
AND BY ADDING THROTTLE TO EXPERIMENTATION WITH SIMPLE TWISTING TECHNIQUES, NEW DESIGNS OF PAPER QUIETS CAN BE DEVELOPED.
For example, if... So, don’t just move the peles to the sides like a flat daisy-like rosette, but lightly twist the tip of the skin peel in the middle (as if we were emphasizing the curls of a Frenchman) - and we can now remove the voluminous plumpness of the ASTER.

How about... create a twisting machine with DIFFERENT WIDTH BANDS. The idea of what we have in mind can be seen in the photo below.
- Vuzka smuzhka (1 cm wide) for the middle part (wound in a tight roll on a toothpick).
- Next, on this roll we wind a pellet fillet (with a cut edge at the fringe) 2 centimeters wide.
- And then we wind a pellet tie with a width of 2.5 cm.
- and gave a pellet mixture 3 cm wide.

And depending on the different width of the folds, we remove the roll, in which the height of the pellets increases from the center to the edges.
If you are familiar with this simple roll technology, you can and will need to do some EXPERIMENTATION. We will continue to desire our complementary mind and our desire for one more dashing idea.
WHAT YAKSHCHO, cut the fringe not straight, but with a cut. And what is it... cut the braid fringe not along the edge ZРІЗ, and along the edge of the FOLD (then the fringe is bent all the way around the edges, and the whole line of the fold is cut obliquely into a fringe, and then twisted in this way).
The pouch in the photo below is a marvelous aster with split perforated petals that spirally twist. This is a beautiful flowerpot – it looks like a folding robot, and it’s easy to make with your own hands.

Such kulta flowers with oblique pellets can be used as a kulta flower for other colors.
The yak axle, for example, has a master class in the photo below. Are you bacita?
There you will also be working on cutting the curved stitching along the slanted fringe... and the orange shaggy head will be created - required for decorating the center of the paper istri.
Before speaking, the paper’s aster itself from the photo below will try to use a very original method in its simplicity.
- The basis of aystri is tse sharuvannya (richly-promeneva zirka with cut prominchiki).
- The skin of the ball is folded with a slate line into the line (like on pants).
- The balls are placed one on top of the other - we remove the pile.
And the axis itself in the middle of this volumetric flower is made using the OBLIQUE FRINGE technique, as we have been so fondly told about.

This roll technology is possible follow the initial pellet balling (Method No. 1 with this statistic).. So - it is possible - because it is common in nature. God Himself came to this idea - and created the cult of Oxamite. And this is the method of attaching the roll and printing it on the paper. (Watch as shown in the infographic below).
At roll technology The fluffy center of the flower is curled up. And in the technique “Ball» The lower part of the black-shaved quilt is made from paper (patterns with five-fold silhouettes). Photo instructions for folding the card are below.

And the axis of the spinner is where the main-middle is assembled using the roll-twisting technique and 2 velvet balls. Before speaking, you can create large sheets of A4 format and stick them on the wall - and your living room will change. Buy a pack of red office paper at the stationery store and buy it from an interior designer. All neighbors will fall in love during the burial.

And the axis of the roller-kvetka technique of the roll is also stuck together to create the fluffy flax, and the fluffy pellets are simply glued adjacent to the lower balls of the fluffy fluff.

Great dormouse flowers emerge from crepe paper.
Using a similar technique, a ROLL-BUNDLE + SPECIAL PLAINS is used to make a daffodil flower and a flower with your own hands.

And the axis of this kvita is either buzka or salyu - with a long stem, it also exists in the roll technology.

Well, well, this is the primary roll technique, with this difference that the paper paper is not rolled into a tube, but wrapped up with a spiral roll on a long stick.
The axis in the photo is lower than the master class of this printed paper book.
- A wide range of crepe (crimped) paper cut long fringe.
- Fringes are tanned with a toothpick(or a knitting needle) - and the curls are pulled off along one edge of the stitch.
- We take a long wooden skewer and wrap our paper stitch with curly fringe around it - the wrapping begins from the upper end of the wooden skewer and go down the spiral.
- I'm timid under the card green wrapping of a skewer stalk And to this stem we glue wide green leaves.
Kviti Trojandi with paper
Zgortannya method.
With a roller machine, you can quickly burn a paper from a paper. Before Paper's Trojans, we'll be okrema statya. I’ll give you two Master Classes right here - because of the stinks of the roll-roll technology of the creation of kvitivs.
Axis first porokovy meister-klass troyandi z paper. Here, thick papier is used and so that the pellet parts reduce the geometry of the horny pellets, requiring thick paper smudge, in the process of collapsing into a roll, crimping and twisting towards itself.
And don’t lose your respect even a few centimeters… Just take it the very essence These are the instructions. Place the paper on the paper and try to twist it into a three-piece, just folding the paper as God pleases - the paper itself will show you where to fold and turn it.

You can find plenty of other options for creating a paper trojan from different types of paper in the statistics
І axis one more way Burn the paper roll so that you look like a Trojan. For such a roll, we need paper paper that is not straight in shape, but to create paper paper in a spiral shape.
For whom is it enough? paint a rayon on the cardboard(krivu nerіvnu, not important yaku). This spiral is painted and will be the template of our paper card.
Now this is a whole line-spiral it is necessary to verify and then start twisting the roll NOT FROM THE MIDDLE OF THE SPIRALS... but rather WHICH EDGE. And in our hands, Paper’s Trojan will appear by itself.
My pleasure, don’t take a slimy glossy papier for such a Trojan viroba.- Such a spring trojan will strive to turn around, or the stake of the spiral will slide out of the box’s bed. It is better to choose a short paper or not too thick cardboard - so the Trojan will be more beautiful and trim its shape.

Kviti from paper
Method No. 3
At the POMPON technology.
And this is the best way to create a fluffy voluminous blanket. You can use the “pom-pom” technique - from corrugated paper
This technique is good because it allows you to quickly produce large quantities of paper - just like crepe paper is sold in large rolls (like trellises). And a leather roll can be turned into a large canvas for decorating a saint.
The master class in the photo below shows how to make such a beautiful paper card with your own hands. Widely (20 cm at the end of the stitch) fold a number of times, so that a lot of balls can be found. The folded stitch is cut into a fringe from two edges, the middle is cut whole.


We fluff the fringe of the flower on all sides - trying to form an ideal stake. And the central part of the flowerpot is decorated with a breast of black paper - and the resemblance of the flowerpot to a splayed poppy is noticeable.

As you understand, the height of the pelusts lies below the length of the fringe. And the shape of the petals lies below the shape of the fringe.
The axis below (Master-class paper paper) is made of anemone exactly in the same pom-pom technique. The difference is that we have changed the shape of the fringe a little - it’s not a cut-fringe, but simply a garish, figured pellet edge of the serving.
As a result, the fluffed flower becomes no longer a poppy, but a delicate anemone with paper.

Or you can do it all do not change the shape of the edge- so they asked him not to cut or wave. Add equal parts, just like in the servery. Lightly fill it with a marker.
And in this technique, we make a pompom with our own hands. They pressed it with a dart, folded it in half, fluffed it up, and cut off the cloves on the dart knife.
Lost adding elements from green paper – kvitkozha(Wrap the toothed roll around the bowl of the kvitka), stalk(Long green wax for wrapping the bottom of the flower), leaves (oval ones glued to the stem).

You can also make a double-color pom-pom like this with a different color in the middle (div. photo below). For this we need paper coats of two colors – one wide (stowed), and the other twice as long as a cauldron (black).
To prepare the fringe, we cut the wide fringe into a double-sided fringe (or the edge edge on both sides), then the edge edges on both sides and on the narrow fringe.
To create the Veserunkovy pelustkovy edge- you need to fold the mixture into an accordion (as in childhood they worked) and from both sides of the folded one a rounded shape was drawn with scissors.
Then I'm burning up my husband's hearts and put in some dark black juice to the middle of the wide Zhovti smuzhki. We fold them again like an accordion (now double-colored).
Translated by the motuzok or with a dart. And unfold the sides with a stake - the cup is closed. For the flowers, the center of the flower can be decorated with crumpled paper or cut fringe, glued between the blades of the black center.

And the master-class axis shows how to make a paper pom-pom with a fringed pom-pom with your own hands (photo instructions below).
The principle of creating this flower from a paper of two colors is the same as in the previous master class. Only here the middle border on both sides is swaying like a fragmentary fringe. Here's another way to make great profits from crepe paper.

Method No. 4
Kviti from paper
Twisted on the knees.
And this is another way to make rolls from corrugated crepe paper.
To make such cakes from paper, you will need wide short pieces of crepe paper and balls of different sizes (chupa chups, balls). We place the ball on the crease and wrap the ball around the crease on both sides - we twist the tails-ends of the crease into a tight rope. Carefully pick up the ball, making sure not to crush the inflated pellet template. We make a bunch of these pellets and collect them from the flowerpot.

Using the same principle, cut round crocus petals from corrugated paper (photo below). Here you need a paper coat that is already doubled - it is placed on the butt with one half of it. The other half twists at the top of the bun and goes back behind the back of the bun and lies on top of its first half. A rounded pellet appears.

If you fold these pellets close together, you will get a cup of closed crocus flower (as in the photo below). Vіdmіnna virobi-kvіti on 8 bereznya for mom.

With crepe corrugated paper you can make even more bouquets. There are also bouquets of cherry blossoms.
Method No. 5
Kviti from paper
At ORIGAMI technology.
And now let’s talk about folding tickets from paper - without the pain of cutting with scissors. This is about the mystique of origami.
The first model is kviti with conical pellets. The axis of the stench is as red. The skin texture of such a patch is made from a simple square of paper. Simple technology has origami.
All the ready-made petals are glued one by one - and a beautiful rhinestone stone is applied to the center for gluing.

It’s easy and quick to make these kind of fruits yourself - and they look really bad on the gift packaging. You can use them to decorate the Yalinka.

As soon as you pick up a paper square and marvel at the master class below, you will immediately make the same paper. It’s very simple - you start working and understand everything along the way. And it’s amazing that no one can start a child’s day care – everything is so simple and accessible to the common people. After the 10th module, if the entire scheme of the card has already been selected from your account, your hands can start working as quickly as possible – automatically.

If you take a roll of one-color trellises in a piece of paper and cut it into large squares, you can cut large squares to decorate the hall or decorate a home celebration.
And also through those that have the shape of a CONE - they can be collected manually into one big bag. I vikoristuvat it like a suspension. Or like the crown of a decorative tree (with which you decorate the fun).

And the axis of the master-class of the great latten and folding techniques with paper without visage.

And this is a simple method, where the pellet modules are prepared side by side, and then the skin module is not glued, but is simply inserted into the grooves of the seat module.
Such paperwork, made with one’s own hands, can become a miraculous remedy for whatever life throws at you. You can now practice paperwork with a variety of techniques and teach children. You can use these ideas to decorate the holy place or to keep your hands busy. Such entries will be suitable as candidates for the Spring competition at the school or kindergarten. Or these flowers can be a gift on the 8th day of pregnancy for mother - a bouquet of paper flowers made with your own hands.
Lots of simple ideas for children's questions on the topic of quality you will find in our other articles:
Far away your virobivs.
Olga Klishevska, specially for the site
Danish self-tutor from quizzes from paper vikoryst photos from the following sites: http://www.wikihow.com http://www.instructables.com http://tipnut.com http://www.twopinkcanaries.com http:// www.marthastewart.com http://vivatunisie.com http://www.linazlina.com
A worldwide selection of gift ideas for whatever the occasion may be. Hello your friends and family! ;)
I fly, dear readers and guides! I have already written more than once that I really love decorating gifts in the most unusual ways. And today I encourage you to earn paper tickets with your own hands. As many as twenty using different methods, among others.
Now, unfortunately, I rarely get around to mass gift wrapping. It’s more likely that with skin cancer, more and more acquaintances and friends appear who need to be greeted among others. It's so happy! I love giving gifts. If I choose them carefully, I always pack them with organzy bags, because I pay less attention to detailed packaging on the occasion of the Holy Day (on the occasion of National Day).
However, it’s difficult to overcome my addiction to a different kind of packaging beauty, so today I’m working with you to work on a beautiful skill behind step-by-step schemes.
Do-it-yourself paperwork: simple and clever
Master-class will be ready, get ready. A good news for all lovers of Trojans: there will be as many as 4 of them.
Aster
Ditlakhiv, honestly, I’m not that good at naming quotes. Also, if you notice something that is obvious to you, write in the comments.
Ozhe, persha na cherzi aistra. For her, there are five pillars: two large, two medium and one very small. Fold the leather circle in three layers, then shape the edge as in the 4th photo. After opening the structure, squeeze the skin pellets to create volume. Place all the stakes one by one and decorate the middle.
Maje calendula
This card is much more similar to a wrapping bow. Prepare a square of paper for the required amount of time and cut the edges together in step 2. You will need a splint of such blanks. Place them one on top of the other and squeeze at the center, tying them together with a dart or thread.
Now the most important thing is to straighten the pellets so that a garne like a cake comes out. Obviously, the more balls, the more pellets and the more colorful the flower as a result.
Please: make a bunch of these flowers of different sizes and glue them on the packaging one by one, then you will get a similar bouquet.

Calla
For the creation of calli, you can use both the original double-sided papier and the backed rubber (the axis wrote that this is also the case in the section about mignon).
For calli, take a hymen (can be taken from paper or molded from polymer clay) and a petal, shaped like a heart. Place the larvae in the pellets, burn the edges of the pellets over the larvae, gluing them one by one. Only the edges were turned up in order to maximize the resemblance to calla lilies.
Such flowers are good for decorating leaflets, packaging, and as a gift in the form of a bouquet.

Dzvinochok
The master class for a teenager is very simple and intelligent. Arrange the workpiece correctly from the first photo. Glue the edges together and carefully straighten the ends. To make everything look natural, make a center from a few thick larvae, which you will need to glue into the middle of the flower.
From such jingles, before speech, it will be wonderful to decorate the packaging for the 8th Birth or just spring National Day.
Convalia
Well, it's similar. For one flower, take a long straight cutter and bend the edge, as in the photo. Cut the wide part so that there are no small wrinkles. Use a knife to twist the edges (for this you need to run the sharp side of the knife along the edges, lightly pressing the blade against them).
To ensure that the card does not fall apart, take a haircut and wrap the green thread around it. Then the animal begins to carefully tighten the “knit” part, which is coated with glue in front. Place the balls thickly so that the greenery does not show through behind them.
And it’s not at all difficult to create an axis of green leaves - for them, just fold a rectangle of green paper like an accordion and trim the edges with a “trickle.” When it burns, you pick off a bunch of green leaves that are ready to be glued to the base.

Poppy
Now let's start corrugating the paper. Place around ten droplet-shaped pellets from it. Stretch out the wide part so that the mushrooms are prepared.
Take a thin piece of paper and wrap it around a piece of paper - this will be the core. Wind the pellets around the core so that the skin parts overlap the front one. Once everything is ready, the structure can be pulled together at the bottom so that it doesn’t fall apart.
The Master Class shows how this card can be attached to a Christmas bag, or on a gift box that looks wonderful.

Chervona kvitka
Does the yak axis belong to a new species? Life's associations never fell asleep. But that’s not the point - for its creation you will need about ten pelusts (Vikorist says, before speaking, corrugated papers). Their shape is perhaps dot-like. ale with the cut end.
Make a colo-base from cardboard. Glue all the petals into balls until they form a stake, lightly overwinter (starve? God, how right :_D) set them up, creating folds in this way - then the flower will be more voluminous and “fluffy”. Decorate the center with yakimos with gudzik or nastinka.
Such a little flower, by the way, looks wonderful from the soft felt - so it will last forever. And if you attach the base for the brooch to the back, then you get two in one - the decoration of the gift and the gift itself.

Extravaganza of colors
There are only two cards here, but for the sake of brightness, even an unexpected effect can emerge. Take the corrugated paper again, twist it around and burn it into a “flying” shape. Before that, cut the spidnichka to wrap around the doll. Attach pellets on top, gluing them along the stake. At the base, glue two wide leaves.
The other one is even simpler - cut the fringe and roll it into a bunch of balls. The flowers are very simple, they can be used as a gift composition.
Nebachena kvitka
To prepare the basis for this eggplant, please look here - here for another eggplant the basis is created in the same way. And then the work begins - the skin from the bundles needs to be tanned with additional heavy traction or knitting needles so that a spiral comes out.
You can use one such design, but I suggest you connect a bunch of (say, three) pieces with the help of obvious spirals - the wow effect of security. You can also experiment - connect elements with spirals in a variety of designs shares.
Porada: going to a Japanese-style party? Then make such a very large flower pot and drink it from yourself - serve as a wonderful decoration for a chandelier.

Pivonia
“Pio-, po-, pivonia gives new knowledge...” - words from the song of the underground group “My Michelle” (I still often hear it, inspired by it). Maystruvatimemo z corrugated paper. You will need five sizes of peles, approximately five copies each (the current appearance is as in the photo).
Stretch the petals so that it looks like a conifer (both for the big ones and for the little ones). Then, from the same corrugated paper, form the ventricle with the throat of the paper with further narrowings. You can work on a sharp skewer, or you can do it without it.
Glue the pellets onto the finished larvae, crossing the front of the skin. Do not tighten the pelvis too much. At the end, just cut the green leaves and stick them on the tree.

4 in 1: kulbaba, cloves, aystra, chamomile
All these miraculous creations of nature follow one principle - cutting the edge of the cream, from which the flower is formed. Place the end shape of the knuckle under the cutting shape. Ensure that some people need pith, but others don’t.
Increase your respect: despite the simple design, the figures appear even more realistic. Since there is very little preparation time, this is an ideal option.
Experiment and reveal your wild growths – you’ll be sure to tell us what happened.

Troyandi with paper
Charming Trojans are one of my favorite colors
Trojan with a twisted edge
The trick here is to carefully twist the edge of the corrugated paper, straightening out the folds. Make sure that the folds are even. Now twist the tie so that the balls fit snugly one to the other. At the end, secure with thread and cut.

Just a Trojan
Is it necessary to earn rosewood for five khvilins? This Trojan is definitely for you! Just draw a circle and paint a spiral. Shape the spiral as in the photo and twist the thread, starting from the found spiral strap (the central part becomes the stand).

Great Trojan
The story is gigantic, as it follows its own dimensions. The heart-pellets are stretched out and placed one on top of another along a stake secured with glue. Finally, green petals are attached. Of course, it is not necessary for the box to work as big as in the photo - be aware of your achievements.
Paper's Trojan is twisted
If I have already described this method of creating a Trojan (friend's axis). The principle is absolutely the same, except for the size of the knits, which comes out when twisted, it must be the same throughout the whole line, otherwise the knit will not be very neat.
As soon as Rosemary's little doll died, she took her fate from the Mishka's exterminator. The whole body was covered with three-pieces, cut up in this way (the three-pieces were made in this way, it’s true).

Konyushina
I'll show you just how to build the foundation for a four-leaf stable. To do this, take a square of paper and fold it in half and again in half. Fold the ends to the center. With the cut-out design you can see the heart. As a result, you will get exactly what we wanted - a lucky ticket.

Nameless
No matter how much I was getting excited, I couldn’t even give it a clear name. As a result, I lost the product from just a garnished card, which recalls the motives of kanzashi (the Japanese art of embellishment with satin stitches).
The cob here is the same as in the stable. Also, after bending the edges, it will be necessary to bend the ends so that the edge of the folded part reaches the bottom of the sides that can be seen in the middle. Then the parts are straightened out and the ingredients are pushed to the edge so that the sides are even. They are bent again and glued together so that three larvae emerge. There may be three such pellets.
This kind of card is best suited for decorating a gift in Japanese style.

I call the aster
Once again you need to glue the pellets along the edge, until you can’t reach the required material. Decorate the center at your own discretion or simply add as many beads as possible.

At this point, I’ll close my eyes on this great kvitkovy look. I hope you have found the very option that will help you decorate your gift in the best possible way. See you soon, subscribe and share with your friends!
Best regards, Anastasia Skorieva
Municipal lighting installation for additional lighting for children
"Boodinok of children's creativity"
Outline of an outdoor activity
preschool teacher
Deputy Victoria Valerievna
Virib from paper
“Charivna kvitka”
2015
SUBJECT: virib from the paper “Charivna kvitka”
META ACTIVITY: Formation of children's interest and need to engage in paper modeling.
Basics: dates of secret statements about the paper and paper modelling.
Developmental: acceptance of the development of cognitive interests, creative abilities, spatial manifestations and coordination of the leaders.
Vikhovat: vikhovat up to your history; You need neatness, organization, neatness.
EQUIPMENT AND MATERIALS:
Ready-made material from colored paper (for buttstock), glue-olive, ready-made parts from colored paper, colored cardboard.
DIDACTICAL EQUIPMENT:
A set of ready-made parts from a colored paper.
Slovesny – front rozmova.
Firstly, a demonstration of the characters.
Practical – independent robot with a set of ready-made parts.
Self-monitoring and evaluation of the constructed robot.
Reproductive – prepared model behind the scenes.
ACTIVITY PLAN:
Organizational part. (2 episodes)
Awareness of new material. (5 khv.)
Consolidation of what has been completed (5 steps)
Practical robot. (15th century)
Suitability of pouches. (3 episodes)
HIGH ACTIVITY:
1.Organizational part.
Good afternoon, guys. My name is Viktoria Valerievna. Today we are getting to know the marvelous, enchanting light of a flower that will help you greet your mothers.
2. Familiarity with new material.
It is important to note that the Russian word papir is similar to the Tatar word “bumug”, which means bavovna. It is clear that for the first time the people of Russia became widely aware of the paper in the middle of the 13th century, when Khan Batiy, in order to collect tribute, completed the first national census of the population of Russia on the paper, which at that time was acquired from the Pivnich conquered by the Mongol-Tatars nomu China. The prepared paper will be tied to the Chinese Cai Lun and will last until the 105th century of our era. Prote papier began to be produced in China even earlier. Tsai Lun's method of allowing vikorism to be used for the production of paper, be it the grown-up ore and come out; bast fibers of mulberry tree and willow, bamboo pastures, straw, grass, moss, seaweed, all kinds of ganchira, hemp tow, tufts. Due to the simplicity of production, the variety of raw materials and the cheapness of hand-made work, the papier has developed a very unique importance in China. In Europe, the art of paper production passed from the Arabs in the 11th-12th centuries, first to Spain, Italy, France, and then to other countries. In Russia they started to work much later. And the information that the paper of the ancient history of Russia was written in the mid-16th century for Ivan the Terrible. Pushing forward to the development of paper production, in Russia gave Petro Pershiy. In a big step, before the development of paper production, wine was removed from 1670 people in Holland for grinding paper pulp, which was approximately 3 times more productive than the bulk of the production. The first paper machine in Russia was manufactured by Russian craftsmen at the St. Petersburg Livar Factory and in 1916 put into operation at the Peterhof Paper Factory. Nowadays, paper machines have contributed to the remaining achievements of scientific and technological progress, as before, as a sign of a highly productive machine.
Fizkhvilinka
Tse is the right hand,
This is the left hand.
Right-handed - galasliva dibrova,
Zliva is a Swedish river.
Turned around us, and axis
Everything became a mess.
Zliva - galasliva dibrova,
Right-handed – Swede River.
Nevzhe became right
My left hand?
3.Practical work.
We can make such a special gift as a gift for mothers.
We took a piece of colored cardboard and folded it in half - this is the basis of our leaflet.
We cut leaves from green paper - 4 pieces each. on the skin of the robot. From the yellow paper, cut the smuga 1.5 cm wide into pellets.
The skin pellet is folded over and glued - the pellet is ready. For one kvitka there are about 15 pelyustok. Glue the petals to the leaflet.
For the middle of the kvitka, take a 2 cm wide rye (some contrasting) color, cut it to the middle throughout the whole smudge, burn it, and glue it - our charming kvitka is ready!
4. Consolidation of what has been covered.
How did the papir appear?
Why do we need a papier?
Why was the first papier formed?
Who contributed to the development of our country's paper?
What material is needed to create a charming book?
5. Reflection.
On the table there is a pellet of yellow and red colors. The yellow color is a lesson I didn’t deserve, the red color is a lesson I deserved. I will give you cardboard on which, in the shape of a daisy, you must stick a pellet of the color you need.
Would you like to find out how to make paperwork with your own hands? You got caught at the address! 🙂 Here we have prepared for you a wonderful selection of photos and master classes, including new 2019 rocks, distributed at a different level of mastery: for the beginning and even more advanced masters. You can also use paper to make both simple ones (children’s eggs) and folded ones, which do not differ from the ones you need.
First of all, you need to decide what kind of paper and what kind of technology you plan to use for your viruses.
Let's look at all the possible self-reported paper reports. Inheriting baby photos from master classes, as well as videos from YouTube, you will learn how to make the same beautiful 3D cards as a gift for National Day, 8th Birth, Teacher's Day or compositions for decorating a hall, classroom, room, photo zone decor and Others are considered holy .
Kviti from corrugated paper
Corrugated or crepe - this is the name of a thin pressed papier, which prevents the slaughter of the virus. The good thing about this is that the elements of the flower can be worked with voluminous, lightly pink fingers, microfolds of texture, and the flowers come out with curved petals.
The simplest card made from corrugated paper:
Pansies, buttercups
Cute and awkward zhovtsi and brothers: To create field flowers, you need to make new pellets, which are combined and secured with a dart or glued to a wooden skewer, the stem is wrapped with a piece of green paper.


Troyanda ta shipshina
The simplest virus - Trojan with corrugated paper What is the power to tell children.
From the red paper to be attached, we make 3 stakes, place them one on top of the other, then burn them into a cone, and staple them with a stapler approximately in the middle. Then we turn it halfway and straighten the pellets. Place on a skewer and wrap it in green crepe paper. We glue the leaves. A simple Trojan girl is ready.


The axle looks like this: Chervona quotation:

Volume Trojans It would be nice to say something like this:

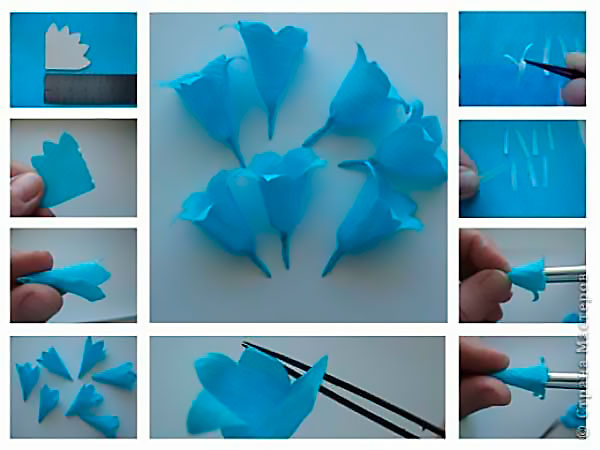
Just a little triand for 10 rubles (how to get a ticket for a paper -):


"Troyandi for Mami." Khristina Matishina.
Made from corrugated paper.

І report instructions on how to make a cat out of squash with your own hands.
This garniy bouquet comes out:

Hyacinthi
Spring flowers from paper. hyacinth- also the simplest words.


"Flowers in a vase. Hyacinths from corrugated paper." Senior group No. 5 MBDOU No. 267 m. Izhevska. Vikhovatel Kochurova G.V.

Pivonia

Garniy and naturalistic pivonia come out of the corrugated paper: to remove large volumetric pellets, place the white piece of corrugated paper on a cup, spray it with water from a spray bottle, and straighten it into the shape of the cup. We add yellow and rye farb and let it dry. We take the heartwood ready or from yellow crepe paper and cover it with our sweet pellets.
The applique “Cat of Pivonia” is a very voluminous leaflet.
Narcissus
Narcisiі lotus —


Please note that the technique of folding colors is the same, but the shape and number of petals for all vary, this photograph shows the patterns of the petals and the shape of the core of the different petals:

It is easy to make such stencils for marking with your own hands.
These simple letters were sent to us from a paper by Tetyana from St. Petersburg. The technology of preparation is cumbersome, but the bouquet of this child’s bird looks miraculous.
Carnations from paper by Masha Shevtsova.

Veliki Rostov Kviti
Great kvitas made from corrugated paper look simply chic; with them, a grown woman can look like a Thumbelina. You can use it to decorate the hall with your own hands, photo zones for taking beautiful memorable photographs, you can hang it on the wall or give it to the local area. How to make volumetric growth pots with your own hands is shown in this video:
Just giant Trojans:
The best option is great, or simple, flowers that can be hung on the wall of a photo zone:
As you see, the size of the colors is not the same as the size of the paper, and from the great paper come real giants.
Little flowers
You can also make miniature charming spring bouquets - apple and cherry flowers. z corrugated paper:


horny buds, blueberries, motherfuckers,

krokushi and daffodils,
small poppies, hairs,

forget-me-nots... Everything lies only in your imagination.


I'll give you a ticket for some lollipop
Using a small bag (we took a lollipop), you can cut out a fancy bag with even sweet pellets to trim the shape, just coat the ends with PVA glue so that they don’t unscrew.

We cut out 5 squares of corrugated paper and wrap them around the lollipop, so that the “tail” extends from one side and the bottom from the other.


For the heart, we fold a piece of red crepe paper several times, and cut the ends - this is the “prime”.


We place the core between the long ends of the pellets, and we wrap everything up to a stick-stalk. We wrap the stem with green corrugated paper.

Looks like such an original little pot with sweet pellets.

Proliski
Lower first spring flowers of the scaffold


Bathing suit
Nizhni Vogniks (swimsuits). For pellets, you need to cut a bunch of new stems, in which one edge curls into a tube, and the other expands and bulges. For the core, the paper is cut and rolled into a roll. Before speaking, how to make a bathing suit from foamiran, marvel.

Chrysanthemums, daisies, carnations
All master classes are made from the production of these colors from the attached paper on the opposite side


Dormouse
Virib from a sealed paper and a reference paper. :

Poppies
Charivny kviti - poppies with crepe paper.
Krokushi
Crocuses are spring flowers, so it’s very common to pick them up before 8 p.m. You can create a simple and cute bouquet of flowers.

Kviti from corrugated paper with tsukerki
Miracles come out of the gofopaper
The simplest child option tulips with corrugated paper with tsukerki. On the 8th of February, we decided to grow tulips for our lovers, as well as spring flowers. Truffles were selected from the sucker, and the stalks were tried to be cut without skewers. For what we needed:
- thick double-sided paper in green color,
- corrugated paper, red color,
- red threads,
- glue (stationery or PVA),
- as well as packaging material for kvitivs and stitches(The bouquet must look like it was correct).
For the stems, we cut green papier into slices and twisted them into spirals.
From a red corrugated paper were drawn pellets of a constricted shape, pointed on one side, six pieces per skin. Using your fingers, you carefully pulled out the fibers in the middle of the pellet so that the wicks were slightly puffed up.

The stems were inserted into the spiral, twisted tightly and glued.

Then they burned the tsukerka with pellets, like a true tulip - three in the middle and three in the middle. To avoid fussing with glue (such a thin paper with rare glue, one might say, tane) we simply tied it with red thread to match the paper.

From the green paper we cut leaves, similar in shape to the long leaves of a tulip, and glued them to the bottom of the stem.

Two more of these little flowers - and a ready-made bouquet. All that was left was to burn it with spit and tie it with a stitch.

The tulips are ready from the paper, three bouquets came out.

You can bring it to the cage and hand it over.


Simple clove
Another option for making a card from corrugated paper without glue is to thread the edge of the paper onto a thread, like a pompony, but here you need to be very careful so that the thin paper doesn’t tear.


The result is a little flower of cloves - quick and easy.
Kviti from servers
Just shy away virobi - kviti from paper servers.
Such experiments are very simple and easy for children. Photo and description of Yermashevoy Oleni about those how to earn money bouquet of serverets with your own hands.
For such an original bouquet you will need:
- paper servets: yellow and rye color (35 pieces);
- bamboo sticks for barbecue (13 pieces);
- PVA glue;
- bronze acrylic frame with sparkles;
- farba green color;
- penzlik;
- knives;
- felt-tip pen chi olivets;
- plastic jar;
- decorative shavings;
- satin stitch;
- llyana textile;
- plastic bottle for 0.5 liters;
- small fireplaces.

Cover the sticks with green paste and let them dry.

For a bouquet of 13 trojans you need 117 bunches with a diameter of 8 cm, 9 pieces per 1 bunch. Make sure you have the required quantity of pellet blanks.

For 1 kvіtka you need to fold 7 kіl all the way.

Grease the edge of the skin stake with glue. Place the stick on the stick and screw the pellet onto the stick.


This is a way to carefully glue other petals.


Using a stick, pierce two stakes in the center.

Cover the top layer with glue in three places. Glue until the pellets are ready.

All you have to do is glue it just like that, and the card is ready.

Zrobimo vase for a bouquet.
Kviti from a colorful paper


For larger colors, you will need a special double-sided paper. To apply, please use a regular school color paper.
The simplest bouquet from colored paper
It’s easy to make such a bouquet from colored paper with your own hands. With this task the little one comes to grips with it. This very virib is a wonderful gift from my mother.
Since the child is still bad at handling knives, the fathers can help her. And it’s not a good idea to get involved in the process. Creativity with children is an important part of education. It develops a creative mind, a sense of beauty. In addition, the child becomes happy with her mother after the gift she has taken away and becomes happy herself.

Materials:
glue;
color papier;
knives;
Olivets.

Pos_bnik for making a bouquet from a colored paper
Take a whole sheet of green colored paper. Long edges are coated with glue. Fold the sheet horizontally so that the edges stick together. The paper is cut at the fold and to the gluing area at a width of 1 cm.
 We coat the base of the workpiece with glue.
 We burn the papier with a straw. Secure with paper clips until the glue dries.
 We check the preparation of the buds. Vikoristovuyu kіlka vіdtіnkіv. It’s best to draw out the template by hand, and then draw the letters along the contour. A bunch of these circles will serve as the core for the cakes.
Glue the centers to the ends.

The skin patch is glued to the edge of the leaf with colored paper.
We distribute flowers step by step according to the bouquet. We straighten the leaves. Ready children's bouquet:

Robimo with the baby's little kit
Kviti with paper is a wonderful gift option for mom. This type of behavior is simple in Vikonanna and looks much better than the living color. This lesson describes the process of preparing paper paper.
For the flower composition the following materials and tools are required:
1. Cardboard (yellow and green).
2. Corrugated paper in red color (can be replaced with serving paper).
3. Stationery glue, olive, knives.
4. A small piece of plasticine.
5. Kryshka like dancing.

Croc 1:
The basket is made up of three sheet blanks of different sizes. From yellow-colored cardboard, you need to cut out three squares of the same shape, and different sizes (from large to small). To make it more handy, you can paint the shape of the flower with an oval, and then stamp it. Glue the blanks together. The largest number is at the bottom.


Croc 2:
With help, roll the leather pellet down: place the pellet under the pellet, press it with your finger and pull it down to the tip, slightly twisting it. This is what it takes to make a large and voluminous flowerpot.

Croc 3:
For the middle of the round you will need corrugated paper or a red-colored serving board. It is necessary to cut the dough about 3 cm, then cut it into the middle of the thick dough. Roll the workpiece and cut it. Another way: just cut the papier into small pieces. Apply glue to the middle of the card and glue the red paper pieces to the paper.


Croc 4:
You can prepare the leaves like this: fold the green cardboard in half, paint half of the Maybutte leaf on the place and stamp it. There are two such sheets.

 Krok 5:
To prepare the stem you will need green cardboard. You need to cut the smudge 2-3 cm wide, roll it into a narrow roll and secure it with glue. Cut the upper part of the stem into several pieces.

Krok 6:
All the parts are ready, all that’s left is to put them together with additional plasticine. You need to apply it to the upper part of the stem and secure the flower. The leaves are attached according to the same principle. Glue the card onto the plasticine up to the top of the dance. This will be a stand for the virobu.

The paper card is ready.

“Leaflet until 8 Bereznya!” Safonova Svetlana Oleksandrivna.
Application from colored paper. Podarunkova leaflet until 8 Bereznya.
We will need a color papier of red, violet, lettuce, yellow, and green colors. Bazhano brother glossy color papier. Three different shapes are visible. Great, middle and least, and so on. Then, onto the fallen cardboard, we glue a large one, then a smaller one, and so on. We draw a vase from a purple paper and glue it to the leaflet. We need three fresh circles, we need to put the centers in our little circles and glue them. Then three stems are cut and glued from the flowers to the vase. We cut the lettuce leaves and glue them. This leaflet has come out!

This video shows how to grow daisies from paper, they look very naturalistic and even like living ones:
The flowers look so realistic that it is important to cut them out from the correct growths.
Narcisi. Meister class
This master class describes how to fold daffodils from colored double-sided paper.

For work you will need:
· Primary olive;
· school line;
· Knives;
· double-sided color paper in orange, yellow and green;
· PVA glue;
· Thin wooden sticks;
· Small vase.
Description of robots
Take half of a standard yellow double-sided paper paper. Prepare a ruler and a simple olive.

Place squares with 5 cm sides on paper paper. Cut them with scissors behind a graphic little piece. For 5 colors you need to prepare 10 squares.

Take 1 square and make 4 cuts on it, as shown in the photo. Then take one wooden stick or cut from the handle and lightly twist the rolls of paper blank.

This is how your pellets will form. For one kettle, you need to prepare 2 new products.

Glue them together so that the pellets of the upper workpiece are interspersed with the pellets of the lower one.
To prepare the center for the daffodil, you need to cut a circle from orange double-sided paper. After this, bend the circle behind the help of the haircut, as shown in the photo.

Glue the middle to the center of the yellow blanks. One box is ready.

Using the same principle, earn 4 more tickets. The narcissists are still coming out.

To prepare the stems, prepare thin wooden sticks and some green double-sided paper.

Just cover the sticks with green paint, and the stems are ready.

Draw thin long leaves from green paper. Use a knife to lightly twist one of the ends of the skin leaf.

Glue 2 leaves onto the stems.

Now it is no longer possible to fix the buds at the top of the stems.

Beautiful handmade flowers look no better than alive.
Take them from the bouquet and place them in a low vase. Look funny!
The advantage of such a bouquet is that you can admire its beauty for more than one day, and even the papier will not wither.
Narcissism is not the only thing that can be created. Experiment and decorate your home with a variety of flowers. For example, the faithful companion of spring daffodils are tulips, as they are easy to grow from a paper, just watch the video:
Blue forget-me-not flower with watercolor paper.
You can make wonderful volumetric flowers for decorating leaflets and gift boxes with your own hands. And such a wonderful technique in handicraft is paperplasty, which allows you to create incredibly beautiful flowers and bouquets. Due to the plasticity of watercolor paper, it is not difficult to create cards for scrapbooking.
Necessary tools and materials for forget-me-nots:
- Watercolor papier blue color;
- Knives;
- The stencil looks like a little flower with 5 pellets;
- Drain with water;
- Tool made from a bag;
- Sponge;
- Myaka ganchirochka;
- PVA glue;
- Perlin's drinks.
Description of robots
To start, you need to make a stencil of a flower with five petals: it can be painted by hand or printed on a printer. Use a couple of stencils for a watercolor paper.
Place the kviti in water for 5-10 minutes. Don’t be afraid to over-mold, the watercolor paper lasts long and soaks in water for a long time. After the allotted time, blot the workpieces with a serving cloth to remove excess juice. If you don’t know the color watercolor paper, you can paint the original white with barnacles, gel pens, felt-tip pens or gouache. It is necessary to work while the papyrus is still fresh.

Place the card on the bottom of the gancher. Using a tool with a ball at the end or any other object with a rounded end (for example, the tip of a pen, a pen), press onto the edge of the pellet and firmly move it to the center. Try all the same things thoroughly with pellets. So the flower will have relief.


Now place the cutter on a thick sponge and push through the center of the cutter. Here the destruction may be greater than that of the petals.

After pressing out the pellets, turn the other bag inside out and press it in the center.

There are two types of flowers to choose from: with petals curved up and down.

Place the flowers on a flat surface and let them dry until completely dry. Dried squash come out even tough, guess cardboard.
Now on the right to collect. For a flower with pellets, folded at the top, glue the flower with pellets in the middle. PVA glue is perfect for watercolor paper.

Glue a bead into the middle of the flower.
The relief card made from watercolor paper is ready! These apartments were used for decoration. Flowers from a watercolor paper can be quite harsh, so they can be used to decorate the wickerwork of screens and cats, as well as to decorate the interior.

Easter bouquet of blueberries. Zabrodina Ganna.

"Proliski". Klementyeva Polina and Oleksandrova Oksana.
It’s a really cute picture, but it’s not at all difficult for children over 5 years old. To prepare it you will need a piece of blackboard, a white sheet, a green olive or felt-tip pen, green colored plasticine, a cutting board, and glue.

A simple paper card with your own hands
From the basic white paper, with a very simple technique you can discover beautiful, amazing results, which will definitely lead to the stagnation of creativity. First of all, there is a need to create voluminous leaves from the technician, who often practice handicrafts, and also the indicated flowers can be collected into a bouquet or simply added to the flower composition. A small food accent is sure to be respected to the wall newspaper or the stupor, the food box or the package.

What needs to be prepared for making such a cake:
White office paper;
water and penzlik;
gouache or watercolor paintings;
knives;
glue;
decorative larvae;
a piece of thin dart.
How to make a food basket with your own hands step by step
1. The overflow of vicorous materials does not have specified colors and decorative larvae, which can be vicorized for making flowers, and they can also be used for your fruit. The basis of the kvitka is the usual white office paper, and then you can prepare the drink in any form, to your taste or according to your needs. To cut the cob, take the scissors and the arch of a white paper.
2. Make a paper with a first round of pellets with a quantity of 6 pieces. The shape of the flower can be slightly different, as long as it is important that the pellets are fully cooked.

3. Using the first square as a template, draw 6 new balls from the white paper. The more balls you choose to create the list, the more vibrate you will get. There is no need to talk about jealousy and accuracy.

4. After scrubbing with cold water, wet the pelyas. Place the tip of the pen in water and pass it over the pellets, preparing them.

5. While the papier is not dry, squeeze the skin pellet, then manually rub it with the same pencil or a pen, applying it to a rounded surface. In this manner, you will not only bend the skin pellets at your accordion, but also use them to turn them out.
6. Complete the same procedure with other pellets, let all the balls dry out.

7. While the balls dry, prepare a bunch of larvae. The fragments here show a white-yellow flower, then the chicks were chosen from each other. Take 6 or 7 double-sided tufts of white and yellow color, find the middle using the other hand and bend it in half to cut off the bunch. Finally, twist the cord so that you can become a guest. Next, it will help to secure the larvae at the center.

8. Start spitting the dried white balls. Glue another one onto the first ball, destroying it.

9. Then glue all the other balls in the same way. In front of you is a preparation for a cake.

10. At the center of the flower, use scissors to make a small opening and pull out the end of the flower, fixing the larvae. Cut the bottom of the bush and coat it with glue.
11. Select the color of the farbee and lightly coat the top part of the cake, removing any white light to make it even more stunning.
12. A beautiful flower with paper, a do-it-yourself vikonana - a wonderful addition to.

A simple autumn bouquet.
Autumn bouquet, made from paper, become a beautiful child’s flower, made with your own hands. Autumn itself is the time of fate, which gives us stringent farbies and incredible materials for creativity. The flower is decorated with a bouquet, decorated with flowers similar to aistri, autumn leaves and a bow.
- type on cardboard and paper;
- knives;
- glue;
- black capillary handle;
- crystal beads;
- brocade bow;
- template of a maple leaf (or a special card in the shape of any leaf).
How to create an autumn bouquet step by step
Prepare cardboard and paper for the work. A thick papier (in this case, a green color was used) is necessary for creating the base. You can also use this method to prepare unsuitable cardboard from packaging or colored plastic. Color the leaves from the set of necessary colors and leaves. If for colors there will be a one-sided paper, a white collar, then you will get double-colored buds.

From a thick sheet prepared for the base, create a detail whose shape resembles a bouquet. The upper part will be widened, and the lower part will have a tail, like a bouquet.

Use a bunch of maple leaves (or you can prepare other shapes, such as oak, chestnut or birch leaves). It is better to choose yellow, orange, brown or red paper for this purpose. Apply veins with a capillary pen. The leaves should be small - this is an additional bouquet, which echoes the autumn theme. Get 5 or more blanks.

Glue the prepared leaves onto the base. You can glue both of them to the animal, one at the bottom, or separate them to the authorities.

Twist the leaves as much as possible. These are the leaves of the aster, which will become the central color of the leaf. Curl the leather sheet with the same scissors. Long details – embellishment of the bouquet.
To create buds, prepare thin cotton from erysipelas paper. Cut the sheet into thin slices and divide the skin from them into segments of approximately 10 cm or so.

Fold the leather section into a loop, overlapping the edges one on top of the other. The collar of the paper can be white.

With a paper of any color, create mugs for kvitivs. Coat the circles with glue and begin to apply loops, forming little balls.

Glue two or more rows of loops to remove the flower buds. Decorate the centers with fillings. You can choose the letters to match the colors of the flowers or highlight the details.

Model three or more astri flowers to decorate the bouquet.

Glue autumn flowers in the center of the bouquet.

Decorate the lower part of the composition with a brocade bow to disguise the imperfections and make the bouquet look complete.
Flower autumn virus with paper ready.
Chamomile
For example, to earn money chamomile with paper, create two blanks from white paper and a piece of yellow paper, glue the core onto the main form:

Troyanda
For Troyandi you will need more preparations and effort, but the result looks impressive: fold the square of the red paper twice and once diagonally. Cut the tip and wide edge with a prick, make 4 balls with 8 petals. To create a volume, cut one side of the workpiece and glue it together to create different widths of the workpiece: 6, 5, 4 and 3 pellets. Twist the beads, insert the balls one into the other and glue. Fold the leaves from green paper into an accordion shape.
“My red face.” Sivolapova Polina.
To prepare this series, you will need a double-sided paper (color paper for your printer).

Another useful option is bicolor: here you need not only a knife and glue, but also a stationery knife for cutting.

The simplest option is how to earn money. Fold 2-3 arched paper into one accordion, tie it in the middle, and trim the edges with a needle. You only need to carefully fluff the pellets:

Forgive me
Forgive me can be made in a spiral way: on the arch of a colored paper, a classic spiral is painted or writhes, with pellets, are visible and curled around the flower.

Zhorzhin
And how to make stakes of different diameters from paper and cut pellets into them, so that you get a very colorful flower - a jorgina.
Kvitka made from curled paper paper.
Another option to earn money three pages, paper or fabric, just folding under the required pile of pellets and burning into a roll:
Video from YouTube:
Hyacinthi Elizara Polyakova:


Great rooms for photo zone
Kviti for office A well-organized photo session can be created using a double-sided color paper.
For example, in this video, a paper with a thickness of 160 g was used, 15 - 24 pieces were needed. You can take the templates, for example, here: //pl.pinterest.com/pin/789818853371506785/. How to create a photo zone with paper kits:
For a photo zone, you need a frame on which the canvas is stretched, and then the flowers are attached to the ground with hot glue:
Another option is to create hanging compositions, for example, such as:
Paper tubes that open near the water
You can spend an hour with your little child at home. It’s simple, but it’s a wonderful thing to catch the little one. Properly prepared tickets will bring satisfaction to everyone.

Need:
- color (two sides) xerox paper;
- office white paper;
- colorful olives;
- a bottle of water;
- white shallow plate;
- stapler,
- stake templates with a diameter of 6, 10 and 12 cm (for folding color options).


Simple option
Draw a number of color options on a white arched paper, approximately 4-5 cm in diameter with small petals. Available in carved colors and pellet shapes. Now they need to be verified. The pellets of the skin are folded into the center along the stake, one on top.


 When the squash are ready, place a plate and pour in a splash of water. Now you can lay out the paper bags with bent pellets on top. And here a marvelous re-creation will occur. All the petals will open and flowers will open in the water.
This action occurs because the paper absorbs water and is allowed to turn to its original appearance. And then, I straighten up in the place of death. It appears that the flower is opening.

 Quotes can be printed directly from a color copier paper. You can glue it in a funnier way and paint it in the middle of the card. For the bazhannyam.
Larger foldable version
Option #1. The original ticket can be made into a larger one of 3 balls. Take a photocopier and connect it behind the stapler in the middle. Having made a template, draw two stakes with a difference of 2 cm between them. Once the bagel is finished, create pellets. The finger serves as a template. Make a note, snoring three balls at once.
Now fold it correctly at the center of the pellet. One by one, stacking one on one. And so there are three stakes. It was too late to launch it into the water and marvel. The book opens up ball by ball. Malyuk deserves it.

 Option #2. This coin can also be divided into 2-3 balls. Now the difference between the stakes will be 4-5 cm. Long pellets will appear. Now you need to twist the skin with an olive in the middle. Can be shortened with a thinner diameter.

Flowers in origami technology
Flowers in origami technology are, of course, not so similar to their counterparts, but they have their own charm. In addition, this technique helps develop fine motor skills, which is very important for children and adults. How can such original speeches come from the original square of paper?
Callie
To prepare children's applications, papier is most often used. We suggest adding a little chenille dart to it and creating beautiful flowers, similar to elegant calli lilies. And with the creation of the flower itself, the child can learn the basics of the origami technique. The entire process of preparing such an application was carried out by this master class.

To create such a virobu we prepared:
- white cardboard;
- papier in red, orange, rye and green colors;
- glue;
- chenille drit;
- olive;
- knives;
- ruler.

The letters for this application will be drawn from color paper using the origami technique. I’ll prepare a square head for that. Our top will have a square with a side of 8 cm.
 Fold it diagonally across.
 Now I’m going to heat up the new butternut squash and finally fold the sides up to the middle line.
 It is necessary to bend symmetrically from both sides.
 Then the upper parts of the bent elements are pushed back. The magnet is applied symmetrically. This is what we have prepared for the kit.
 The center of the kvitka will be a piece of chenille dart. It is enough to take about 4 cm. We vikoristovuyu orange blue drit, but for the eggplant such a middle can be chopped up from chenille drut of any color. We secure this piece of paper with additional PVA glue.
 The lower cut of this cutlet is folded onto the collar side and glued.
 In a similar way, we remove the buds from erysipelas and orange paper.
 Now we distribute the flowers on white cardboard, after which we fix them with glue.
 From the green paper we can see thin dark spots that will become the stems of our appliqué.
 Leaves for flowers are also made from green paper. For this purpose, we fold it in half, after which we trace the outline of half the leaf. We printed 3 leaves of different sizes. Let's glue them onto our vib. The application with paper and chenille dart is ready.
Video on how to create spring convalia. Valeria Vikoristova writes a great arched paper to make it more meaningful, but for miniature flowers you need to take 5x5 cm squares and repeat after the author:


Tetyana Zhmurova
Dear colleagues and guests of my site! Soon we will celebrate the holy day of all women! This wonderful day we want to celebrate and make children and fathers happy. And it’s amazing to us that, first of all, the concert embellished the hall. Our garden "private" And for the decoration of the hall, as in the rich, there are not a lot of pennies. We don’t even have a musical pot yet. Ale є mi - teachers! Of course, we can do anything! Our creative team decided to decorate the hall flower compositions. Kozhen brought his ideas from us, everyone was pleased and preparations began. I encourage you to take a look at mine « charming book» It's easy and simple to get wine. It looks really beautiful! You can earn whatever size you want, colors and shapes(flat, voluminous, with candy wrappers, burnt paper, etc.) Even older children can get used to this work. I work in volume and for emergencies colorful paper.
We need for work: glue - whatever, I have an olive Cardboard - whatever, I have a basic one, white A-4 format. Dial colorful paper, knives.
Made from cardboard. The size is determined by itself, May A-4. For symmetry, I divided the stake into pieces with a simple olive.

Virizable from colorful paper square my 10 to 10.


We glue “balls” together from them.

Then we begin to stick them on, row by row.


The middle started to simply fight! We can rotate thinner ones "balls" And insert them in the middle.


If there are a lot of them, then the stench will not require gluing. They look great on the wall.

Well, what about kvіti and snowstorms will complement our Kvitkova galyavin. Most of you already know how to earn them. I will be glad if I have someone to be with me kvіti!


Publications on the topic:
Hello guests of my page. I drink your water from disposable cups, it’s very easy to make them. We select different colors.
Master class: Kvitka-semikvitka. A charming book for the Kazkov wound. Shanov's colleagues! Skin wounds in a child’s cage are not worth it.
To prepare the card you will need: a small sock in any color, green papier, tape, a wooden stick, a 7-10 cm long stitch.
Materials: Colored cardboard, olive glue, colored papier, scissors, openwork servers On Mother's Day we hasten to greet everyone who is called beautiful.
Sonechko is already warming the earth tenderly. Spring is coming. Spring is approaching, the holy day of our wives - 8 Bereznya. The groups are worried about preparation.
Some of us would like to be spellbound without marveling at the beauty that nature has given us. Dosit often with our darling light tank or.
Holy 8 BEREZNYA is approaching. Everyone will be occupied with welcoming turbots associated with this saint, songs, dances, gifts and natural skin.