How to finish a wooden subfloor under laminate flooring - methods from the practice of masters. How to veneer a wooden subfloor under a laminate: the process of verifying the subfloor using screeds, plywood and wedge-like joists with your own hands Laying a laminate with your own hands on a wooden subfloor
If you are completely finished, you can independently lay the laminate on a wooden base and remove the surface evenly and evenly.
Previously, laminated boards were mounted entirely on a concrete base. Nowadays, there is a simple technology that allows you to lay laminate flooring on a wooden base. In essence, there is little difference between the schemes for installing such a coating on a plaster-cement mixture. It is necessary to pay attention to the special features of the plank stands. And even installation with your own hands will go without a hitch or a snag.
Laying laminate on a base
The basis of the tree has two key features. Over time, the stench loses its cob characteristics and changes geometric parameters. Before laying the laminate on an old wooden subfloor, you should carefully analyze the joists, support beams and boards. If this machine does not have enough quality, it is necessary to thoroughly prepare the base before installing the coating that is being laminated.
Plank bases are not stable or particularly resistant. In connection with this, minor damage to the panels that are laminated is the reason for the creation of additional attention to their locks. This results in deformation of the coating during its operation.
If you want the laminate to delight you with its smooth and elegant surface, first remove all defects of the plank base. There is more information about how to earn money with your own hands.
The first crumb is the identification of uneven plots of the sublog. Follow this operation with the help of a daily routine (or better yet, use a laser tool). You can revive an old plank frame with your own hands using a number of techniques.
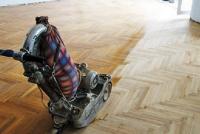
Cycling is suitable for bases with slight unevenness (about 4-6 mm per square of base). The finishing is done with an electric plane or sandpaper (as defects in the wooden base can be removed in one step). Before starting the operation, it is necessary to embed all the fastening elements (for example, flowers) into the wood so as not to damage the knives of the plane or hand scraper, which can also be used for correcting the frame. As a rule, check the thickness of the sanding robots and the surface thickness after sanding the leather edge of the base. After cycling, check the surface of the lining again.

Cycling of forgeries
When installing chipboard (chipboard) or plywood boards, it is recommended to install thick sheets (about 1.5-2 cm). Treat plywood or chipboard with a fungicidal agent or basic drying oil, carefully level the wooden base with the help of placing plastic or wooden wedges under the joists. The plywood sheets need to be cut with a special circular saw to the required dimensions, and then placed on a rough base. After this, check the difference in surfaces, which is greatest, and if necessary, place small slats made of wood under the sheets of viscous material. Chipboard and plywood are attached.
There is often a need for minor repairs to the wooden base when you want to lay boards to laminate with your own hands. Such robots simply vibrate:
- At the hour of sitting, install special support blades under the wooden beams;
- rotten boards will be replaced;
- gaps and cracks are filled with putty;
- The thin boards are fixed with screws;
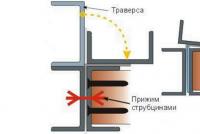
- If both the joists and the boards on them are hit, it is necessary to secure the supporting elements (press the joists onto the supports with anchors).
After repairs, do not forget to thoroughly clean the base with a smear and saw. Vikorist the sawmill.
When laying the laminate, the linings become dry. Stinks can be produced by:
- bitumen;
- polyurethane foam;
- environmentally friendly natural cork material;
- foil;
- polypropylene (backed).
The installation allows you to absorb minor unevenness of the black substrate, and also ensures heat saving and noise insulation effects. It is important to choose the right lining. For wooden bases, fachives recommend using cork linings, which interact well with the wood. At the same time, it is possible to put less expensive materials from polypropylene or polyurethane foam.

Laying laminate on a lining
Increase your respect! It is necessary to lay the lining on the front mounted polyethylene lining. It has a hydroisolating function. The lining is laid with an overlap of at least 15 cm (more is possible). And the installation of the lining itself is carried out vertically.
To secure the lining, use adhesive tape (the lining is marked with continuous lines or periodic dots). There is no need to fix the lining to the wall surfaces and to the underlay.
Installation of laminated panels begins from the corner located at the maximum height from the doors. The laying of the first row of beads is laid out horizontally, and runs along the laminate.
Before installation, check the position of the laminated boards in relation to the wall. The stench may lie absolutely flat.
Important moment! Laying the panels on the boards is carried out perpendicularly until the remaining ones are laid out. It is also necessary to ensure a gap between the panels to be laminated and the wall. For this, simply install the boundaries. Stinks can come from wood or plastic.

Self-installation of laminate
After the first correctly laid row rests against the wall, take an electric jigsaw and cut a part of the panel. Then you begin to lay out the next row. In this case, at the ends of the stick, it is not necessary to coincide with the sticks of the front line. To achieve this, you need to take a new row, remove about a third of the new one and start installing another row (similar to the first one).
Respect the offensive nuance. It is necessary to clamp together all the panels of the other row and only then separate them from the components of the first line. It is allowed to beat the laminate with a heavy hammer. In this case, be sure to stiffen the block so as not to damage the panels.
The steps have become clearer. Install all rows in a similar way. Keep an eye on the gaps between the laminate and the walls. The seeds of the remaining row will need to be cut into pieces.
You managed to lay the laminated boards yourself! Now you remove the edges, install the mounting robots on the cob, and proceed to install the plinth. To mask the sections of the cuts, it is recommended to use vikorist caps for the laminate.
The final touch - Installation of the door threshold. This element is installed so that the height difference between adjacent spaces is visually unnoticeable.
The current market of durable materials is rich in variety of types of underlayment: ceramic tiles, linoleum, carpet, cork underlay, parquet and others. Nowadays, more and more often, buyers give preference to laminate, as this material is durable, easy to use, has an affordable price and a wonderful modern look. This article describes the secrets of properly laying laminate on a wooden base. Also given is the power supply that will power many readers. What is the correct way to lay laminate flooring on a rough wooden substrate? How do you prepare a wooden subfloor for laminate flooring? How to lay laminate flooring with your own hands?
Oh dear, everything is in order. You bought laminate flooring. Now it is necessary to repair this installation, wasting time and effort with minimal resources, and also to ensure high viscosity of the installed robot, so that repairs can be saved for a long time.
Lesson 1. Assessment of the quality of the surface

It's no secret that dismantling old wood is a laborious and time-consuming process. People often want to avoid dismantling robots, but have doubts about the correct installation of the laminate on the surface.
To assess the effectiveness of laying the laminate on a base made of wood, it is necessary to carefully check the entire area of the substrate for the presence of fungus and color, sagging and creaking of bridges, and large deformation changes in the surface.
Vimogs to the wooden base
- Dryness. Old material is not guilty of traces of rot or fungal growths. This factor is very important, since the process of stress and decay of the tree will continue after laying the lamellas. After about an hour, the laminate will also be free of fungus and mold;
- Hardness. The base must be defaced so that the new designs do not suffer from deformation and maintain their original appearance;
- Jealousy. It is not allowed to have a difference in height of the main surface of more than 2 mm per 2 m. The old reason is uneven due to the creaking of the lamellas and the deformation of the locking joints of the laminate.
A more detailed description of the wooden base can be found by watching the video:
Porada. If the original covering for the subfloor in your apartment does not meet the required standards, you can bring the wooden subfloor into proper appearance by locally replacing the base sections. Use plywood flooring to level the surface.
Lesson 2. Preparation of wooden flooring
Important! When frequently replacing wooden substrates, it is necessary to seal the material with dry and acidic material. Otherwise, the base structure may become deformed during use and drying of the wood, which will lead to the laminate coating being damaged.
The floorboards are creaking
A common cause of unpleasant sound is poor fixation of boards to joists. The old fastening has become worn out over time and needs to be replaced with a new one. And here it’s not necessary to pick out a lot of flowers, you can open the door. In this case, it is better to tighten the screws, which are 2-3 cm less than the thickness of the frame. It is necessary to screw the leather board to the joists, press in the droplets so that they do not wash off. A quick reference can be found in this video:
We trust the original wooden substrate
We first need to identify differences in height beyond the daily level. It is better to dig this tool up to 1.5–2 m long, in order to maximally dig the entire surface area and obtain more accurate measurements.
If you have a false pretext, then it is not good to be angry. Finish the rounded plots by cutting them, preferably by cutting them with a grinding machine or an electric planer. If you lay sheets of plywood, you can easily accommodate differences in height and create a base for the foundation that is more compact and even.
Krok 3. Laying plywood on an uneven wooden base

Laying plywood is an effective way to eliminate defects in the wooden subfloor.
Advantages:
- Durability, resistance to deformation; durable flooring for laminate;
- High thermal insulation. The material absorbs 30% more heat;
- soundproofing;
- Water resistance;
- Simplicity of Wikoristanny. You can lay this material yourself, without getting help;
- The large dimensions of the vibrator allow it to quickly move over the surface of large and small spaces;
- Low varity.
When choosing plywood, it is necessary to ensure that the thickness of the sheet is consistent with the underlying coating or be larger. Also, for laying under the laminate, it is better to twist sheets of plywood, the thickness of which becomes no less than 10 mm.
There is a bunch of grades of plywood sheets. For industrial purposes, use this material of the FB and FOF brands, for work in living areas - FSF and FC brands. When used in special adhesive warehouses, sheets of FSF brand plywood are subject to increased moisture resistance. However, such germs are not recommended to be stuck in the middle of apartments and podinki, the stink fragments can cause harm to healthy people through phenol-formaldehyde glue in their warehouse instead of toxins. It is better to lay eco-friendly and cheap FC plywood brand.
It is necessary to lay plywood correctly in order to ensure safety. It cannot be allowed for 4 corners to converge at one point. The front opening of the sheets and their numbering will help you not get lost when the time comes to lay the cover. The technology of laying plywood ensures that the gaps between the seams are 2-3 mm and the gaps around the perimeter of the walls are 10-12 mm. This is to allow the tree to expand without deformation due to temperature changes.
To secure the old wooden base behind the plywood, it is necessary to fasten the screws on a spacer not more than 20 cm apart along the perimeter of the sheet, extending 2 cm from the edge.
Details of the opening of the sheets, the diagram of fastening the sheets and the secrets of checking the frame of the wicker work can be found out by watching the video:
Porada. You can additionally glue the uneven substrate to sheets of plywood. By allowing the unpretentious beauty of the boards to disappear during an hour of walking, this will increase the durability of the laminate coating.
After you have finished leveling and preparing the wood flooring, you need to consider how to lay underlays under the laminate.
Croc 4. Choice of lining for laminate

The lining is a special rolled material that prevents the black lining and laminate from forming. By compensating for and distributing stress, the lining will soften the pressure of gravity, thereby ensuring the value of the entire structure of the coating. In this case, the lock joints of the lamellas are not deformed. Also, this material has the functions of noise reduction and vapor barrier, in addition to which minor ventilation can be achieved.
The lining comes in various types: polystyrene foam, polystyrene, cork.
What do you need to know to choose an underlay for laminate flooring? Vimogi to this virobu. Here is a video to help you when asked:
Respect! Correctly assembled lining will increase the service life of the laminate and its operational power.
Step 5. Laying the laminate on a prepared wooden base

The technology for laying laminate flooring is simple. On the prepared base of the lining, you need to lay a lining with adhesive tape, securing the edges of the rolled material with tape or a masking stitch. Start laying the slats from the window to the door to the wall. Having inserted a wedge that will ensure a temperature rise of 10-12 mm from the walls, you can begin laying the laminate boards. The remaining laminate plate in the row will need to be cut with a jigsaw, so that the edge that has been removed from the wall will be completely destroyed. It is important to lay the other row, moving the laminate board to the first row on a 40 cm rise. This will add additional value and integrity to the laminate coating, as well as paint the outer appearance of the substrate.
Installation of laminate boards makes it easier to secure the locking joints. However, sometimes it is necessary to use additional careful manipulations with a hammer in order to create gaps and reach the strength of adhesion of the lamellas.
Laminate looks beautiful and expensive. It looks good whether in an apartment or in a private cabin, giving the aesthetic uniqueness of the space. Moreover, it can be laid on any surface: concrete, plywood, boards or linoleum. The smut itself must be properly prepared - it must be trimmed and loosened.
We will try to grow up on our own, and without a doubt, how to properly lay laminate flooring on a wooden base.
What to start with: designing surfaces and materials
We need to unzip it first - how much do we need the laminate coming from the placement area. It’s impossible to predict perfectly, but you still end up running out of stock for scraps and packaging. The best thing to do is contact the store consultant where you buy laminate flooring, specifying the location and size of the laminate flooring. So it’s easy to understand how you want to lay the laminate flooring - classically under a straight cut (on the wall) or you would like to lay the laminate under the cut (for example, diagonally). Then we move on to the main stage.

Preparing the wooden subfloor before laying the laminate
It is necessary to note that when installed, the “wooden base” is subject to any type of wood: plywood, chipboard, boards, fiberboard, etc. Let's look at the example of a laminate laid on a wooden base without plywood (with it, as a rule, it works much less) - laid on boards.
To lay the laminate, a perfectly flat surface is required, since all highly processed materials are resistant to excessive material inflow and deformation (volatile, drying out), and the building becomes deformed. Obviously, we evaluate what kind of surface the surface will look like and what kind of finishing will be required for it:

- We take away with a hammer all the flowers that need to be washed (for self-driving, you don’t need a hammer 😄😄😄).
- The culprit was daily creaks all over the place. The creak is to talk about those that the flowers in the logs were delighted and the daughter is gratifying.
- Visually check for cracks, fungus, rot and moisture. If there are deep and irrevocable deteriorations similar to the character of the present, it is necessary to replace the board.
Verification of wooden subfloor
In addition to using more superficial methods for verifying the substrate, it is possible to verify the wooden substrate under the laminate using special compounds.
- The first step will be cleaning the paint or varnish that was previously applied to the black surface.
- Let's check the harshness. It’s not the daughter’s fault to sag and become deformed under your wag. If this is necessary, it is necessary to secure the edges of the boards in places where there are gaps or better secure them. As on the right in the material itself, it is necessary to replace it with something more meaningful.
- To help with alignment, we check the horizontality. After one to two meters, a difference of a few millimeters is permissible. If the substructure is uneven and exceeds the daily limit of tasks, we take a sanding machine in our hands and check the lower values.
- We hammer down all the flowers that need to be washed with a hammer, and tap the screws with a screwdriver.
- The culprit would be the daily creaks otherwise - not to mention those that the flowers in the logs were delighted and the playground was in play.
- Visually check for cracks, fungus, rot and moisture. If there are deep and irrevocable defects similar to the character of the present, it is necessary to replace them.
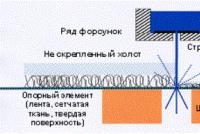
Type of wood lining.
The cream of over-insurance and more convenient methods of verifying the forgery. You can use special bags for help.
- The first step will be cleaning the paint or varnish that was previously applied to the black surface. Then sanding.


- Seams, cracks and holes are covered with putty. And then, after drying, we cover the entire surface with a moisture-rich primer.
- On top withered We lay lining (waterproofing) on the surface.
- According to the principle of the foundation, before pouring concrete, a reinforced lattice is placed on the surface. On the walls it is indicated what the height of your article is.
Respect! Before pouring the substrate, I will make sure that it is strong, carefully reconfigure it so that the substrate does not “play” (does not collapse). This check needs to be done throughout the entire room! If the frame is loose, it is not possible to fill the frame, it is necessary to remove the looseness of the wooden frame from the beginning!

- Next, follow the instructions on the package. Viral sums in everyday convenience stores are impersonal.
- Once the mixture is ready and the mixture has steeped for 10-15 minutes, pour it onto the surface.

Respect! With special respect, please add information on the packaging of the product that is valid for maximum durability. Or you should consult your nutritionist with your doctor. If there is a higher technical level of labor, you can avoid cracking of the varnished surface.
- Using a special studded roller, we remove all the necessary plots with bulbs. I level the base with a spatula or a special mop (check until the surface is close to ideal).


The surface is ready before laying the laminate!
Laying the laminate on a wooden base with plywood.
As has already been said, the simplest way to finish black coating is with whole sheets of plywood. You remove the finished, even surface for the laminate without any special pressure.
The leaves are secured to the bottom with screws through the skin 15 cm, pushing them deep into the surface. Then we go through the entire process with a sanding machine (as during the installation process, irregularities appeared in the sticks).

Laying laminate on a wooden base
The material itself is not very flexible and does not require special skills or fastening. Sticks to the principle of lining, which allows your child to “walk” through temperature changes without visible or noticeable changes. Installation is a breeze. Well, the instructions themselves:
- Place a polypropylene or cork lining on the black surface (on plywood or filled with a lining that is viscous). Polypropylene is cheaper. Cork is an environmentally friendly option with excellent heat and sound insulation properties (made of polypropylene). The polypropylene lining is made from a ball of thermal insulation (pictured below).


- Installation begins from here in the room, blocking the access from the wall with a size of 1 cm.
Apartment renovations often involve not only updating the interior decor, but also replacing the old coating for a more modern interior. Most often, this stage of repair itself becomes the most problematic. We especially welcome this food for Vlasnik apartments in the Khrushchev era, where the boards are made, and even if they are painted, then the coverings for the boards are not so good when it comes to laying them on wood. Most often it is necessary to dismantle the wooden subfloor with further preparation before laying a new covering for the substructure. However, this procedure is not only difficult, but it is necessary to finish the process before choosing a covering that can be laid without losing your old plank frame. The best option in this case is a laminate, which can easily and without difficulty be laid on any wooden base, without going into the hands of the fawners. About how to lay laminate flooring on a wooden base in an apartment and beyond.
To assess the integrity of the vicorized laminated flooring for laying on a wooden base, it is necessary to carry out a new diagnosis of the rest, even though wooden flooring often succumbs to the influx of fungus or mold, the influx of external factors can cause and until surface deformation, sagging and squeaks. Therefore, we should pay attention to the present moments before checking the plank base so that it can be re-contoured so that the laminate can be laid on a wooden base:
- dryness - this indicator should be given special attention, rotting debris on the surface or fungal infection of the board will continue to exist even after installation of the lamellas. Over the years, this problem will expand and on the laminate flooring;
- hardness - the value of the wooden base under the laminate, is another important factor that should not be ignored. Where to store those that will serve the new coating for a long time without damage or deformation;
- evenness - the next step is to ensure that the surface of the front surface is as even as possible. An increase of 2 mm per 2 m is allowed. Otherwise, the laminate lamellas will begin to creak, and the locks will become deformed.
You can get acquainted with detailed instructions on how to work with a wooden subfloor for laying laminate by watching the video. Since the base still has water that can be sunk, laying the laminate on a wooden base is carried out only after its liquidation.
In case of great deterioration of the plank subfloor, it is still recommended to dismantle it further and then pour a flat concrete screed.
How to lay laminate on a wooden base
The technology for laying lamellas on a plank base consists of several stages of preparatory work and laying directly onto the laminate itself. Before laying the laminate on a wooden base, it is necessary to prepare all the necessary materials and tools. Then, evaluate the condition of the base surface and, if necessary, carry out work to eliminate any imperfections on it. At the next stage, the selected lining is laid, on which the selected type of laminate is already laid.
Before preparing the necessary tools and materials, the first step is to select the laminate itself, which is made up of several balls and possibly a different base.
The laminated board has the following structure:
- overlay – a ball that protects, which protects damaged lamellas from different types of liquid: chemical, biological, mechanical;
- decorative ball - a material that defines the color scheme of the board and its design. The reliability of the ball is ensured by melamine infiltration;
- base - slab, made of high-strength wood-fiber materials. Depending on the thickness of the base, the strength of the panels lies in the area of drying. The base can be either MDF or chipboard;
- stabilizing ball - protects moisture from leakage, so paraffin or melamine paper is included in the warehouse.
The type of laminate is selected depending on the area of its drying and the flow of the area.
Materials required for vikoristan:
- laminate of the same class from 31 to 33;
- lining;
- fastening materials for wood;
- mastic;
- timber
To work, you will need a set of the following tools:
- carpenter's hammer;
- Kosinets;
- mallet;
- ruler;
- jigsaw;
- beeweed sucker;
- tsvyakhoder;
- saw;
- rhubarb and level;
- hacksaw;
- perforator;
- brushes;
- screwdriver;
- scraping machine.
Having disposed of such a warehouse of tools and materials, you can move on to the next stage of work.  Tools for laying laminate flooring
Diagnostics and repair of foundations
Before laying laminate flooring on a wooden base, it is necessary to carry out a thorough inspection to determine if there is such a need for repairs that can be done independently. At what moments to gain respect and when the shortcomings have been revealed are discussed below:
- the wooden frames have become thin or rotten. If there is minor damage to the material, you can lay the same board by simply turning it over. A place that has become infested with mold or rot must be properly treated with a special warehouse. If the tree is in need of maintenance, it is better to completely replace the plank area;
- when the frame is creaking or small, they sit on adjacent plots, it is necessary to securely secure the boards, vicor screws or flowers. Place their droplets deeply on the surface of the wood. In other cases, metal that penetrates between surfaces can damage power tools that are being used in the future – a scraper machine or an electric planer;
- If the boards “play” under your feet at the same time as the joists, it is necessary to fix the joists themselves. For this purpose, the lag must be secured to the concrete base with an anchor, drilled in front;
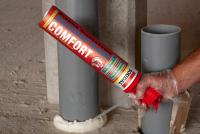
- Small gaps or cracks between the boards can be filled with putty. Large intervals can be set using an additional mounting pin;
- In case of significant subsidence and changes that exceed the norm, it is necessary to straighten the frame directly, removing the plank flooring in front. To insert the non-net parts, support wedges are twisted and attached to the joists. In case of significant differences in height, a complete replacement of the frame is necessary.
 Preparation of wooden subfloor before repair
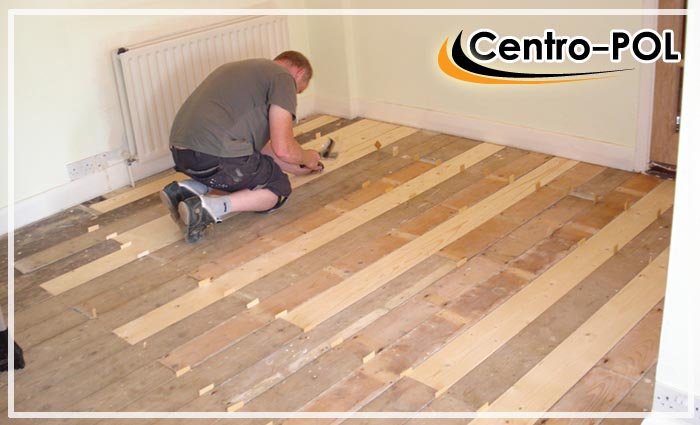
  Scroll the plot in rows along the logs
 After completing all preparatory work, the base for laying the laminated boards must be perfectly level, so that it can be checked, vicorized or leveled. If you place the laminate on an uneven wooden substrate, then a squeak will inevitably appear, the service life of the coating for the substrate will be short, since the locks of the lamellas will come apart, thereby destroying the integrity of the surface .
Verification of wooden subfloor
Most importantly, it was said that the final result will always lie below the level of the base surface. Therefore, before checking the plank base, you should ensure that it is consistent, and even cause minor unevenness, which will then become the cause of creaks or breakdowns. This is a list of the most advanced methods of finishing surfaces on a wooden base.
Sanding a wooden substrate - if there are minor irregularities in the wood base, you can use the sanding method or use an electric planer to finish the surface. This method will give the best result for minor changes in height difference, which is not necessary to exceed 4-6 mm per 1 m 2. For ease of use in the robot and easier control, grinding the surface of the substrate is better than dividing it into a number of squares. After completing all the work, it is necessary to carry out a control check of the surface and carefully clean up the liquid with a vacuum cleaner. If the imperfections occupy a small area, they can be treated with an emery paper or by hand scraping.  Sanding of underlays
This is a self-validating madness - because the pretext is already old, and replacing it with a new one is not necessary or feasible. Before pouring the trace, carry out the preparation work: clean the substrate from the surface, fill the empty parts, if they are obvious, with putty, prime the dry surface, spread the substrate with a suitable level, make the prepared filling mix and level the surface.
Finishing the wooden substrate with PVA-based putty. The discovery of such sums is more pleasant when working with large surfaces. A screed with such mixtures consists of several subsequent stages: installing beacon slats, filling gaps with a thin layer and diluted mixture, checking the evenness of the surface, removing imperfections. If necessary, you can apply a small amount of additional balls of putty about 2 cm. The new ball is poured only onto the dry front surface, which will require time-consuming staining.  Filling gaps and cracks with putty
Verification with plywood - plywood under laminate on a wooden subfloor is the most extensive method of verifying the base area. The quality of plywood is lower than 4/4, and the thickness is lower than 15 mm. The plywood must first be processed through special warehouses, which protect the Swedish material. From these indicators, the final result is consistent. Laying plywood on a wooden base under the laminate begins with leveling the black base. For which wedges are installed under the joists. Then the plywood is laid with full horizontal control. If necessary, place slats under the chipboard sheets. Then the plywood is attached to the frame base, stick by stick. You can learn more about the types of verification of subtexts with your own hands by watching the video below.  Painting with plywood
Laying linings under the laminate
For additional varnishing of the underlay, a special waterproofing material is used - a lining, which takes the place between the varnished black underlay and the laminate. The laying of the lining is carried out either on the basis of glue or without additional fastening. In another case, the sticks are fixed with tape. The optimal material thickness is 3 mm. Before laying the lining, wooden subfloors must be carefully cleaned from the saw and any debris.  Roll lining
The lining serves for the following purposes:
- increased heat and sound insulation;
- forgetting to rub the laminate against the wooden base;
- increased value of the design;
- additional verification of the base ball.
For robotic use, use the lining from the following materials:
- polypolyethylene;
- cork;
- bitumen sheet;
- polyurethane foam.
To cover a wooden base, it is best to use a lining made from natural materials.  Gluing the lining behind the sticks
Laying laminate
Before laying the laminate on a wooden base, it is necessary that the lamellas that are laminated undergo acclimatization. For this purpose, leave them in the room for 2-3 days. This procedure helps the material to reach a balance with the appearance of excessive middleness.
First, you need to know how to properly lay the laminate on a wooden base and how to place the lamellas. The laminate can be laid perpendicularly or parallel to the window, which is bright, or diagonally. The diagonal placement of the slats creates a visually wider space. Perpendicular masonry helps to seal the sticks.
Work on the flooring must begin with laying out the substructure, followed by measuring the riser and unrolling a number of boards for laying. At this stage, it is necessary to ensure that the front row that is being laminated must move onto the surface of at least half of the lamella, which creates the necessary separation of the seams. Let's look at how to lay laminate flooring on a wooden subfloor using different installation methods. Laying the first row Replacement of seams  Padding the lock of the laminate
Click system
A completely new and easiest installation method, which allows you to quickly and easily lay the slats on a wooden base with your own hands. Laminate flooring with a Click lock begins to be laid from a distance in rows, closing a gap of 10 mm between the wall and the first row by installing special wedges. This procedure helps to prevent deformation of the panels to be laminated due to temperature changes or changes in moisture in the surrounding area. The planks are joined by connecting the locks of the lamellas under a pressure of 20-30 degrees and pressed firmly onto the surface. The Click connection system allows you to disassemble the necessary parts for repair robots.
Lock system
Laminate flooring with such a system begins to be laid from a cut, spread out just before the door opening. The lamellas are pressed horizontally. To do this, insert the tenon of one lamella into the groove of the already laid panel and press until firmly fixed with a gum cue. A further row is laid in front using permanent fixation. It is necessary to create a temperature gap of 3-5 mm between the wall and the floor. For the flooring of the remaining row, a lamella is cut to fill up any space that has been lost. It is better to tap not on the end of the laminate, but rather on a buffer block. In this way, damage to the surface of the laminated board and deformation of the lock can occur.
Glued laminate
The most labor-intensive method of laying boards is lamination, and this type of laminate is rarely seen. This is the current method of masonry for placement with displaced moisture. The panels are connected using the tongue and groove method. The ends of the laminated boards are coated with glue and are connected with the locks of the foot board. To lay another row, the first lamella is cut in half, which allows the masonry to be printed with displaced seams. For better fixation of the flooring, you can apply tape. The finished surface can be coated in no less than 12 years. Thematic video will allow you to learn about all the nuances of working with laminate.
Installation of plinth
After completing the work on laying the panels to be laminated, it is necessary to carry out the final stage - installation of skirting boards. In combination with the base of the laminate, the fastening of any type of plinth can reach the wall. What are dowels, screws or glue used for?
The plinth can be made of all types and modifications - wood, pebbles, plastic or MDF, solid or with a cable channel. The main rule in this case is the organic connection of the new article with the plinth.
If you could roll over, laminate flooring is not so important on the right. It is important, before laying the laminate on an uneven substrate, to carry out all the necessary work, removing any shortcomings, and thus please your masters with long-term care and reliability.  Mounting the plinth
Video about laying on a wooden laminate
The video explains in detail how to lay laminate on a wooden base.
Laminate, as a finishing coating for underlays, is becoming increasingly popular due to its excellent performance characteristics, aesthetically pleasing appearance, simplicity and ease of installation.
1. Cycling is carried out in such a way that the difference is insignificant, and food can be distributed to the inhabitants of a small ball of wood on the right side of the substrate, thereby ensuring a pleasant evenness of the surface.
2. An electric planer is useful if the local difference in the boardwalk in any place is greater. If this tool becomes stagnant, it is necessary to ensure that the pads are sufficiently tight, and the droplets of flowers and screws do not become damaged.
So, as a building plane is used to cut a great ball of wood, after passing the skin along the boards, the necessary control is necessary. After carrying out such a procedure on the plots of the substrate that needs to be performed, the desired result can be achieved.
3. If the surface is very weak, you won’t be able to use an electric planer alone; the fragments on the right are not in the boards, but in the sunken joists.
Tom, happen dismantle the boards and look at the logs and cross the beams. Perhaps, over the years, the stench has become unbearable, either caused by mosquitoes or microorganisms. In this case, the logs and beams will have to be replaced with new ones. If they are in good condition, then you can raise planks on them using wooden linings, also controlling the process of varnishing. If the boards are placed on the linings, and the lining becomes smooth, the surface needs to be carefully scraped.
The process of verification from the background is difficult and time-consuming, but it is not necessary to carry out. Otherwise, the foundation will not last long, which means that the boards will still have to be lifted and repair work carried out, and this will also be associated with complex procedures - dismantling the recently installed laminate.
4. Another process of reviving the wooden subfloor is based on additional stains, the scraps of the boards are covered with plywood. However, this method will help not only to create a false seal, but also to insulate it well. Using a similar method, you can quickly get to the point where you can get away with it.
The covering boards may also need to be leveled, and in places where they are lower than the main covering, spacers from plywood or chipboard are secured, and it may be necessary to skim the boards. If the boards are to be vicorized for veneering, they should be nailed perpendicular to the boards of the base.
Sheets of plywood, 10-12 mm thick, are fastened to the base at a distance of 1-3 mm from the walls and screwed to the base using self-tapping screws. When using small sheets of material, the stinks are placed in displaced rows on half a sheet.
5. You can repair a wooden frame with help self-virtuous self-leveling linings and screeds. In this case, a thick waterproofing polyethylene lining is laid on the plank surface. Their edges are lifted and secured to the wall. The mold is responsible for creating an airtight space, so the sheets around them are overlapped by 15-20 cm and secured together with waterproof tape.
- Further along the perimeter of the room, an elastic damper is installed as a compensator for the screed when the material expands.
- Then, the surface is aligned, and the areas where the surface is much lower than the main surface, install a beacon from a metal straight line. This height may be similar to the difference in the height of the substrate. The beacon must be secured to additional plaster material. The guide cannot be screwed on with screws, otherwise the tightness of the waterproofing will be damaged.
- Then, the ingredients are mixed and placed on the surface in the same area where the lowest point of the mixture is located. The screed follows additional rules.
- Since the difference in subtext is small, it means that it is completely suitable for filling self-validate forgery. It is specially recommended to dilute it into a homogeneous mass and pour it with waterproofing, razor-sharp liquid and a flowing, bare roller to remove the cracked bulbs from breaking.
- After drying the flooded warehouse, the surface is rubbed again. Since this demonstrates the benefits of horizontal alignment, you can proceed to further work. If the required amount of liquid has not been reached, then the beast can be given another thin ball of filling material.
6. The wooden subfloor can be leveled using the popular dry screed method.
For this method, just as for the previous one, it is necessary to create reliable waterproofing. In this case, it is not only necessary to prevent the moisture from penetrating onto the wooden surface, but also the effervescent material that is formed from the expanded clay fraction, without spilling at the crevice of the substrate.
- Backfilling is carried out from the place where the lowest point of the surface is located, and you need to fill up the expanded clay there more, so as not to lose it after vibrating.
- Then, install it on the visip beacons - directly Most often - from a galvanized metal profile, which is used for work with plasterboard. The stinks are placed in such a way that with residual vibrating material, at the highest point of the screed, the expanded clay rises above the wooden covering by at least two to three centimeters.
- Special layers are placed on top of the expanded clay layer. gypsum fiber panels that are glued together and then screwed together with screws. This creates a reliable, solid surface for laying the laminate. In addition to the vibrating function, this material is used as a heat-insulating material.
Lining for laminate
Following the technology, one of the types of linings is laid under the laminate. This is necessary so that the cover lays evenly, the soft “pillow” is cushioned, and it remains insulated. For this reason, the following materials are used:
The spine is polyethylene;
Cork lining;
Linoleum;
Dorn.
In addition to the above-described functions, the lining softens the noise of cutting on the surface of the laminate and protects against mechanical damage both from the surface and from its springiness.
- The best part is the cork lining - it will continue to enjoy great popularity. This environmentally friendly material has few special advantages over others - it has excellent noise and heat insulation, and the thinnest ball can replace more polymer linings.
It is easy to install and lay the laminate on a simpler basis, on other linings, so that the cork mats do not fit into an accordion and do not change. Such material is rolled in rolls and slabs, so you can manually select the shape for the robot.
- Dornit is an environmentally friendly non-woven material, also called geotextile. It is spun from polypropylene fibers, which gives it excellent springiness and calmly absorbs great strength.
The material is not worth the price, but it is important to use it for reinforcement of road pavement. It is suitable as a lining under the laminate, however, you need to know that the door does not have any special sound- and heat-insulating properties, otherwise it will muffle the sound of scratching on the laminate entirely.
- The backs are polyethylene and are used not only as a lining, but also as a full-fledged insulation agent, as well as various materials.
It is a continuous material that can be laid manually, but rather than being removed from the laminate during installation, it is better to secure it with double-sided tape to the base. Foam polyethylene is good at dampening noise and softly springing when walking on the ground.
- If linoleum was laid on a wooden base, then after leveling the surface, it can be turned again in place and twisted like a lining. Buildings can also be insulated and soundproofed. When walking on the laminate flooring, the sound from the floors is often damped.
System for joining laminate panels
Today, there are a number of types of laminate panels connected to each other - either glueless or adhesive connections. The most popular type of laminate is that which has a locking connection, and there are two main types, called “Lock” or “Click”.
"Lock" system
The panels with the “Lock” connection system have grooves and tenons, spread out in one horizontal plane. The stings are easy to join - move them horizontally and insert the tenon into the groove. Then, from the other side of the panel, install a straight and smooth wooden block and carefully tap it on the new one, leaving the remaining edges of the canvas together.
“Lock” is a quick-release lock, which is more economical when purchasing, but not as valuable as “Click”. Moreover, if it is necessary to dismantle the surface, it will be difficult to get through - the spikes will easily break off. Therefore, this system will be released and will be used for the rest of the day.
Click system
“Click” locks have a special trivial design, and fit into sealed bodies when the panels are connected under the final door. If the furniture gets dirty, it is difficult to remove the laminated frame with such locks, and then reinstall it in the old or other place.
This system of locks is connected to a number of different companies that vibrate the laminate.
Adhesive laminate
Laminate, which is laid on glue, has an advantage over other systems in that such a joint creates a reliable, practically monolithic surface. This allows the material to be used in areas with high moisture content or in places where water is likely to get on the surface (for example, a kitchen).
- There are problems that may arise during the installation of the coating - if the glue is permanently applied to the locking parts of the panel.
- Once the adhesive laminate is laid, after completion of the work it can be used in just ten years.
- The laminate, stuck on glue, will be difficult to dismantle without damaging it, so you won’t be able to get rid of it.
- It is not recommended to use this material for coating underlays with heating, as the glue may dry out under the influence of elevated temperatures and the laminate will not adhere to the surface. Cream glue can be seen unpleasant for people viparovuvannya.
Installation of laminate
- The laminate flooring starts out of nowhere. The first thing you need to do is cover the entire room or bed with a lining, and you can start working on it. The next plot can be laid only after the first part is completely filled with the assembled laminate. The sheets of the lining are held together using special adhesive tape.
- The first row starts with a solid panel and is laid at a distance of 10 mm from the wall. In order to achieve the required gap, insert spacer blades between the laminate panels and the wall. This will ensure an expansion joint, which is necessary so that the surface does not buckle during thermal expansion of the coating.
- The first row is laid flat. At the end of the day, parts of the panel must be laid, measured and cut using a jigsaw.
- The other row is started from half of the laminate panel and laid in the same way until the end. Yes chew further In this manner, all unpaired rows begin with a whole panel, and the guys -
- If the first row contains all the panels, and it was not possible to add halves, then the other row All you need to do is start with half of the laminate board, and the other half will need to be created like the other a number of. This is necessary in order to complete the “re-tying” of laminated boards in rows. To protect it, it is necessary to carefully cut the cut parts of the panels when laying them on the cob guys

- Laminate with Click type locks has a characteristic installation feature. The stinks are inserted under the singing edge, and when turned in one direction, they lock. In this manner, no additional manipulations such as tapping with a hammer are required.
- However, this means another important feature of the folding of such a covering. During installation, it is necessary to remove the leather layer with a tanned layer and then join it with the already laid laminate. Without a deputy, especially for the great size of the place, it is impossible to get back from this.
- After laying the remaining row, spacer wedges can be inserted and installed along the entire perimeter of the covering. There is no need to attach the plinth. In this case, it is necessary to remember that skirting boards are always not attached to the surface of the laminate - only to the wall!
Video: a short lesson on how to properly lay laminate flooring
It is difficult to cover a wooden base with laminate; the material behind this lock is will be the most comfortable when laid. Therefore, it is very important to properly prepare the surface. If there are Vikonans and minds, then the work will be perfect without any special folding tools.
- If the first row contains all the panels, and it was not possible to add halves, then the other row All you need to do is start with half of the laminate board, and the other half will need to be created like the other a number of. This is necessary in order to complete the “re-tying” of laminated boards in rows. To protect it, it is necessary to carefully cut the cut parts of the panels when laying them on the cob guys