Preparation of the face shield from plywood. Do-it-yourself furniture panel - the subtleties and nuances of making a do-it-yourself furniture panel
First start with the instructions you need to prepare the following materials:
First of all, we need a sheet of plywood. Then you need to work the little silhouette, after which you need to vibrate the colo. We choose the size of the stake ourselves. This process can be organized in a rational manner. You can hold a moth, flowers and olives in your hand. In this way we can cut a unique compass. For this purpose, simply beat the flowers on one side and tie the olive on the other side with a skein. We need a compass to paint the circle. And the vibration axis can be used with the help of a file or a jigsaw. This is why you need to open the hole in the middle of the stake. The opening is the size of a fist. Before speaking, open the door and then need to close it with a umbon. In addition, it is necessary to create 2 strips (trimming) and, of course, handles. The materials that can be used are oak, beech, birch and pine. It is required to rivet them as shown on the baby. Why do we need rivets that can be anodized for the tanks? The diameter of the rivets should be more than 6-7 mm like at the cap and more than 3.5-4 mm like at the top. You also need to tidy up the ears with nippers and pry them apart.
After this we move on to pasting the shield. For which, obviously, we need glue. It will be more beautiful if we have PVA or casein glue. Since we are glued with skin, then it’s best to use fish glue. We also need skin and fabric to cover the outer side of our shield. This process needs to be implemented like this. The fabric needs to be soaked through, and then glued onto the shield. You can also use farboi on top of the baby. Then, for help, the drill that turns around needs to be opened. Moreover, it is necessary to work around the edge of a small stake. This process must be implemented in order to strengthen the umbo. In order to hammer the crown, we need a steel blank, the thickness of which ranges from 1.5 to 3 mm. If the thickness of the steel billet is 3mm, then the umbon needs to be hammered in stages. In this case we have 2 stages. Moreover, it is necessary to beat it with a finger, which may be crotch. For this you can use a gas grill or a gas stove. There are a number of types of shields. Fist and elbow. In order to keep the edge of the shield from cracking, you need to beat it with metal or nails, which are small. On the right is that great carnations are called to be pierced, but that’s not right. We also need 2 bolts to secure the crown and handle. Before speaking, you need to work through the shield. The umbon needs to be fastened from the outside side, and the axle of the handle needs to be attached. To ensure everything is secure, you can secure the umbo with two more bolts. Before speaking, if you don’t wrap the skin around your handle, you may rub your hand. He needs to be wrapped in leather. And after all, there is a need to sew the skin, but it is only necessary to do this after the lining has dried on the shield, as it may be ready. Before speaking, it is necessary to sew with nylon thread or cotton, and it is necessary to work along the entire perimeter of our shield. And the axis of the stitch is 1.5 to 2.5 cm in diameter. We also need an electric drill with a drill to open it for stitching. This is why you need to take the metal plates and put them on those places, on the stands. Before speaking, the coverings can be fastened with a bunch of rivets under your hand. Until then, it is very important to carry out the lining of the skin.
Make such shields wrap around a leather strap that is made up of many parts. Or rather, two of them. The first part of the chain will end in a cast buckle. And the axis of the other part is the tail, which ends in a tail, which is decorative or lite.
You can even decorate the handle with linings at the same time using a primary winding. Moreover, the material of the linings may be different. It is possible to use bronze made of silver, or made of gilded wood. Before speaking, carefully decorate the area where you can grab it with a leather belt. The entire part of the handle can be decorated with nails from cut gold or darts from the same metals. You can also create the illusion of planks. It is possible to work with stain or watercolor under your hand. It is necessary to paint the dark skin. And in order to create the illusion of a small crack between the boards, you can paint black between the boards. You can use a simple pen or carving tool.
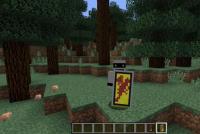
The story about how to get a shield from Minecraft starts to spread among all the players in the game early and late. This item of defensive nature helps to avoid losses from enemies. It’s a simple one, and the recipe won’t seem complicated for most Gravians. It is enough to know about the ingredients in order to combine them.
Zastosuvannya and zagalni characteristics
Gravtsiv tsikavit food about how to build a shield in Minecraft through the high parameters of a defensive direct-cut object. It blocks any expenditure, including shots. Its value is 337 units, which allows you to block enemy attacks for a long time.
It’s best to equip the character in the left hand, as the fragments in the right hand may be damaged. With this rank, the koristuvach can destroy the defense and defeat the enemy instantly.
Preparation of resources
The lesson on how to get a shield from Minecraft is simple. In the beginning, koristuvacheva will have to produce six blocks of planks of any kind of tree. To do this, it is enough to saw a block of wood to obtain the necessary gravel elements. Complete the double operation to remove all six items. After this, you need to create it. There are three ways to do this - singe the charcoal, put together nine pieces of lizard, or cut a block of this material into the nine pieces you need. Clients choose the method of seizing these resources independently, depending on their capabilities. The easiest way would be to find the crawling block and take away nine gold coins, which will happen again and again in the future. After collecting resources, it became clear how to earn a shield from Minecraft.
Creation and embellishment of an object
After you have downloaded the crafting resources, you will no longer be able to open the crafting window and move any necessary materials. There will be boards at the top windows, and between them there will be a slimy gold. Other materials are required for removing the blocks of wood chips. After placing the materials, a warning shield will appear at the window. It will be of a standard shape, but can be decorated with ensigns that are created from a colored outside.

For one such item you will need six blocks of sheep material and one club. Then you will lose your shield and ensign. The stench may be of the same type, as well as the mothers of the other side. This crafting method describes how to make a shield in Minecraft without mods. Third-party programs allow you to remove items from content not provided by game developers.
The shield is a military weapon of war, which served as a great defense against cold and metal armor. Previously, if there was no flammable outbreak, even the skin of the warriors was a mother’s shield, and even the stench realized that their life would lie in the future. The shields began to fall back a long time ago, and to this day the stench has seen many changes.
How to make a shield with your own hands?
We will show you how you can make a beautiful middle shield from simple materials, which you can find in your local stores, or even at home.
For our future shield we need:
Plywood
. Bolti
. Linen awning
. Farbi
. Glue
. Tsvyakhi
. Suede
. Skinny belt
Having prepared everything, we can begin to unravel. Zrazkov's axis is a diagram of what we are doing:
Let's go!
1. We are starting to work on the plywood first. Having determined the dimensions, we transfer them to the shield and view them. The dimension axis of our shield:

Scheme of how to correctly mark out the shield:

2. Plywood can be cut into pieces of a rounded shape, or even in special units. Since there is no such possibility, then it can be deprived of simple jealousy.
3. Once the workpiece is ready, the front part is sealed with a linen awning. For this purpose, we sew a cloth of a size larger than a shield and glue it with glue. The edges of the tracks are tanned in the middle.


5 . We prepare the opening for the belts and glue the suede part (using vicor glue and small flowers), which is needed so as not to rub your hand on the plywood all the time.
6. We fasten the belt with bolts.

7. The remaining croft is the barred shield. The skin of the people, especially protecting their shield, was also a sign of their allegiance to the power of the war.
Fig.1. Stages of preparation:
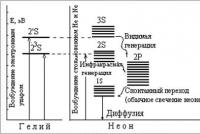
The round shield was conquered by the leaders and infantrymen. Middle-aged craftsmen made it from wooden planks, and then stretched it onto a new skin. The top of the shields was decorated with various decorative elements made of bronze and copper. The guard of the hand served as an umbo. The umbo is a surface or a cone that is placed behind the handle or belt.
To prepare a Norman shield with a diameter of 0.8-0.9 m, we need planed tar boards. They are glued end to end using Vicor and epoxy glue. To give the structure its value, 2 transverse slats are glued to it. Its width is 5 cm, its thickness is 0.5 cm. Then the shield is given a rounded shape, for which the wooden bars are sawed off. At the center it is necessary to drill a hole for the umbo.
Next, think about how to build a shield for those who deserve it. For this purpose, nail the transverse slats. If the ends of the flowers are missing, then wash them, then press them with pliers.
How to build a shield: preparing the umbon
In order to make money, you need a tin can. The sharp edge can be beaten with a hammer. Once cut, the workpiece is inserted into the opening of the shield and glued with epoxy glue. You can make the umbon yourself, if you want, so that we can make it even better, it’s better to make it with the help of a lathe.
A twisted umbon is glued to the bottom of a tin can inserted into the shield. In this case, the same epoxy glue is used. The shield is turned over on its reverse side and there, from the embossed umbo, a wooden handle is nailed, after which the braided skins are cut off. Take the gum hose and open it. Vіn will be the rim of the shield. This is attached to the virobu for additional flowers. If there aren’t any, then natomist vikorystvoyetsya drіt, but for the first time you need to drill under a new opening. The fastening ring of the umbon is made of polystyrene and glued with “Moment” glue. The thickness of the polymer is taken to be approximately 1 mm.
How to make a shield from decorative coatings
Now let’s think about how to create a shield similar to the one on the right. For the decorative coating of the shield, waterproof varnish and wood stain are used. All wooden parts are coated with stain. Then the frame is covered with varnish. So that the heads of the rivets and the crown look like metal, they are coated with farbe, which has the color of metal. There are different options for making the shield: single-color, checkerboard or black-colored.
How to make a shield with a cut edge
Fig.2. Shield with cut top edge:
At a later period, the faces acquired dry shells, the upper edge of which was flat-cut. To make a convex shield, it is better to take plywood. The thickness may become 3-5 mm. We cut around the required diameter from it, soak it in hot water until it becomes even soft. Having pressed the plywood into a shape, then fix it in this position with another squeegee. If the shield is dry, it needs to be removed.
To glue the shield, use a canvas or chair paper. Stinks stick to the surface of the surface. It is advisable to use a cut gum hose, which is attached to the vibrator for additional support or flowers.
The belts are attached in the middle and at the end with the help of rivets. Place the felting cloth completely and glue it onto the shield under the handle.
If you are a role-player, then you, of course, need a good arrangement, for example, a shield that you can prepare on your own. This article shows how to make a shield with your own hands.
What is this needed for?
The shield is needed by fathers who have small children, and even children on the New River may need a face costume, and for this purpose a sword and shield. A shield can also be useful for an adult person. Carnival costume parties, theatrical performances and the exact performance of face-to-face battles can increase the visibility of the shield among the participants.
Before we begin to make a shield from any material, it is necessary to consider its size and shape. You can make a black chair on paper to ensure that the dimensions are correct.
Also, lovers of facial shields are guilty of knowing that shields come in different shapes: long, almond-like, or short, oval. It is also necessary to think in advance about the sealing of the shield and, therefore, select the material for its preparation.
Cardboard shield
For a child in the early hours of a nursery, there is no need to make a shield from expensive and important material. In this case, the ideal material to use would be cardboard. Let's do a lot of work to create a shield for the child.
- It is necessary to remember that such a shield is of small size, the mounting frame should be installed so that it fits easily in the hand, and the shield itself is not responsible for protecting the child during the holy hour.
- To make a shield, you can add whatman paper, cut the shield into the required shape, and use fabric to create a hand trim that is attached to the back side of the shield.
- You can attach it with glue or double-sided tape. Now it’s no longer possible to paint the shield with these farbs, as if they would harmonize with the child’s costume.
Plywood board
The lightest and brightest shield will be made from plywood. It is first necessary to pay attention to the proportions of the shield, to take care of all the different details in order to eliminate irregularities and asymmetries.
Then you need to decide what kind of shield it will be: flat or slightly curved. If it is flat, you can use single-ball plywood. If it is necessary to bend a little of it, then it will be necessary to glue two arches of plywood of the required dimensions under the press.
After gluing and drying the shield under the press, there may be a few days, the shield must be cut. For this miracle, a jigsaw or a stitch file will do. To ensure the accuracy of the lines, it is necessary to apply the markings on the plywood from the back side and follow the daubed lines. After finishing the shield, you need to sand it with sandpaper, remove all the jagged edges and make it smooth. You can remove the sharp edges of the shield using an additional rasp.
Now you can start decorating. Varto think about how to decorate the shield. On this basis, you can make the baby into farbs by first priming the shield and giving the material the smoothest shape, and you can twist the fabric for such purposes.
To give the shield an ancient look, its front part was covered with linen, linen or hide. To do this, cut the fabric of the required size and glue it to the shield with wood glue. The back side of the shield is most often covered with leatherette, which needs to be glued. Ale Varto think about those who have a shield for vikors. If during battles, you can put a ball of foam rubber or soft fabric under the leatherette, so as to smooth out the blows when cutting a shield with a sword. Now it is necessary to create the edging of the shield. An ideal edging would be made of gray hide, as it has a distinct bending and pleasant bruise.
It's time to draw a handle for the trimach of the shield. The strongest leather belt that is not too hard to handle. Attach it with bolts so that the handle fits tightly on the shield. It is necessary to make two handles, one of which is used to fasten the hand while liking, and the other for use in the hand. You can also think of an armrest, making it soft. The shield is practically ready. I lost my way to sew on the symbols. How to make a shield with your own hands!
Wooden shield
You can also consider the option of preparing a wooden shield. The principle is the same as when preparing a shield from plywood. A wooden shield will be slightly more important than a plywood shield and it will no longer be so easy to use it.