Virobs from crusts from cakes. DIY gift wrapping. Pictures made from plastic shells
Ale and vikoryst and plastic caps are in front of them.
Using absolutely unnatural material, you can create a simulator for developing fine motor skills, organize a tabletop game, create an original wall recorder and panel, create flat and three-dimensional toys. Do you still throw out plastic caps?
Figurines of creatures made from plastic shells
For young school-aged children, you can do mixed appliqué: glue a bunch of cracks to cardboard and get creative with their decor. They produce miracle birds, domestic animals, wild animals, fish, and mosquitoes.


By threading plastic caps onto hair, thread or dripping, using wet water, you can remove large figures of animals and comas. Now the stinks of the buildings are already collapsing and there is a lot of waste behind them.


Kviti made from plastic caps
The scraped caps from the plastic balls can turn into the core of a charming card. Similarly, we glue them to cardboard and decorate them. If you glue not only the plastic cap itself, but also the neck of the dance, then in the middle you can find some secret for the child. For example, snowstorm or bjilku. Then it will be good to work with such items.


Pictures made from plastic shells
Once you have accumulated a few bags of plastic shells, you can move on to large-scale art projects and installations. The caps can be glued and nailed onto the dowels. Golovne, as always, has a brilliant idea.

Flat heads made of plastic covers
Just like before making simple figurines of creatures, you can prepare silhouettes of various characters and flat dolls with shells. We fantasize and stick them on a base made of cardboard or thick fabric, decorate and rejoice at the result!


Add some originality to the little one, fill it with volume and highlight the details from the color-matched caps. These could include elements of clothing, beads on a suit, coats, bags and much more. For example, what a funny clown!

Transformable robots made from plastic shells
Delighting your boys with a creative robot, it turns out, is easy and simple. To do this, we string the caps onto the base and collect all the purchase details. Now our robot can collapse, and it is possible to create various types of damage, wheels or wind a car, antennas, or create various tubes, boxes and jars in its design.


Transport based on plastic shells
Transport flows can be large and stationary, as you can see traffic conditions on large format paper or cardboard. For such a project you will need to: find the base from a large box, select the necessary decorations and images from magazines and newspapers, draw the necessary objects yourself, glue everything onto the base, and then engage in crochet craftsmanship. For which we take different lids: small ones for juices, medium ones for mineral water, large ones for canisters and five-liter plastic jars. For the right!
Spending an hour playing with such a “simulator”, the baby will quite exercise his fingers, opening and closing the little things, searching for the picture below them.
Please note that the shells can be not only the core of the cup, but also the wheels of the car, but also the doors and finally, what is included in the details and photographs.


With the materials at hand you can create fantastic pictures. For this purpose, everything is practical: a toilet paper roller, a jar of yogurt, other containers, canisters, cardboard boxes for dairy products.


Other items with crystals
In truth, there is no limit to human imagination! It turns out that you can create a stylish birthday card from plastic shells, organize a game of checkers, make play musical instruments, tsukerki and decorate a child’s kitchen for gambling.


Dzherela photos from dobirtsi: foto-tur.ru/?p=8773, womanadvice.ru, fotostrana.ru, subscribe.ru, armama.ru, ayamama.ru, podelkilegko.ru, uckomp.ru, boombob.ru, lestnica. info, cinesoft.ru, everything.kz, www.awd-auto.ru, handmadehelp.ru, dou98.zlatoust.me, thebestartt.com, mirfb.ru, boltayanozhkami.blogspot.ru/2012/ 09/pirozhnie-iz- probok.html, horoshaya-mama.ru/, stranamasterov.ru/, solium.ru, faberena.blogspot.ru/2012/07/ein-lernspielzeug-aus-den.html, morburybeverly.blogspot. ru/2012/12/blog-post_8408.html, photo-bazar.ru/?p=8855/, fotohomka.ru, handmade.jofo.ru, studon.ru, stranamam.ru, searchmasterclass.net, allriddles.ucoz. ru
From plastic bowls you can create a variety of brown and original items for the interior or for the garden and cottage. In addition, by making eggs from plastic balls with your own hands, we are preserving the purity of nature. It’s no secret that the sorting and processing of plastic in our country is still not in the highest order, and plastic is sorted out more than 100 times! So, what can you earn from plastic dances?
1. Stands for embellishment with a wax hand.
 You will need dances of different sizes - 2l, 1l and 0.5l. Use scissors or a sharp knife to cut a 3-4 centimeter curl into the skin. Then drill a hole in the center of the cut-off skin “saucer”, which indicates a later prepared haircut with splits.

Place the saucer on the cut between two washers and two nuts. If you just use a metal rod, a wooden knitting needle or something like that in the bowl, then the saucers can be placed on hot glue.

The bottom of the 2-liter saucer will act as the base of the stand, so simply turn the saucer over for stability of the entire structure.

2. Boxes for pastries and cakes made from plastic balloons before.
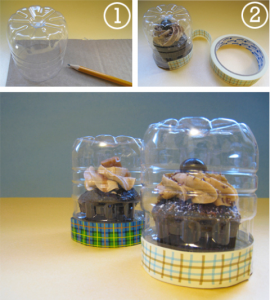
boxes for cupcakes and cakes made of plastic bowls. The leakage and cupcakes may be prone to drying, and it can be difficult to bring such beauty to a guest safely and securely. Not scary! Make these types of fruits from plastic bowls with your own hands - malt boxes. A cardboard stake and halves of a doughnut yield a box for one dough, and two halves of a doughnut can hold the most delicious macarons!

3. A small screen - a cover made from plastic dances with your own hands.
Place 5 - 7 cm curls over two liters of day dances. Hand sew a small embroidery stitch on the inside.


4. Do-it-yourself organizers and stands made of plastic bowls
Plastic dances provide great flexibility in organizing the work place. You can use a variety of organizers for magazines and correspondence, tools and sewing equipment, stands for stationery and cosmetics, cat boxes for toys and other things. Before dancing, we simply cut the neck, and then it’s up to you to decide. A few simple options below will give you ideas.


5. Curtains made from plastic dances with your own hands.
Unusual creations from plastic bowls with your own hands - curtains or light partitions for zoning space. Such curtains look like the silent widening openings of a room that flutter around sleepy exchanges. This decor is not limited to the interior of the cabin, but also to the veranda or terrace at the dacha. You can see a detailed master class with photographs here.


1. Do-it-yourself birdseeds and birdseeds.
You don’t give anyone such a virus from dances. In many parks and forests, as well as on balconies, you can see a variety of dances, dances and milk cartons everywhere, especially in winter. Well, you might still find it useful to take a look at the ones you can make from plastic with your own hands.


 do-it-yourself birdbath from a plastic dance
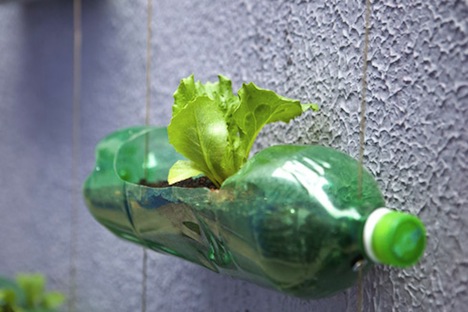
2. Vertical garden on the wall
The empty concrete walls of the hut, garage and park are just begging to be painted. It would be a good idea to build a vertical garden from plastic dances on bare, dirty walls with your own hands!

You will need dozens of two-liter plastic dances, scissors, a skein (twine or thread) and two washers per dance. The process of schematically reading the baby:

For drainage, you can make a couple of holes at the bottom of the container - pads, and place crushed stones, sand or a special layer in front of the soil. And in such hanging gardens you can grow an entire city: herbs, spices, flowers, berries and medicinal plants!
 3. Crops for rose gardens.
From the halves of the plastic bowl come wonderful seedlings for seedlings to catch young seedlings in the wind and weather.

4. Choven from plastic dances.
This unique product is made from plastic balls, which is practically incomparable to the factory model made of wood or gum. If you have a wine, it’s practically cost-effective to get such a chaven in order to explore the closest lake or river, you’ll find a master class here.


5. Flowerbeds made from plastic dances with your own hands
To decorate the garden and fence flower beds and beds, you can use halves of plastic dances. Moreover, roses can grow under the dances. Such garden sprouts made from plastic sprouts with your own hands are great for children.


6. The nozzle for the hose is a waterer made from a plastic pad.

A wonderful garden idea for gently watering the bushes in the city. Take a plastic bowl and make a lot of small shapes from it. Then place the dance on a stroller, for example, an old carriage, toy stroller or roller skate. Attach the hose to the neck and add water. Drilling jets from the openings water the weeds like a plank, and the wheel allows the plantings - waterers to be mobile.
Do-it-yourself anniversary celebration for the New River.
A new river comes to the saints, which exude a particularly warm and spiritual atmosphere. And there are a lot of little ones coming out. Yuletide yalinka, different colors of flowers, beautifully packaged gifts and, especially, various new decorations.
For those who want to create a festive and warm atmosphere with their own hands, we know how to create a beautiful New Year’s Eve, which can be an embellishment to any life. Kerivnitsa-cobs can try making simple round-shaped plants from polystyrene, and those who are new to this can try to make a new plant, which is more like a bud with corn.
New year anniversary stencil with paper and dial for new year anniversary: design template
Template #1
 Template No. 2
  Template No. 3
 In principle, the new year’s birthday can change its shape entirely. For the wall, you can make them similar to the basic round alarm clock or create a larger one that can be placed on the wall.
If your form is not small, remember that in this case it is very important to give respect to the decor. To make your anniversary truly look like a new decoration, decorate it with ashberry nails, cotton wool, sparkling snowflakes and sequins.
Depending on the dial, it can be either simple or foldable. If you don’t want to bother, then just paint a circle, put numbers on it and attach it to the base. If your style is more original, then decorate it with a special themed dial. Use the Christmas stencils to prepare the New Year's Eve and you can get a little extra.
How to earn a great new year anniversary from a box?
If you want to get the most out of your new experience, then the box is ready for just what you need. For this miracle, a straight box or, for example, a round one like a cake would be ideal. If you will give preference to this particular version of the product, then you will only need to correctly fix the details together and, most importantly, decorate them in an original way.
Anniversary from a box of cake:


- Wash the box first and let it dry thoroughly
- Next, take the paper of the color you need and select the numbers for the dial from that
- Carefully coat them with glue and secure them to the top of the box
- While the stench dries out, start painting the internal parts of the plant


- Place a variety of boards, various Yalinka toys, or just cute animal figurines in her place.

- Take plasticine blanks (the culprit is the shape of the cones) and cover them with foil
- Join the two parts of the box together, fix the cones on them and decorate them with additional board.
New Year's Eve with a gift box:


- Now, take a box of rectangular shape and fix it on the bottom part of the stitch until the pine cones will be tied.

- At the next stage, use a stencil, draw the Holy Day dial and also fix it on the workpiece


- Next, take two thin straight-cut boxes and 2 strips of tricut-shaped cardboard and customize it for your anniversary.


- Decorate the look to your own discretion (you can use absolutely all the new tinsel or ashberry gilts)
How to make a delicious New Year's Eve card from cardboard?
 New Year's Day card made from cardboard
 Decorate for the virobu
 If you like to do everything with your own hands, then try to work on your own and the very foundation for the new year. For these purposes, a box made of cardboard would be ideal. If you have never tried before, you can marvel at the master class, which accommodates a trifle more. A diagram is presented on the little one so that you can easily adapt it to the original vibrator.
Just remember that in such a simple way you need to work as diligently as possible. And this means that you cannot allow yourself to see the line of your life, which is called the eyelid. If, as a result, you want to get the perfect piece, then you will need to first use a ruler and a ruler, paint the cardboard correctly, and then proceed until the lines are cut.
Once the box is ready, you can decorate it with new tinsel. Don’t forget that you first need to mark the Holy Day dial on it. In order for those who are absent to understand that there is a lot of money in honor of the New Rock, give priority to the dials, such as Santa Claus, the Snowman or just snowflakes.
How to earn a great New Year's Eve from tsukerok?

 New Year's Eve with Tsukerok
 Recommendations for preparing the box
 If you want to make a New Year's Day box from the sucker, then you will have to make a round box of the required size with your own hands. To make your selection ideal, you will need to make it so that the board of the cardboard blank is the same as the one you have chosen.
- I’ll first cover the cardboard blank with corrugated paper, foil, or just plain packaging. Try to fix them on the basis as best as possible, and also from what deposits it is good to trim the marks on it.
- Glue the dial onto the top of the box and make the arrows with adhesive. The smells can be made from more contrasting paper or from wooden blanks prepared in the required color.
- Once everything is ready, you can start fixing the sucker on the box. Try to place them in such a way that there is no large gap between them. If you have chosen the cutlets with jagged edges, then lay the empty ones on the board.
- After all the dolls are glued, you will no longer have to decorate your New Year's Eve with additional Christmas decorations. At this stage, you can allow yourself to use all your imagination and, in addition to the standard new decor, add in, for example, garnishes or original rivets.
How to earn a great New Year's Eve from disks?


The easiest way to make a date from a disk is to simply take it, fix it on a roller, and then use a marker to draw on the dial on it. As a result, you remove a simple virus, which can be used for preparing eggs.

If you want to decorate those who are away with more beauty, then don’t bother and create a foldable figure from the disks. Once they are well fixed with each other, you will only have to decorate them in a proper manner and add arrows to them.

Another bad option is to glue the disc with a Christmas dial. In order to create such a yearbook, you will need to cut out the stencil at the required scale, cut it out and carefully stick it on the disk. As soon as everything dries well, you can use the skein to hang the embellishments, and place it in any place suitable for you.
How to make a great New Year's Eve with polystyrene foam?
 New year old with polystyrene foam
  Anniversary of stampings with polystyrene foam
  Figurines to decorate the anniversary
 If you have been doing handicrafts for a long time, you know that polystyrene foam is a very pliable material. For a gift you can earn a very beautiful New Year's Day card. If you have time, then you can make a round from this material of the required size, and then work with it in the same way as with a round box. You can cover it with decorative material, and then decorate it to your liking.
Also, polyfoam can be decorated with adhesives, and then decorated with glitter tinsel. Well, those masters who are not afraid of hoof robots can try to make a year from polystyrene. And in order for yours to look like Christmastide, you will need to give it a special shape or simply decorate it with new figures made from the same polystyrene foam. You can see how everything can be incorporated into life in the pictures placed in the place.
How to make a hot New Year's cake from salted dough?

 Preparing for the New Year's Eve
 New Year's Eve made from salt dough
 If you like to do handicrafts with your children at the same time, then you are definitely suited to working on a new year’s cake using salt dough. There is nothing complicated about this process, as all you have to do is give the material the correct shape. However, remember that in order for your choice of ingredients to be correct, you need to be as precise as possible before preparing the dough.
You must achieve such a consistency so that it does not crumble or stick to your hands. Some handicrafts encourage beginners to add a little olive oil to the dough, motivating that it is easy to digest. However, as practice shows, such dough as a result dries very badly and after drying it cracks a little.
Respectfully, it will be more beautiful if you prepare the dough for the following recipe:
- Boroshno - 500 g
- Sil – 250 g
- Water – 250 ml
So, remember that the prepared dough cannot be left for too long, as it will inevitably affect the quality of the finished product. Well, let’s make it simpler, since after mixing you will immediately begin creating a Christmas masterpiece. There are two ways to earn a new year's holiday. You can simply knead the dough and then cut it out into the required shape.
You can also try removing the mixture from other parts and then dry it in the oven. Remember that you need to dry the dough yourself, just so you can get rid of the dough’s structure, so that the dough won’t be afraid. If you try to bake your workpieces quickly, they may not dry out in the middle and this will cause cracks to appear after drying.
Do-it-yourself New Year's Virib with Zozuleya: photo
A new year-old from Zozul will follow the same principle as those who have already known you. Honestly, for the beginning you will need to prepare some thick cardboard, glue or tape, Christmas decorations and paint for painting, and you can safely start creating new decorations.
Otje:

- For the cob, prepare the blanks from which you will make a little box. When cutting, make sure that all parts are the correct size. If you want one of the blanks to be less or more than required, then as a result you will not be able to assemble a design.


- Having completed all the necessary workpieces, begin to connect them together with glue, and then with tape. This is to ensure that the finished structure is as useful as possible.

- Having made the box, begin to work with the workpiece, which is a small zozuli. In this case, it is important to open the size correctly so that the bird can be seen in it. In order for it to look harmonious in the new one, I would like it to be 1-2 cm thicker and wider, lower down.


- At the final stage, shape the bezel (it can be crushed from paper or plasticine) and fix it in the opening. Take all the parts of the anniversary together and decorate them the way you like. Idea No. 4

 Idea No. 5
 Video: Godinnik z tsukerok. What should you give for the New River?
Empty boxes for cake vikorista who are like that. Who mercilessly throws away their pets, who grows their seedlings, in our work, the tidyers save their essentials: soda, powder, which are used for school, and when repairing, they can also be used as a handy tool. Yesterday I tried to find this item with a different method, having added a simple box to the gentry mission.
Frame
To make the frame, I needed a lid from a cake box, twine and a glue gun. Before starting work, I sprinkled alcohol on the top of the cake, making sure to remove all the spills.

The protruding part of the box will be at the end of the next frame, and fill the entire part from the protrusion to the end with twine.

I apply the glue so that the turns of the twine are not glued together, but glued to the base.

While laying out the coils, I try to apply a mixture of hot glue in small sections, because in the wind it will get wet.

Having placed the turns of twine to the end of the box, I trim the kernel.

For the lining, I chose a light base - non-woven fabric.

I use the shape of the blank frame and cut out a circle.

To decorate the work, I took this piece of cherry that had been lying around for a long time. Then I added an embroidery machine and tried to embroider a dozen pieces of the little one, but it was all right. I put the prepared dishes in a tatka and now the stinks are waiting for their time. Please note that today the axis of this picture was spared.

I place the finished bunch of non-woven fabric on the embroidery, joining the centers of this and that. I cut the stitching and glue it along the edges of the offended fabric.

I will eat the frame blank with embroidery and glue it along the stake in several places. If excess fabric extends beyond the frames, they will need to be trimmed immediately.

I'll glue the edges again, lightly stretching the embroidery. I mean the place where the loop will be on the frame. I continue laying the turns of the twine, carefully switching to the turn, not forgetting to make the loop itself. View from the inside out of my picture. It is better to double the non-woven fabric with cardboard


The axis came out in me. You can, of course, leave it out in this version, or you can get fancy. I added snowflakes from a serving board, which I first glued with additional PVA onto the fabric and stamped, and then placed it on the frame.