Let's take a look at the basement: materials, features, consistency. Pouring the foundation in the basement DIY foundation in the basement
Kozhen Gospodar budinku, even early and late, ponders over the spores of the tree and the basement. This accommodation is even more necessary in everyday life. This is the best place to save pickles, as well as the harvest from the land plot. Besides, the basement is often demolished in the garage. . This option is more suitable for baggy places, and they also need to save various pickled spindles and vegetables collected at the dacha. Make a lot of money in the basement with your own hands under the power of your skin, don’t be afraid of the firebrand.
Burial or basement, what's the difference?

The basement is important to those who work in everyday life, whether in a cubicle or a garage. Vikorist is used to preserve the harvest of vegetables and fruits, as well as various preserves. The main goal of the basement is to help the rulers of the house to better preserve the entire harvest so that it can winter in the spring, including apples, potatoes, carrots, cabbage, etc. For this purpose, it is good to think through such aspects as ventilation, moisture and temperature, so that the harvesting of root vegetables and fruits does not dry out.
The cellar is also a mystery. The difference with the basement lies in the fact that there is no dispute, as there is a cottage or cottage nearby. The burial should be done if the basement cannot be built into a building through groundwater contamination, which can damage the foundation. Well, the advantage of the basement is that you don’t need to go outside when the rain is falling and it’s really cold outside, everything that needs to go to the booth.
It is true that today the words lokh and basement are synonyms and are used for their intended purpose, where conservation or destruction is preserved.
How to make a concrete base into a block with your own hands?
Before the beginning of the active work there is a headache, how to stand before the owner of the plot, which means how deep the ground waters lie. The river must be checked in the spring when it snows and the groundwater rises to its maximum height. The simplest option is to determine how much the current flow has increased by adding water to the wells. You can also quickly use traditional methods, but for this you need to understand the names of the plants:
- to grow water-loving plants - horsetail, ocheret, Kinsky sorrel is more beautiful than the well;
- This is the path of deduction, as the trees pass through the singing fields - this place is ideal for lyoh.
Also, to improve the chances of finding a good place, it is better to choose the highest.
Why the concrete excuse?

The creation of such a structure in the basement of a garage or a hut is simple to explain - the tree cannot be preserved for long at such a constant moisture and temperature, and the soil is not very easy to use, so it is more comfortable to grow in lye or basement, durable, solid concrete base . . Until then, the mechanical damage is well visible, it is simply repaired and repaired.
You can also learn more about the following advantages of a concrete subfloor:
- fire-safe;
- do not give in to the flow of vologies;
- All robots can be made with your own hands , do not involve outside specialists;
- Nyomu cannot have grizuni chi komahi;
- A concrete base can be a wonderful base for finishing coating, for example, ceramic tiles.
Concrete slab near the basement of the garage

Cleaning the concrete base in the basement of the garage or cabin, however. Work begins with preparing the surface, which in most cases is soil.
- So that the future of the forgery is smooth, from the very beginning it is necessary to work everything correctly and clearly. The soil that will serve as the basis must be carefully leveled and compacted;
- Then the animal is filled with a ball of crushed stone or gravel, which adds hardness to the base;
- After this, it is necessary to rinse the pillow with sand. The sand must be poured and compacted to add hardness to the base, and also to better level the surface;
At this stage, the preparation of the foundation in the garage is completed.
This is followed by the waterproofing stage. The importance of this element lies in the fact that waterproofing will protect the basement in the garage from the penetration of cold and moisture from the ground, which reduces the incidence of mold and mildew. The waterproofing ball is treated with the help of roofing material or other bituminous materials.
Today there are a number of different types of waterproofing materials:
- cement-based mastics;
- hydroisolating farbees;
- spitting waterproofing;
- Intense speeches that penetrate.

The simplest and most affordable way to waterproof a garage basement is to use rolled materials. They must be overlapped so that the leather extends 15-20 cm to the front, so that the material extends 25 cm onto the wall. Thus, waterproofing is applied to the water that gets into the place of the substrates and walls. It is best to secure all parts of the material together with duct tape.
Note!!! If it was decided to place a number of waterproofing balls, the front ball must be laid perpendicular to the front one.
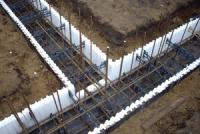
Now the time has come to install the formwork. Since the basement of a garage or a cabin takes up a large area, the surface of the substructure is divided into a number of squares, and the work itself is carried out in stages and takes more than one day. Small spaces can be covered in a day. Formwork is a structure into which concrete is poured. They are mounted from planks or plywood, about 2 cm thick. As has already been said, in large areas it is necessary to cut a number of squares of formwork, the size of which depends on the productivity of the work per day.

The next stage of installation of the substructure in the basement of the garage is called reinforcement. As the main material, the fittings of various garments are used. There is greater rigidity and great value in the design of the substructure, which allows you to highlight great importance. The rods of the fittings are connected to each other in such a way that a mesh emerges.
The optimal diameter of the reinforcement rods for the foundation in the basement or cellar is 0.5 cm. Since the current foundation has to show great importance, then you should take reinforcement with a diameter of 10-16 mm.
Once the reinforcement is completed, you can proceed directly to pouring the concrete. For whom is a riot being prepared? Since the main material is cement, various plasticizers can also be added to enhance the structure and harden it. These words can also be lost in the cement itself.
One more thing, before pouring the concrete completely, it is necessary to first install beacons, behind which there is a surface of the base. Keep the area between the lighthouses in the area, and then apply water so that you do not exceed 2 m.
Note!!! To make sure the beacons are easier to pull out after drying, you can lubricate them with oil.
Vashtuvannya of concrete should be stored according to the grade of concrete. To cover as many gaps as necessary: it is necessary to multiply the depth of the subfloor by the width and thickness of the concrete screed. Maistri recommends that the results of obsessions be increased by 10-15%.

After pouring, it is necessary to allow an hour for the concrete base to set and harden. Then the surface is rubbed. To check, you can grind the vikorist in an offensive way - step on the surface, if there is no more than 4 mm of trace on it, then you can start working. It is necessary to begin with these plots, which were filled with first.
Before grinding, it is recommended to use special concrete compounds - toppings. The first step is to use a rough grout, so use half the topping. Afterwards, I’ll immediately add another one. Finishing rubbing is carried out until the gap does not exceed 1 mm.
To be honest, everything is simple: the more emphasis is placed on the forgery, the more it is necessary to vikorist the topping. So, for washing the substrate, where the average requirement will be standard, it is necessary to take 5 kg per 1 m2 from the expansion, for placement, where in the future the average attention will be revealed – you will also need to use 8 kg per 1 m2.
Vlastuvannya drainage
It’s not too late for the basement to be afraid of the places where the ground waters lie very deep. Sometimes you go nowhere and get out of the situation that has developed. In order to reduce the negative influx of groundwater into the new soil, internal drainage should be reduced. For this, at the cob stage, it is necessary to do the following:
- A trench with a depth of 50 cm is dug along the entire perimeter of the premises;
- Geotextiles are laid at the bottom of the trench and covered with crushed stone or gravel and compacted;
- After which drainage pipes are installed in the trench, which are responsible for leading ground water to a special reservoir. The water collection point is located at the lower point of the basement or lyoshka and is responsible for containing all the ground water;
- then the trench is filled with crushed stone or gravel and covered with geotextile.
What is a basement? It’s simpler to place it under a booth. The basement has its own special technologies, which transfer waterproofing to the basement, waterproofing of the outer wall of the basement and the foundation. Waterproofing protects the basement, and subsequently the cabins, from moisture and water getting under the cabins. However, the technology of basement development does not transfer the bonded insulation of basements and it no longer transfers burning in the basement and especially in the basement.
There is not only a basement placed in the hut for storing household belongings, but also a basement with a source of cold wind that penetrates into the hut. The basement of the first one at the top is installed between the walls of the string foundation, as well as other foundations, subdivided from the monolithic foundations USHP and RPP. It is colder behind the above-mentioned underground, and the area under the booth is well ventilated. Ventilation is ensured by special ventilation openings at the foundation (vents). In the cold, do not mix soil and scrape from crushed stone and sand in the basement.
All these features present a headache to the first step on top of a private cabin - its insulation. Thermal insulation of subfloors is regulated by SNiP 02/23/2003 “Thermal protection budivel”. More about architectural design in .
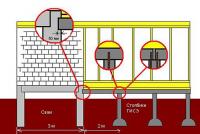
5 substructure structures above the basement in a recessed type of overlap
Construction of a wooden substructure above the basement
The trees are forged on the first floor of the booth to work behind the logs. The logs can lie (spiral) on the target or concrete or under the size and shape of the installation, working without supports.
In both cases, a wooden lining is placed at the bottom of the beam, non-flammable insulation (mineral wool) is placed on it, and everything is covered with OSB boards or moisture-resistant plywood.

The structure of the wooden substructure with joists placed on the supporting platform is similar. The importance lies in the insulation of the beams from the stone pedestals of the supporting pillars with the help of wooden gaskets, coated with an antiseptic and covered with roofing felt.

One ball of this design cannot fit on the baby, but not the required one. This is a ball of vapor barrier that is placed on the insulation unit, under the lining of the black lining on top.
Video stats: Insulation of the underfloor
class="eliadunit">
Construction of a concrete substructure above the basement
Neobov'yazkovo vikoristannya beams for the first layer on top. With a good foundation, a black lining on top can cause a concrete slab to be overcreted. In this case, the design of the substrate itself changes, but the principle is no longer unchanged: the substrate needs to be insulated and protected from condensation through the temperature difference.

Since the base of the first one is a concrete slab on top, then the structure of the substructure is correct:
- Laying wooden joists on the slab, with insulation between the joists;
- Heat is water or electrical;
- Dry screed on a ball of hard insulation with an adjacent thin electrical substructure.
The design of the support that is preferred (floating support)
The premise that is proposed, the basis of which is to serve as a slab, is as follows:
A polystyrene foam insulation layer is laid over the slab, and a melt is placed overlapping it to serve as a waterproofing insulator. A screed is placed on top of the spit. The screed of the subfloor, which floats, is reinforced against the walls with a thin ball of insulation (damper). Cover the dry screed with a vapor barrier and lay the base for a clean subfloor.

Note
Please note that in order to insulate the underlay, the warm wooden underlay should not be laminated on top. I’m guessing, the wooden system of warm underlay works between joists or behind a special wooden flooring and we put elements on it to knock it down.
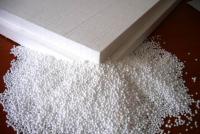
However, it is entirely acceptable to control the heat at first, since the stove is overcooked. Please remember that the insulation on concrete made from extruded polypropylene is 25-30 mm thick. And also before the insulation, a waterproofing material is laid on the slab, and a material is laid on the insulation that absorbs heat.
The basement area is located deep under the ground, so cementation and waterproofing of the base and walls are carried out. completely at once:
- scorched basement;
- vykoristannya as a living room;
- construction for renovation of a workshop, gym, garage, sauna;
- location of the boiler room or similar technical premises;
- placement of leaves to preserve products;
- elevated soil moisture.
When there is wet vapor from the damp earth, pipes, furniture, furniture, furnished walls and floors emerge. Budynok can come before the emergency.
Tools and materials
To start the process you will need the following tools:
- bucket;
- shovel;
- grater and kelnya;
- foundation rammer;
- Capacity for concrete demolition;
- grinding machine;
- rhubarb;
- waterproofing;
- beige tape;
- reinforcement or steel mesh;
- beacons;
- rule for concrete vibrating;
- grinder with discs on stone;
Materials you will need:
- cement M400;
- standard crushed stone;
- quarry sand;
- tap water;
- Chemical additives that increase hydrophobicity and value of concrete (as required).
Instead of shovels, containers for mixing concrete, use a concrete mixer. This will help you prepare the yogurt sum sooner.
Technological process
The concrete foundation at the basement is completed in six stages:
- Make a pit with a width that matches the dimensions of the walls and formwork.
- Creation of a soft pillow with crushed stone.
- Installation of formwork.
- Lays a ball of waterproofing.
- Reinforcement fittings.
- Pouring with concrete.
Preparation of the substrate before cementation
Concrete on ground is an ideal option for screed.The ideal option for laying screed in the basement is concrete on the ground. Preparatory work is reduced to a minimum: reduce the amount of dirt, moisture, compact the soil and you can start screeding. When new subtexts are installed on top of the old ones, the following will be displayed:
- clearing of the old pavement from the distant vads;
- narrowing of the cracks and chipping of them, widening them and finishing with sand-cement or polymer storage;
- dismantling of unrepairable plots;
- adjusting differences in height of the base using a milling machine;
- cleaning the surface with a saw, otherwise the adhesion of the concrete to the old substrate will be impaired.
If it is not possible to create a perfectly level base from the old coating, it is recommended to lay a concrete ball.
Pillow filling and compaction
When placing the support directly on the ground, it will immediately result in compaction, then from crushed stone or crushed stone. The ball gives the base hardness, preventing the possibility of cracks appearing. Next, a sand cushion is laid with a ball of 0.5-1 m, which can save up to 25% with further compaction with a roller or vibrator. This fact must be taken into account before the hour of sleep. After strengthening the sand, it is watered with water.
Waterproofing
After the pillow is compressed and compacted, waterproofing is achieved. At the core of this work is the impenetrability of the future state. The height of this parameter is allowed, please. For waterproofing, vicorboard rolls of bitumen, polymer material or thick polyethylene sheeting are used.
The selected material is overlapped along the entire base and secured with tape. It is not wrong to create gaps and crevices. The excess is cut off. Place the waterproofing layer on the wall 25 cm. This is to protect the stick from moisture. You can isolate water from a concrete ball. Why are insulating materials coated?
Laying metal mesh
 If the basement is very flat, it is recommended to lay a reinforced ball using a reinforced structure. The surface of the corn needs to be divided into squares. Then follow the marking with the boards of 2-2.5 cm.
The fittings are selected carefully based on the intended location and the intended location. You can knit metal rods or reinforced mesh (knitted, welded). As a rule, a road mesh with a wire diameter of 0.5 cm is installed.
Lighthouse installations and screeds
Before it is important to correctly display the beacons. Leave the finished work until the surface is as smooth as possible. The formation of beacons consists of the laying stages of the first portion and the second half of the process. With a 1 m window, the heights are created from each other, and a slats with a vest are placed for the animal. Behind the additional level installed in the lower levels, the top of the beacons is moved under the bottom of the level.
For underlay screeds, the brand costs no less than M400. As a reminder, granite or granite is usually used in the home. For the first ball of masonry, a sealant or plasticizer is added. The victor or clay vibrator must be used for vibrating.
Drying
 If the concrete has piled up, you can start pouring the walls.
 After laying the skin on the concrete, wait an hour for the screed to gain strength and dry. This process can be carried out without giving the least amount of money. To speed up the process of setting the concrete screed without wasting its value, it is recommended to carry out the vicor operation. For this purpose, a material is placed on the plain concrete, which is filtered and covered with a fireproof mat. A vacuum pump pipe is attached to the center of the mat, which draws out the moisture without damaging the screed. Drying using this method requires only 7 years.
Drying of the concrete is completed when a trace of up to 4 mm is removed from its surface.
If the concrete is sufficiently strong, you can stretch the beacons and putty the furrows with sand-cement. Walking on top of fresh concrete is better than using a sheet of plywood. After this, cover it with polyethylene foam. Outside ripening of concrete – 28 days.
Grinding and rubbing
The rubbing begins at the walls and door openings in the middle. For this purpose it is recommended to use a topping or a concrete slab. The process is complete when the rubbing material is applied to the surface of the clay. The process is repeated three times. The final stage is considered when the concrete has lost a trace of up to 1 mm. For small screeds you will need 5 kg, for medium sizes – 8 kg, for colored underlays – 8 kg screed per 1 m2.
Having recently bought my own life. The great ruler turned out to be a decent person and immediately told me that the boards, for which the foundation was built over the basement, soon rotted and required term replacement. Perhaps I was afraid that one day I might fall through there. The basement itself was located in a hut under the kitchen and has the following dimensions: width - 2.4 m, depth - 2.3 m. In the middle, the walls are lined with a whole and coated with a ball of clay.
The frame above it lay on two wooden beams and was made up of planks and laid on top of them with chipboard slabs. The stains were damaged and the flooring was crooked, so it was really unsafe to walk on it. All the wood was damaged by tree beetles, and the chipboard boards were sagging and became fluffy.
Initially, I decided to simply replace the boards with new ones, but then, without haste, everything was dying, I decided to work on the metal frame and fill it with concrete. First of all, the basement will always have moisture, if you don’t turn it, and then, new boards, which will protect the low moisture content of the wood, will definitely not be worn out, otherwise, if you already work, then - surely, once and again, and what can you do? Is it better to use concrete?
Dismantling the old substructure
First we needed to remove the chipboard, and then the boards. With the help of a nail puller, a hammer and a hammer, I was given the opportunity to complete it in three years. There were no problems with the slabs, but more time was needed to remove the boards: the stinks were driven up to the beams by the great flowers, which caused great difficulties. Once the wood covering the base had been completely tidied up, I had to shovel a decent ball of earth (one piece at a time) along the entire perimeter of the walls, in order to push in all the other imperfections and level the surface. Qia on the right took up the entire remainder of the day. The cutting robots were checking the wound.
Preparing the frame
I did not damage the metal on the prepared frame. It is possible, if you choose to give it more, it is not necessary, but only in order not to put additional supports in the middle of the tree so as to change its large expanse. The basis of the structure was made of thick-walled pipes (? 61 mm, wall thickness 5 mm), which were never washed. On the right is where earlier there was a scorched area near the booth. It looked greedy, unwieldy, and it was entirely natural that I had tidied up everything from the rooms, replacing it with everyday scorching equipment. And the pipes you blow are good for the basement.

First, I evenly distributed the three tight three-meter pipes, which are load-bearing beams, above the cellar pit (every 80 cm). Then, having placed them exactly behind the level, they began to boil them among themselves. For this purpose, pipes of a smaller diameter (? 32 mm - 12 m) and heavy fittings (? 12 mm - 40 m) were needed. First of all, I welded 15 jumpers between the beams, after which I strengthened the entire structure with reinforcing rods welded to them below. The result is a very reliable metal frame.
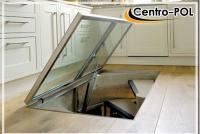
We would like to sit on the prepared frames that frame the entrance to the basement. I made it from a 40/20 mm profile pipe in a rectangular shape (length – 70 cm, width – 50 cm). What is there to show respect for here? First of all, all the frames must be perfectly straight, the dimensions of the sides are strictly correct, otherwise the lid will not fit into it easily, and you will not be able to see through it. Otherwise, weld them in such a way that their height is on the same level as the pipe beams and also the beacons.
The cover itself was also prepared by me from a profile pipe (40/20 mm) and a thick piece of plywood, securely connected to the metal base with screws. We cut around the lid, which prevents it from falling into the basement, using rolls, welding to the underside of the frame that frames it. That day I worked hard on my soul: from the very morning until late at night, and finally ended on the right. I burned maybe two packs of electrodes alone, and inhaled so much caustic smoke - gasp! (Pipes in the Farbi Buli).
Formwork installation
The metal frame was ready, now I needed a new task - to install the formwork above the cellar. We looked at different options for their preparation, and then chose to lay them on chipboard slabs that were removed from the old substrate. Why? First of all, it was easier to close the great expanse above the pit and there were practically no gaps where the rare concrete could be spilled, so the slabs practically didn’t exist. I fastened them to the frame from the bottom side with a solid knitting rod: I drilled them into the openings of the chipboard, then mixed them with drill, and then screwed them tightly to the reinforcement with pliers. It turned out well, but looking at the heaviness of the concrete, I put a bunch of time-sensitive supports at the bottom for every problem.
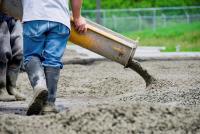
Working with concrete is not a serious test, since you need to pour 12 m of concrete in one day? when the thickness of the ball is 10 cm. For this reason, I called on a friend to help, who first prepared everything necessary for this purpose: gravel, cement, bark for mixing, shovels, buckets, rule. We divided it up like this: we mixed the concrete at once (in a proportion of 1/5), then one brought it from the center to the place of pouring and poured, and the other - divided the finished mixture using a three-meter rule, pressing it firmly to the beacons and building. The remaining parts of the hammer are thrown to the sides.


Double worked on the water. Having started to work on the eighth wound, we had already finished pouring by lunchtime. The result was pleasing. The pretext turned out to be true, and the whole room was immediately transformed. After two days, when the concrete could already be walked on, I took an old car wheel and created circular ruins on the surface of the base, removing minor unevenness from it. Now there is only so much left to check, and the concrete is still dry.
Final chord
The week has passed and I have begun the final work. In front of us, we carefully coated the dry concrete surface with a primer. Not for beauty, no, but to change the strength of the saw, which inevitably breaks when walking. When the farb has dried, put it on a base of hydroisolating melt, which prevents moisture from penetrating from the concrete into the linoleum. After which, as you already guessed, the beds were made of linoleum, not simple, but thick, insulating, with an abrasion-resistant surface that is not afraid of dragging on it. Satisfied with the road (the price of a linear meter is about 2 thousand rubles), but, look, it’s a cost of wasted pennies.


I covered the entrance to the basement and the lid itself with a decorative metal bundle. It turned out neat and beautiful: under the bundle I managed to seal the edges of the linoleum that had been cut unevenly, and then firmly pressing them to the surface. I didn’t get a handle for the crib first, but I made sure it didn’t bother me while I was walking. To do this, I drilled the cap in the center, screwed the metal plate to the gate side, and spot welded the primary nut to that point. For it, prepare a special key, which is a small twig with splits and a lump at the end.
For the rich, a basement is associated with a tree. And the whole world is correct. If you insulate the basement, provide ventilation, create a clear substrate, an additional place for preserving agricultural products is ready. Obviously, since there is constant moisture in the basement, it is detrimental to both the foundation and the walls of the hut. The same bottom-most trace should be given due respect.
In order to figure out why to create a forgery in the basement, you should know that there are only two ways:
- on the ground: adobe or concrete subfloors
- that forgery that spreads along the joists
The initial choice between these two options is the level of groundwater. If the stench is present close to the surface, it is stronger than the concrete base.
The cob works by cleaning up the dirt, leveling and compacting the surface of the earth. If you want to make adobe foundations, then the stench will certainly be warm. If your choice falls on a concrete base, then such an excuse will be worse than the adobe, and therefore worth less for it. The foundation of the basement is built on frost-resistant ground.
Basement lining on top along the ground
Vlashtovuyemo adobe substructure
To soften the base of the track, place a ball of crushed stone mixed with clay. The thickness of the ball should be no less than 10-12 cm. The crushed stone and clay should be compacted well. After the first ball of crushed stone is dry, we lay another one of the same thickness: 6-8 cm. After this ball is dry, it is necessary to fill the cracks that have appeared. For example, with wax and clay.
Vlashtovom concrete base
For a concrete base, it is necessary to prepare a base. Vlashtovaetsya, so called the ball that underlies. Made from crushed stone and gravel. Then the base becomes stronger and stronger. In order to ensure that the underlay is poured evenly, the height of the underlay is determined by the height of the underlay and is indicated on the wall behind an additional marker. Next, we proceed with the hydraulic system: using a mark on one wall, we find the required height on the opposite wall and indicate it with a marker. Depending on how large the basement area is, we install one or a dozen marks near the metal rod at a distance of 1-1.5 m, one type of one, for which the required height is also determined using an additional hydraulic івня. The rod of the trace is simply driven into the basis of the sublogue.
We fill the foundation with cement mortar 1:5. Focusing on the marks, the rule is to align the ball with the concrete. As the work progresses, the rods with marks need to be twisted and reinforced with them. After 3-4 days, the mixture will harden, followed by the residual filling with rare soil, as soon as all the water has been removed. During the formation of another concrete ball, it needs to be periodically crushed in order to improve its durability characteristics.
Waterproofing of substrates
When there is a high level of ground water, additional waterproofing is required. To do this, cover it with bituminous mastic and lay the ball with roofing felt (you can use two balls, coating them with the same mastic). Then, once the surface has hardened, pour in another ball of concrete. Once this ball is in good condition, we fill the ball with a concrete screed that is leveled. This comradeship may exceed 1 div.
Podloga podlogovogo on top behind the logs
If you are interested in creating a forgery in the basement, you have settled on this option, following certain nuances. It depends on the type of soil (dry and watery) and the level of ground water that most likely feeds the waterproofing. If the moisture content is high, then a wooden subfloor should be used to create a concrete one. Once everything is ready, let’s get started. Get acquainted:
- logs: made of well-dried wood with a diameter of 150 mm.
- boards: tongue and groove 40-50 mm.
Treat the tree with antiseptic disinfectant. Trim the trees before the end of the day, so they are 2-3 cm shorter per day of placement. Place the first board 1.5 cm from the wall to prevent deformation of the substrate from the natural movement of the soil due to temperature changes.
For deck logs, cut the track after the last placement. It is necessary to lay sheets of roofing felt under the deck (timber). The logs should be installed strictly behind the beam. After this is complete, we lay the flooring from boards: with 6-7 cm long stems.
River balls of wood on the wooden boards of the guilty "marvel" at the different sides. So the forgery will seem more accurate. Behind the wooden flooring, you can put linoleum or another covering for the base.