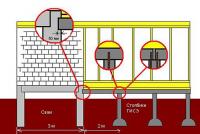
How to build a wall under the stove. How it’s broken up, how it’s worked, how it’s crushed. "On the Swedish hand"
Pecheras or grottoes can decorate the design of any garden or country house. These are so original and beautiful. Its popularity has grown significantly over the past few years. The ovens (grottos) will be of any size. Moreover, despite the fact that stone slabs for everyday life can be important, the process of everyday life itself is not as complicated as it might seem. The report on how to build a grotto with your own hands is obvious.
Where will I place it?When choosing a place to build a grotto, first of all, show respect for the ruler’s merits. Tim, no less, has these recommendations:
Stones for everyday lifeIf there is a shortage of materials, it will be easier to build a stove or a grotto without having to deal with large rock formations. The more stones there are in the block shape, the more natural it will look. In this case, you will need material for plastering the jumper. For this you need to add small stones, which will manually block the entrance. Foundation for the grotto
The foundation is the basis of a structure that will ensure safety, value and reliability. For those who do not care about their great courage, it is often not their fault that they sag or crack. When laying the basis for the oven, it is necessary to dig up a large amount of soil, which, however, will become vikoristic and further. The best way to build a foundation is to build a concrete platform reinforced with steel reinforcement. There is a layer of polyvinyl chloride or butylate in the middle. This spit is subject to strong pressure. Therefore, you need to place soft sand and priming cloth on top of the ball. To protect the concrete foundation in the middle, you need to spread even thicker plaster.
Next there is a swimming pool under the stove. Its depth may become at least 600-650 millimeters. On the sides of the pool it is necessary to construct an additional concrete plinth. If you lay a long sheet under the concrete, then it is absolutely necessary to coat it with a waterproof mixture. Screw walls
The back of the wall and the entrance to the new stove are built around the edges with water on several plinths. To connect the rock between themselves, excavations are made. It is important that after the work on the structure is completed, all the sticks are not visible. Do not forget that the walls and the back of the future oven are likely to stick to the excavated structure. If you need to go, formulate their traces at the same time that the walls are erected. In this case, it is necessary to vikorize for this stone of great size. You can try in the middle of the oven and on the offending sides near the entrance to create a lining from flat stones. The stench is applied one by one until it lasts heavily, after which they squeak among themselves for further stinking damage. This is necessary in order to give the project a realistic look. Therefore, flat stones line the bottom of the pool. It’s better to re-drain a number of planting nests. It is recommended to place the stone near the front of the pool before entering the stove. This obov'yazkovo needs to be developed in this situation, since all the spores were created on earth. When singing, the water does not rise above the level of concrete police. In addition, the furnace grotto is transferred to the raised terrace. Let us replenish the stones and earth. This should lie in front of your basket. After the oven walls are completed, a fireplace can be installed. It’s best to put him on vapnyaniy rozchin. To ensure a child-safe environment, the fireplace should be placed on a steel plate. Dah oven
This can be done in a variety of ways, but one of the simplest ones is:
How to decorate the grotto
After completing all daily work, the grotto needs to be decorated. For which decorative plants, flowerpots with flowers, various garden figurines and other small architectural forms are best suited. The walls in the middle of the oven can be decorated with a mosaic made of stone or colored glass. It is recommended to cover the bottom with crushed stone, and install wooden doors at the entrance. If the grotto is located deep in the sky, then on the surface you can create an alpine rock or implement a great idea for the garden. At this stage, use your imagination and creativity as much as possible. DIY grotto for an aquarium
A grotto in an aquarium can be not only a beautiful decoration, but also a place to hide peaceful fish from the huts. It is difficult to earn money with your own hands. Moreover, you can use different materials. Grotto made of stone
Most often, a grotto for an aquarium is built from a brook. For which use a different neutral stone behind the warehouse? In order to make various openings in stone, you will need several types of power tools. Of course, the labor of a robot, or even that wart, will be difficult. After soaking in aquarium water, the stone is filled with colorful greenery. This will not spoil the appearance of your aquarium.
Grotto from the village
As a material for a grotto, you can also use wood. There will be plenty, but this is not rational, even though it is clear that the tree near the water is rotting. Still, it is worthwhile to prolong the life of this material. And this is why there is a special treatment. To make a grotto out of wood you need:
Grotto made of stone
You can make fish shelters from stone. For this you need a bunch of smooth stones, without sharp edges. The stinks can be either flat or round in shape. The order works:
Other options for living in the grotto
Dosit often hide from corrals, as you may be able to do today. For which are the original souvenirs brought from trips to Egypt, Turkey and Israel. Place the coral directly into the aquarium. The top of the yoga can be decorated with small muffles. A nasty piece of shit can lead to measles. On old trees, the bark comes off in large chunks, which soon begin to collapse into a tube. This form of material is ideal for lining a grotto in an aquarium. Before harvesting, the bark must be washed, boiled and disinfected. After this, they can be placed in an aquarium. Now, don’t be afraid to use your imagination when decorating your aquarium. Then you will have a unique little piece of natural beauty. Sometimes, for example, they make a grotto out of plastic pipes, cover the shell with sticky resin, and then cover it with gravel or sand. I want this decision to be for everyone, because... It never looks good. In addition, such grottoes can cloud the water and, therefore, harm the fish.
Grotto: video |


And were you planning to take a break from the sky? Regardless of the reasons for your decision spoil the snow baker need to know what snow oven This will become a great way to protect yourself from the cold and wind.
The head material, snow, has amazing components that will help create a fantastic headstock for you.
Space
First of all, before you start building your snow oven, you need to choose the right place for it. Why find a small open plot of land, which will have a sufficient ball of snow for the future furnace, which will accommodate all the people you would like to accommodate there.
Place of everyday life
It is also important to carefully select a place for creating a snow oven. It is important that there are no slopes or rises in the place of everyday life; the best option would be the plain. Before the start of everyday life, make sure that you don’t get lost on the mighty path of the avalanche, which exploded so quickly. If you place the stove on a flat slope, make the entrance lower behind the arm. Do not allow the warm air to linger near the stove for a longer hour.
Volume of snow
To build a snow oven, you need a sufficient amount of snow, so ask about this later. To start, collect a large amount of snow in one pile, which will compact it more heavily. True, remember that snow is not suitable for everyday life. So, for building a snow oven, frozen snow covered with ice is not suitable. It will be possible to get rid of wet snow, however, it will be possible to use such a snow oven only after it freezes.
Time to wake up
After you have dumped and compacted the mountain and the snow, you need to mark the hour. You will want to allow the product to become much smaller and firmer, around the breast or parts of the snow oven to accumulate among themselves, which will prevent your oven from collapsing the moment you scoop it up. If you become more expensive with snowshoes, then use them for compacting snow. Allow us to make a big coupe, and then, a good one.
The hour has come to open the digging of the future oven. To get ready with a shovel, start digging a tunnel in preparation for the snow. It is necessary to excavate a tunnel, which is only a few minutes beneath the surface, and the depth of which is several meters. It will be easier for you to do the work if you have a special shovel for digging in snow.
Perebig dahu
As a result of your breathing, it is possible that the water will begin to melt and drip. To achieve this, it is necessary to make the yakmog's stele smoother. To do this, smooth it out with your hands. This allows you to escape the birds that have appeared and keep your sleeping bags dry. You can also create small grooves on the surface of the dome, which will help water drain without dripping on you.
Bedrooms
If possible, you can place a seat or bench in the middle of the stove for handiness. Place the heads at a sufficient height to reach the ground. The more benches you set up, the more comfortable you will sleep or sit on them. The colder the wind is below, you will be warm while you prepare the bench.
To keep the stove warmer, you can add a little insulation and cover. For this purpose, lay out tourist kilimkas or tarpaulins. This way you will not come into direct contact with the cold snow, which will keep your feet warm.
Ventilation
Also, do not forget to ensure that there is no carbon dioxide released as a result of your breathing. You also need sourness and freshness in the morning. Why create a ventilation hole at the bottom of your snow oven? The diameter of this opening must be close to an inch, and the passage through the hole must go through all the trouble. In other words, it may be dripping. Also create another ventilation hole of the same dimensions as the first one, which was placed here near the wall. If you can’t create anything, then your oven can dry up strongly due to the warm wind that has accumulated in the middle of it.
Have fun
The snow oven is ready for testing. Get into it, and after about an hour you will notice that you are starting to warm up. Don’t forget to drink some hot kawaii tea to speed up the brewing process. Also, having climbed into the oven, change into a dry, warm coat. However, always do not spread a lot of liquid in the middle of the oven and do not use other heaters. This will increase the likelihood of a snow oven collapsing on you, which could lead to your death.
Systems input output
Of course, you need to think about how to protect the entrance doors, and also the cold air through them. The most important solutions to this situation will depend on your backpack. For help, you can safely block the entrance. If you plan to spend more than one day in the snow oven, then after each night, clean the walls and ceilings with melted snow, and then replenish them with new snow.
One of the most original features in the garden, which you don’t often find in your summer cottage, is the grotto. Create a grotto to add monolithic terraces and garden plots that show differences in height. The advantage of the grotto above and you created it with your own hands!
News about the grotto
The grotto is a shallow cave that forms the crypt of the stele. The view of the grotto will make your summer cottage more mysterious and give it an antique character.
In addition to its decorative function, the grotto is also a place for improvement, as well as a place for complete maintenance and care of the hidden picture in the garden.
To create a grotto you don’t need a lot of money or special skills. All you need are some basic masonry skills and creative ideas and imagination that will help you decorate this garden plant in an original way.
In order to build a grotto with your own hands, you need to stock up on a small amount of natural stone of various shapes and sizes. The most popular stone for making a grotto is stone, dolomite and granite.
Instructions for making a grotto with your own hands
In order to open the mainsail smoothly and accurately, it is necessary to follow the following instructions:
Lesson 1 - Choosing a place for the grotto
When choosing a place for a grotto, it is necessary to ensure that the view from the grotto is likely to spoil the entire garden plot, and the view of the grotto will immediately catch the attention of all the guests.
So you can give the garden business some kind of secrecy and grab a grotto at a walking place. You may enjoy a stroll through the garden and a spree of tea leaves in the vineyard or other curly growths when you see the inconspicuous entrance to the grotto.
Since the grotto serves as a place of amusement, it is so necessary to place it overlooking the entire garden, or in an inconspicuous little corner, so that the guests do not suspect about its existence.

The plan, as you see, is to place the grotto on the dacha plot due to the success of the rulers.
Croc 2 – Determined by the shape and size of the mainsail
Our butt will have a different mainsail, which is located in. The dimensions of the grotto will be slightly larger, the lower size of the supporting wall will give the grotto dominance in the composition. The shape of the grotto is pvsphere.
Lesson 3 – Creating the frame of the mainsail
In order to get to the grotto with your own hands, you need to build its frame from the beginning. For this purpose, it is recommended to vicorize the boards that are cut, or the sheets of plywood. It is necessary that the frame of the grotto be made to match the stones that the beast will need to lay it in. Also, pay attention to those that the inner wall of the frame is the wall of a future oven, so it is important that the walls be more or less uniform in shape. After the frame has been built, a foundation (most importantly a foundation) is poured along its perimeter, on which the fireplace structure will be built.


Krok 4 - Laying stones
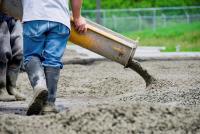
Once the foundation is in place, we begin to lay the stone. For this we prepare a cement mixture (grade M500), the viscosity of which suggests the consistency of sour cream. Before applying the chisel, the stone must be wet. Stone masonry must be done at a rate of no more than 4 rows per day, so that the structure fits well and does not deform under the rows, so that it lies more firmly.
It should be noted that the construction of the grotto consists of masonry stones formed into a bunch of balls. After laying the first ball, the mesh and fittings are laid with it and covered with cracks. To completely freeze the structure, it is necessary to take a break of 3-4 days.
Once the damage is overtaken, we begin to lay the stone for the ball. This ball is external (facing), so try to make its contours beautiful.
Once the structure of the grotto is laid out, we leave it in peace for 3-4 days, so that the damage is completely covered, after which we knock down the wooden frame that is located in the middle and the aligned walls of the oven (which o є start a fight, we hope їх).
Krok 5 - Decorating the grotto
In order for the grotto to attract the attention of guests with its design, it is necessary to decorate it decoratively. For this purpose, it is recommended to pick up bushes, flowerpots with flowers to stand in order, various garden figurines and other small architectural forms.
In the middle of the grotto you can decorate the walls, vikorist and mosaic of colored glass or stone.

If the grotto is located in the depths of the soil on the surface, on the surface you can create an alpine rock or create another idea for the garden, as you were surprised.
The bottom of the grotto can be covered with pebbles or crushed stone, and the front part can be lined with wooden doors.
Zagalom, at this stage you must use your imagination and creativity as effectively as possible.
On this occasion, the grotto is finished with your own hands. As you see, there is nothing complicated about this process.

Do you need to know the terminology to cover up in the snow? Have you ever spent the night in the fresh air on the highway? Are you trying to create the best snow fort in your area? It doesn’t matter if you want to fight the snow furnace, carefully follow the skin pattern so that your snow furnace does not fall on you. If you are ready to keep your important work and weather away for many years, you can build a snow oven with which you can write.
Crocs
Part 1
Select location and preparation- Ventilation openings will be discussed in this article later.
-
Call for help from a friend. It is highly recommended to practice it twice as much as possible. Fill one person with a stove with a strong shovel through this process of everyday life. In case of a furnace collapse, we can quickly rescue people from the rubble.
If necessary, work kuchuguri. If your area does not have deep enough snow, you will have to throw snow with shovels so that the pile is at least 1.5 meters deep and large enough to accommodate all the people who need to be buried in the oven.
Compact the snow firmly. You can compact the snow using the soles of booties or, for help, a plywood arch, pressing on the new animal with your body weight. If the snow is light and fluffy, you may have to compact it several times while you operate the oven, until the final compaction, if the oven is high enough.
Leave your bush for two to three years - the cold wind will melt the snow. This will keep the snow hard and reduce the chance of collapse if you decide to dig up the stove. It is recommended to wait for more than two years, although if the snow is fluffy, dry and fluffy, you may have to wait up to 24 years.
Drive a tunnel in the snow. Once you have dug the kuchuguru, you have to build a tunnel that is wide enough so that you can reach the depth of a few feet with a hillock. If you are digging a tunnel in deep snow, dig a pit with a depth of 5 feet or more and then dig the tunnel while standing on the bottom. You will be relieved that you have a compact snow shovel under your hand, which you can get in any tourism supply store or for active repairs.
Place your fingers or nails into the body as a guide at 30-50 centimeters. If you dig in the middle of the stove, you will have to grope when you reach the ends of these items. In another case, the steel will become too thin and the oven will either collapse immediately or become spilled into such phenomena as, for example, an avalanche.
-
Form the oven crypt. Swirl snow from the center of the pile or snow drift through the entrance tunnel. If you have left enough space for your body in the snow, you may find yourself stuck in the middle of the oven and shoveling snow with your feet. Make sure that the sheet is not thinner than 30 centimeters to minimize the chance of collapse. The walls are to blame for 10 or more centimeters of the body, the bottom of the body.
- Try to create a mixture of furnace linings below the entrance tunnel. This solution will help to save heat in the sleeping area, as fragments of the cold air will accumulate at the entrance to the tunnel.
Avoid areas of rockfalls and slopes that are blown away. Do not dig your snow furnace onto the path of a potential avalanche or stone. Sheets, against direct wind, may be unsafe, if you are left without sleep at night, the fragments of the stove entrance may be blocked with snow, which is caused by the wind.
Find a place with a great depth of snow cover. If you manage to find a kuchuguru more than a meter deep, then a large part of the work will already be broken up for you. Search the areas where the wind has blown such a kuchuguri against the skhila. Don't forget that the size of the place depends on the number of people who need to be covered. The oven with a diameter of 3 meters is handy for two or three people.
Turn over the snow. With light and fluffy snow, which covers everything, it is important to treat, moreover, the structures will fall apart with greater speed. Fortunately, the snow tends to increase over time, so since you have an hour, scoop it up and bake it until it becomes hard, then, having done everything, you will still be able to form it into a snow oven.
If you wash away the trash for everyday life, instead of the oven, dig a foundation pit. If you are in an emergency situation, an alternative is to dig a pit and lay down a tarp to cover it. As stands for fastening the tarpaulin, use sticks or hammers under the snow. It is easier and quicker to navigate, but it will be much colder in the oven, and you can get caught under a ball of snow or an avalanche.
Check that you have the necessary speech and possessions. Warm, waterproof clothing is essential for life in times of crisis, as if you were just living in the wild locality. Consider taking off one or two lower layers of clothing before starting work, and then you will have to change clothes to sleep before the hour of digging. Once you have one or two compact snow shovels, you will significantly speed up and simplify the baking process. The dzherelo is light so that it does not burn the flame every night, but a candle or other small dzherelo fire can be used if you want to create a ventilation hole.
Part 3
Completed oven activityOpen the ventilation openings. Snow ovens can be insulated from the wind, especially since the steam that is seen creates a crunching ball on the surface and walls. To get rid of the poisons, use a stick or other object to create one or two openings in the worst part of the dahu. Turn over and open it through.
- The fragments of the ventilation opening will lead to some loss of heat, you can close the opening with snow or another object and it will be enough if you feel stuffy again, or everyone’s head is starting to spin. Take the item from the door before you go to bed.
The stench should not only be considered aesthetic and harmonious, but should also be actively used as a means of gambling and finally. Specialized stores have such equipment - woe. However, the stench does not always indicate the design intent, it can be expensive, and often instills doubts about its safety: because of the Chinese viruses, we cannot guarantee the non-toxicity of the materials and the processing sufficient to ensure that the patients are not injured. That’s why smart people prefer to build a grotto for an aquarium with their own hands. In this case, it will definitely fit into the underwater landscape and will be absolutely safe for fish.
A couple of words about the decorations
As we begin to organize our “budinochki”, please remind us about the environmental friendliness of the output materials. To fasten the elements, you can use silicone intended for sealing aquariums - this may open the pipes.
Collected from a natural medium, it requires good washing, or better yet, boiling.
It is not the fault of the sharp edges, protrusions and edges. There is particular concern about the entrances to underwater structures, where the risk of injury to fish is greatest.
The internal dimensions will be sufficient for the opening of the doors or the “emergency exit”, opening directly opposite the entrance.
Beware of the stagnation of cements: they will have the ability to completely change the acidity of many of your compounds.
If you are interested in ceramics for an aquarium, remember that the purchased one will require an additional deposit. Or take the shards that are sold in specialty stores.

"On the Swedish hand"
In some situations, a grotto is very necessary: for example, you were given newbies, and the “pool” turned out to be cramped for them. In the deepening of their vital minds, fish can kill one another. You can handle the situation with just a little preparation.
Take a glass of the required size (for example, for ketchup), wash, boil and dry. Dry sand is scattered on the newspaper, the container is coated with silicone and rolled in the ground. After a year, when the silicone accumulates, the sticky sand will stick to the stones and pebbles that fit. The stench adds to the aesthetics and adds to the dance of stability. A similar grotto for a do-it-yourself aquarium needs to never dry out so that the silicone becomes fully functional. In the morning, you can place it in water until it boils.
Tsіlіsnokam'yanе ukrittya
It will take an hour to create it, and be careful with the tools. Then such a grotto for an aquarium with your own hands will be exclusive and eternal. For this purpose, a stone of consistent dimensions and not very high value is selected. With foam and aerated concrete blocks, it is easier to see that odors are easily removed, and unnecessary chemicals are not released into the aquarium water. A chisel and a hammer are used to beat out the corners and protrude so that a chimera comes out. Behind the additional drill and long drills, the required cutting passes through the passages and furnaces. Mothers in their order need to be chaotic, so that things don’t go wrong. Farbuvati or as if to additionally decorate the “skela” is not very good: having stood near the water, it has grown overgrown with trees and has a natural, natural appearance.

How to create a grotto for an aquarium using pebbles
This version of the decoration is even more elegant, but the output gives true architectural masterpieces. For the cob, you will need to collect (or buy) a sufficient amount of smooth stones, preferably prepared in bright colors. Then it would be a bad idea to write a sketch without compromising on the dimensions, and your grotto would not be deprived of its vinyatka landscape embellishment. Then the first row is laid out behind the intended open curve. The next entrance is fixed with an object suitable for cutting - a plastic pad, for example. The fireplaces are selected to be approximately the same height. Sealant is applied to them and the next row is placed. If the silicone accumulates, the front lanyard is removed, and the skin row is made only a little with a smaller internal cut, so that a rounded structure emerges.
When you reach the crypt on the right, a papier is placed in the middle of the grotto, and the masonry is laid on top of it. After residual contact with the silicone, the inlet clamp and support paper are pulled out.

As long as you don’t water or wet the surfaces, you will get an exclusive lock for the aquarium, a place in which to wash all the bags. Before installing it in a permanent place, it is better to soak the empty container for a few days after changing the water.
Wooden tower
From cramps or a small stump, you can also create a wonderful grotto for an aquarium with your own hands. Golovne - don’t take the oak, which pre-fabricates the water and sees unnecessary phytoncides in it. I quilt so that the material does not become rotten. It’s also bad to prepare it in special ways to avoid rotting. The technology is elementary: consistent with its manifestations of beauty, apart from the regulation of dimensions that live in the aquarium of fish, passages and halls emerge in the middle of the village. All places touched below are burned with a candle, otherwise it will be natural and will become additional insurance against injury.

Coconut stove
From the mountain you can see a very quiet grotto for an aquarium with your own hands. Just buy it fresh so that the milk bubbles in the middle. The coconut is split, the pulp is cleaned, and the vibrations come and go. “Hair” can be stripped, it can be tidied up; If the aquarium is small, boil the scallops.