You pick the flowers with your own hands from those around you. Beautiful DIY crafts in your home. We decorate life in various ways: pendants, panels, pillows, mittens and much more. Leaflets, decorate and virobi
Today's work we consider This is the original version from paper both from children and for children.
But first of all, let’s marvel at what we need for this:
To create viruses, we will use different types of paper and cardboard:
servettes for decoupage on boxes;
a newspaper for making windy bags from papa-mâché;
old magazines for virobu z namist;
crepe and opalt papier;
color double-sided paper;
corrugated and cardboard;
paper plates, cardboard tubes, various boxes and much more.
For a child’s creativity, basic materials and tools such as knives, glue, furbi and felt-tip pens are needed.
Do you find yourself collecting a lot of other necessary items, but there is nowhere to put them? Let's build a cheerful gut that will hold everything and can be hung on a separate place.
Viroby from paper for children: CORISNA KISHENKA
What is needed:
color paper
Olivets
lace scissors glue
Sequence of work:
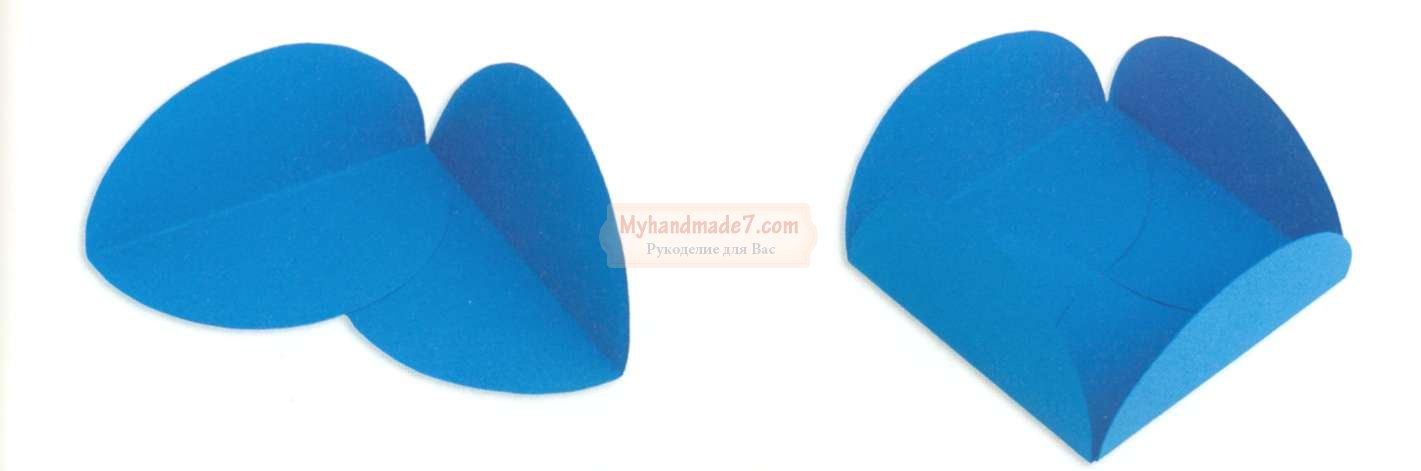
Draw the outline of the creature's face, like the butt of a bear.
There are two similar figures along the contour. Find details for the ears and nose, as shown in the photo.

Apply glue along the edge, joining the part, so that the intestine comes out in the middle. Punch open two doors.

Glue on the ear and nose. Pull the stitch in so you can hang it.

Such a gut is wonderfully suitable for saving small speeches: hairpins, combs or office supplies.

Videos from paper for children: Racing race
Do you know that you can make unusual racing cars with your own hands? Let's create a valid check-in. Tsikavo, what car number can you use?
What is needed:
farbi cardboard tubes, felt-tip pens
colored paper, cardboard
scissors glue
Sequence of work:
Rosefarm the straws in bright colors.

Make parts for cars from colored and white paper (for wheels, better use black cardboard - then your “car” is worth a lot). Use a felt-tip pen to paint what is needed.

Open the pipe as shown for the baby (you can ask an adult to help).

Now glue all the parts. Check it until it’s dry, and go ahead!

Write a paper for children.
Who doesn’t want to fly on a windshield? Koli ti obov'yazkovo tse zrobish. Now let's try to prepare an emergency snack from the original newspaper.
What is needed:
glue bag
needle head
farbi cream
Sequence of work:
Inflate the bag, spread it with some kind of cream. Prepare newspaper for the virobu - for which you need to tear it into small pieces. When they are wet near the water, cover the bag so that there is no light.

Now apply a ball of glue to the bag and glue it once again with newspapers soaked in water - so you need to make 2-3 balls. You may need help from an adult.

If the bag is dry (for which you will need to bake for 1-2 days), pierce it with a needle - we don’t need it now - and shape the bag, as shown in the photo.

Now fill the bag with farbs.

Now the cat is dying. For this purpose, the newspaper sheet was divided into 4 parts to produce rectangular-shaped blanks. Then, starting from the bottom heap, use a knitting needle to twist the newspaper into a tube, and glue the tip.

Take 5 tubes and put them on the handle, and stretch the last one across under the first, over the other, under the third, etc., in a row. When I step on the tube, I need to weave it in a hurry: those that were below will appear to the beast.

To secure our base, take one tube and weave it through, so that it passes between the other tubes through one.

Now you can work on the cat itself: for this, bend all the ends up and weave them together in the same way as you did before. Weave 4 rows.

Weave the unneeded ends into the animal and glue them, you can simply cut them off. Rozfarbuy koshik gouache.

Try to open the bottom of the pocket and secure the zipper with additional thread. The baked bag is ready!

FUN CREATURES
It turns out that you can quickly and easily make yourself a dark friend. And so that you can play with friends, let’s find out how to raise not just a tiger, but other creatures.
What is needed:
color paper
scissors glue
Sequence of work:
Take a bottle of colorful paper and fold it as shown on the little one. Glue the ends together so that the cream comes out.

Fold the string with an accordion in three places to make the letter “M” appear.

Virizh from a colored paper of preparations for the creature.

Glue the blank onto the base. Ready! You have a Viishov tiger.

HOME THEATER
Why do you run a real theater in your home? You can ask older adults to come to the performance and show them a Kazka, for example, “Kolobok”. I think it’s hard to appreciate your mastery!
What is needed:
color paper compasses scissors glue
felt-tip pen
Sequence of work:
Draw on a sheet of colored paper and prepare it, as shown in the photo.

Turn the workpiece and glue it.

Virizh from colored paper as a basis for the creation
Glue the parts onto the base. Marvel at who is Viyshov in us

Take your favorite fairy tale with creatures as a basis and draw all the characters from the paper. If you glue sticks to the blanks, you can show the performance through a screen, like in a doll theater.
Paper stories for children: Funny caterpillars and spiders
Have you ever seen the right spider? What about the caterpillar? Let's make funny creatures with hairy legs from cardboard boxes. The stinks will look like they're fresh!
What is needed:
cardboard box is empty
scissors glue
color paper
drits
Sequence of work:
Made from a cardboard box: three centers for caterpillars, one for beetles and spiders.

Rosefarm gouache blanks.

Prepare parts for the creatures: eyes from colorful paper, legs from fluffy dart.
Open it in the preparations and insert the legs. Then glue the eyes.

Try to earn them this way yourself.

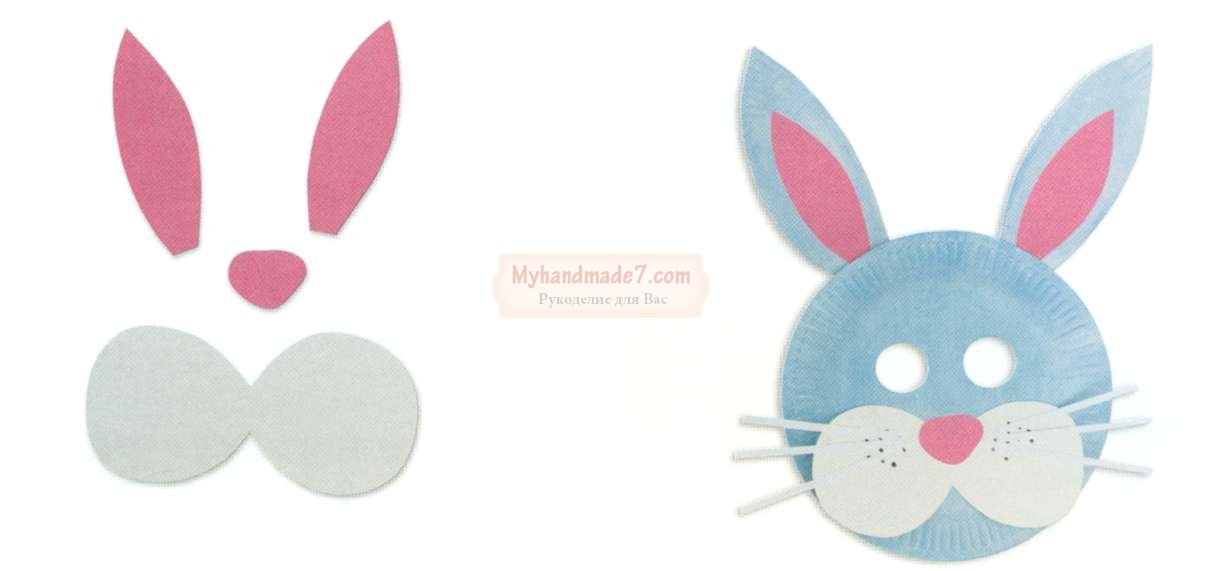
WONDERFUL MASQUERADE
You can celebrate your national day in a special way by holding a masquerade. Ask your friends, and don’t forget to make your own mask of the creature. It'll be fun!
What is needed:
cardboard plates
colored cardboard and paper
gum knives
Sequence of work:
Fill the plate in a dark blue color.

Virizhushka and the same opening.

Prepare parts for the bunny using colored paper.
Open the image for the eyes and glue the parts as shown on the baby.

PAPER BEADS
What girl doesn't love embellishment? Let's try to make money from old magazines. You will have sparkles that you can wear with your favorite cloth or give to your mother.
Sequence of work:
Details from a magazine sheet: hems approximately 1 cm wide and knitted jerseys.

Wind the blanks onto a knitting needle - there will be paper beads. Glue the tip well.

Use a bunch of beads to get all the beauty out of it. Take the head with the thread and carefully place the mustache on the thread.

The axle can be so easily created in something unexpected: original different-colored nasties, bright bracelets. You can probably give them to anyone: what kind of girl could look at such beauty?
Videos from paper for children: DECORATIONS FOR PRINCESSES
All the girls are dying to become true princesses. How does a princess live without a crown? Let's break it down from a basic cardboard roll.
What is needed:
farbi cardboard tubes
color paper
gum knives
Sequence of work:
Virizh with a crown roll. You can earn a few pieces.

Rouse the preparations in different colors.

Decorate the crown. For this you can use beads, stitches and laces.
Open the sides and wet the gum so that the crown can be worn.

You can create some embellishment for your beautiful princess with a special headband: with the help of a colored paper, transform it into a beautiful tiara.
Paper stories for children: Hat for toys
Chantly, like all children, you have a lot. There are a lot of table tops, so it’s important to fold them carefully. Let's put together a hat to save little toys.
What is needed:
boxes of different sizes
gouache white
servettes with baby
clerical knife
penzlik pens
Sequence of work:
Paint the boxes with a white color so that the little ones can’t see the text on them.

Cover the box from all sides with serving paper. To do this, place it on the box, pressing it along the edges, and using a pencil, apply a thick ball of glue to the animal so that it sticks.

Turn the door with a stationery knife - here you need the help of an adult. Glue the handles and glue the boxes together with superglue to make a cap.
That's it! Our chest of drawers is ready. Now you can put your toys there. The mother’s axis is healthy, if you ask, what kind of order do you have!
CREATIVE BOX
Do you like babies? Or maybe you should show up and work? That's great! Let's try to create a bag-box where you can put everything you need for creativity.
What is needed:
the transmission box is inflated
obgorkovy papier
color paper
glue lace
Sequence of work:
Glue the box and the lid from the sides. If it is important to you, ask some of the adults about this.

Place the blanks in the middle of the box. At the bottom of the folded colored paper, cut a cut to the middle, as shown in the photo. Two of the same blanks are equal to the width of the box from the top to the middle.

By placing the blanks one at a time and placing them in a box, this will become a separate part of our bag.
Carefully open the sides of the box: the stench must be released so quickly that the box can be closed with a lid. Make handles from the cord so that you can easily pick up the box.

PHOTO ALBUMS OF MANUAL ROBOTICS
Where did you go when you got up? Maybe there was a trip to the sea with your dads or a vacation at your grandmother’s village? Chantly, you have lost your memories of photographs. Let's make a photo album for him near the valise.
What is needed:
colored paper and cardboard
cutter scissors cord
Sequence of work:
To cover the photo album, take a piece of colored cardboard and fold it all over.

For the sides, take the arches of double-sided paper in a different color and the same folds.

Now the lining and sides are connected to each other: for this purpose, open everything at once and open it from the side with a hole punch. Tie the leaves together with a coil or string.

Create the details for the valley from colored cardboard and glue them to the photo album.


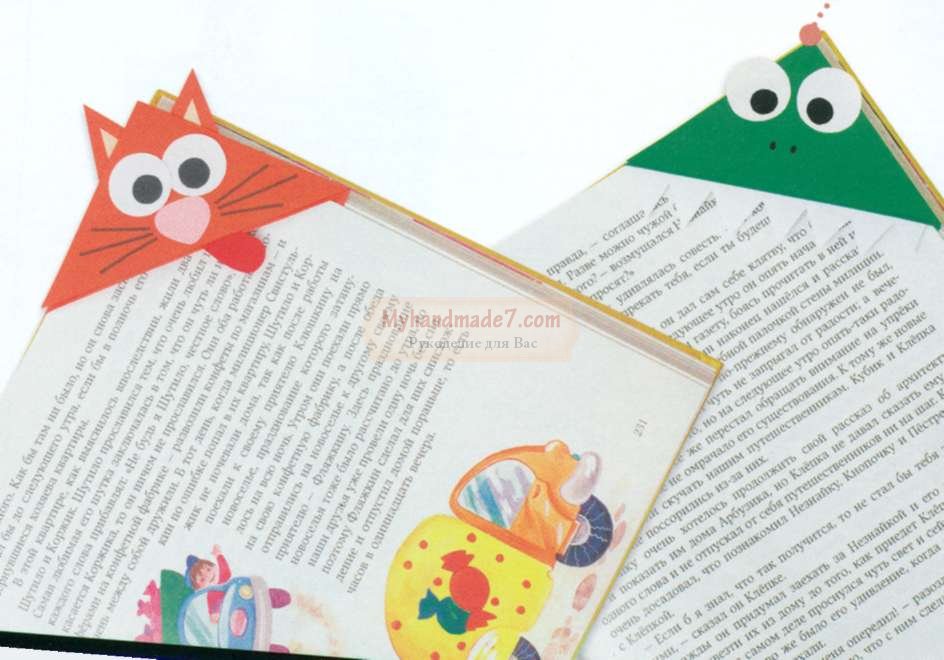
Paper videos for children: FUNNY BOOKMARKS
What is your favorite book? Or maybe their kilka? It’s wonderful that you love to read. Let's make a great bookmark for the book.
What is needed:
color paper
Sequence of work:
Place three squares behind the line on the arch of the colored paper, as shown in the photo. You won’t need trikutniki, which are prepared.

Verify the workpiece.

І її, as shown in the photo: fold the head onto the inner cut, then on top of the other one. Glue them together. Virizh from color paper details.

It was great, right? Now you can easily find the place in the book, even if your children stop reading. You can also make a bookmark that looks like a different creature, for example, a dinosaur with sharp teeth.
CARDBOARD HANDBAG
Do you know how you can make a handbag from an original box? Really simple! Let's get creative and create a handbag that we can take with us out into the street in sleepy weather.
What is needed:
dry snack box
color paper
scissors glue
Sequence of work:
Rosefarm a box of gouache.

Virizh from a box bag with handles. Here you may need some help from an adult.

A circle with a colored paper and a circle - this will be the core of the flower. Fold the mixture with an accordion and glue the ends. Once the card has been trimmed, stick it onto a small square. Glue the core on top.

For snowstorms, make preparations from 1 colored paper. In order for the figurine to be voluminous, you will need to make 5-6 new parts. Glue them together in the middle. Glue all the parts to the box.

Do-it-yourself experiments from paper: stand for olives
Do you want to make a gift for someone else, but don’t know what to choose? Don't worry, I have an idea! Make an original stationery stand from an original cardboard box. Such a gift will definitely suit your friend!
What is needed:
boxes
however, the same width
white and colored paper, cardboard
glue tape
Sequence of work:
Stack the ship's boxes: the height of the lids and their height. From the bottom of the ship, cut the pipes out of cardboard.

Cover the leather part with colored paper in the middle and in the middle.

The turn and glue at the end, the ritual circle, the steering wheel, the anchor.

Glue the boxes together and glue them onto the base, cut along the contour.

APPLICATION WITH PUZZLES
You have unnecessary puzzles, but a lot of details have already been lost? I have an idea how they can be frozen. Let's try a barvyst applique with aspen leaves.
What is needed:
unnecessary puzzles crepe paper
farbi glue
Sequence of work:
Rosefarm puzzles in the colors of bright autumn leaves: yellow, orange, red.

From the crepe paper, turn the rectangular brown koloru - where you will stovbor the tree - and grow the grass of the green koloru.

Glue the brown blank at the outside of the trunk: here you need to squeeze the paper with balls, and here you need to straighten it out.
Use the prepared jigsaw puzzle pieces to cut out the crown of the tree. Also glue a bunch of balls of grass to make it voluminous.


Videos from paper for children: VOLUME PICTURE
Do you want to make a volume application? It's so simple! You will have a perfect picture that you can give to your grandmother and grandfather.
What is needed:
box of sucker
corrugated cardboard
scotch tape glue
Sequence of work:
The corrugated cardboard is the necessary details for the painting.

Glue the first ball of appliqué onto the bottom of the box - those that will be in the background.
There are other parts on top of the stickers.

What a beauty! The correct three-dimensional picture emerged. In this way you can create a place where there are cottages and plenty of surfaces, or an underwater world with turtles, algae and fish.

BOUQUET AT VIDKRITTI
Do you want to give your mother an unexpected gift? Let's make a leaf-bouquet from a colored paper. Believe me, she deserves it.
What is needed:
double-sided color paper
scissors stitch
Sequence of work:
Paint a colorful paper on the arch, I will prepare it, as shown on the baby.

Virizh preparation and okremo trikutnik.
Glue a small trikutnik to the bottom, and fold the larger part as shown on the little one.

Draw, and then create little flowers of different sizes and colors. Pick leaves for a bouquet.

Glue a little flower in the middle of our leaf near the bouquet, tie it with a stitch at the bottom.


3D VIEW
Chantingly, you marveled at the cartoon in 3D and noted how the characters come to life in a three-dimensional image. It turns out that creating trivial objects is easy. Let's try to create a leaflet with a 3D effect.
What is needed:
colored cardboard, double-sided colored paper
scissors stitch
Sequence of work:
Take two folded sheets of paper: one for cardboard, the other for colored paper.

On the arch of the colored paper, I made cuts on the side, as shown in the photo. You must enter 3 equal squares of different sizes.

Now those that you have cut hang in front and in the middle. You might end up with a piece of wood, out of a box.
Glue the blank onto colored cardboard. Decorate the boxes: glue colored paper and stitches.

Following this principle, you can create a leaflet from bags

VIDKRITTYA WITH DOLONKS
Would you like to create another unique leaflet? For this you don’t need anything special: just a piece of colored paper and cardboard, knives, glue and your miracle pens.
What is needed:
colored cardboard and paper
Sequence of work:
Trace your valley on cardboard.

I’ll prepare the curve with knives. You need two of these parts.
Virzh with color paper with folds and accordion.

Glue one edge of the accordion to one hand, and the other to the other. Virizh from a colored paper or write your wishes with felt-tip pens.

Envelope
Do you know how you can decorate a small gift? For whom it is not obligatory to be mature and does not require any special devices. Repeat after me, and everything will come out smoothly in you!
What is needed:
color paper glue
stitch
Sequence of work:
Paint 4 different stakes on the arches of the colored paper. This is easy to do by taking a bowl, placing it upside down and circling it.

The circle of mugs and their warehouses are in full swing.

Glue the stake together, as shown in the baby.
Bend the opposite halves of the stakes so that one comes out on top of the other. Then reach the mountain from the bottom on one side.

SWEET GIFT
Whenever you receive a gift, you see decorations? Perhaps you were given something similar? Let's create such a surprise, and you can "participate" with anyone.
What is needed:
cardboard tube
burnt paper glue
scissors stitch
Sequence of work:
Virizh iz obgortkovy paper square. For the size, the larger one is responsible for the cardboard tube.

Cover the tube with paper. Tie one end of the tsukerka with a stitch.

Place the tsukherki as a gift and tie the other end.
3D FIGURES
Have you ever wanted to spruce up your room? Let's make some voluminous decorative figures from colored paper. They can be placed on the bedside table or hung on a thread from the chandelier.
What is needed:
color paper glue
scissors stitch
Sequence of work:
Paint half an apple on a double-folded piece of colored paper, as shown in the photo.

To create a blank and use it as a template, make 5 such copies. Additional details for apple.

Glue the blanks together, as shown in the photo.

Glue other parts.

Fruits and vegetables can be whatever they are!
Pictures from cardboard and paper: brightly colored flowers
Do you want to put some colorful flowers on your window? Let's make them out of cardboard tubes, just so that no one will guess what the stink of the material is.
What is needed:
farbi cardboard tubes
color paper glue
knives skewers
Sequence of work:
Make slits on both sides of the tube so that the stench does not reach the middle.

Rosefarm the tubes in different colors.

If the workpiece dries, straighten the pellets, as shown in the photo.
Glue the center of the visor from colored paper.

Cover the skewer with colored paper, the shape of the leaf.
Let's get all the details together. Use a skewer to make an opening at the core of the flower.
Such a little flower can be placed in a vase and given as a gift to someone.

FRAMEWORK OF NON-VALID KITKIV
Do you have a boring single-color frame at home? Let's create a real masterpiece with her!
What is needed:
cardboard box is empty
scissors glue
Sequence of work:
The image from the center of a cardboard box is used to prepare pellets, as in the picture.

Rosefarm them in one color. There are 15-18 such sets of different colors (depending on the size of the frame).

Glue the pellets together in the middle, press firmly and let them dry.
Glue the flowers onto the frame. You can’t attach everything right away, so just do it step by step until everything is dry.

The frame is ready. Now you can insert your favorite photo before it.
CUTE CACTUS
How are you such a cute cactus? It is absolutely safe for children, as the thorns are new coated. Let's cut up such a cactus and put it on the windowsill.
What is needed:
felt-tip pens
Sequence of work:
Paint a cactus on cardboard for a miner.

Rotate the picture on both sides and make another one of the same kind.

Make cuts: on one cactus from the bottom to the middle, and on the other - from the top to the middle.

Aligning the workpieces one by one. The cactus is ready.
In the same way you can make a rocket or a witch.
KOLIRNI LIKHTARI
It’s Christmas Day coming up for you, and you want to decorate your room so that it’s beautiful for Christmas? Then let's create some unique color shades.
What is needed:
toilet paper tubes
crepe papier
stitches
scissors glue
Sequence of work:
Make a square with crepe paper and glue one side of the tube.

Prepare the blanks from the crepe paper: the edge of the crease and the final cuts on one side throughout the entire length.

Start gluing the tube from the bottom. You may end up with a little girl like the one in the photo.
Cover the whole lekhtarik with this rank. Open the top sides of the cutout and thread the stitch through them so that the cutout can be hung.

Such lightars can be not just embellishment, but also cinnamon rich. For example, on the holy day you can win the game with prizes: hang the lechtariks on the motorcycle and put valuables in them, gluing the bottom. With tied eyes, the guest uses scissors to cut the gift.

BEAUTIFUL ROOM
Do you want to get a bird? Of course, nothing compares with the regular one, but still, an unusual and beautiful bird can be created with a standard colored paper. Marvel at how stubborn you are.
What is needed:
double-sided color paper
crepe papier scissors
stitches
drits
Sequence of work:
Draw silhouettes of birds on the arched paper.

Virizh ich. Grab a handful of such preparations. The stinks of the butts of different colors.

From a crepe paper, make a wing: for this purpose the rectums of different colors and the folds of them are arranged like an accordion.
Make cuts in the bird preparations and place the wing there. Tie strings to the figures and hang them on a stake prepared from the ground.
This article will become a welcome sign for everyone who create a quiet interior at your home. You don’t need to spend a lot of pennies to bring a little bit of wickedness into your life! Handy materials, alas, a couple of bright ideas - and the apartment will not be forgotten.
The screens here will disappear in two seconds, but the eyes will remain silent for a long time. I fell in love with the skin of them, the idea with a great cat seems especially cute. I will be glad that you deserve it!
Do-it-yourself experiments for home
- Hanger for shawls and hustok. I need it so much! It’s really easy to work with the help of wooden clothespins.

- Wooden stands Hot and cold dishes will never be a problem in the kitchen!


- Case for eyepieces From the crib. It's great...

- Pillowcases From a shirt. I have one in mind, I need to earn it!

- Another life for old furniture! Wonderful mini-bar in Viyshov.

- Replacing the anniversary strap with a bright khustka is a stylish idea.

- Wonderful decoration for the Christmas table!

- Lamp shade. It looks original during the day, and the evening casts quiet shadows! And it’s so easy to earn money.

- Vase made of pencils for painting!

- Another idea for using wooden clothespins: how you can keep your embellishments in order.

- The candle from the video. I'm under attack!

- How to create a decorative anniversary card: these will fit into any interior.

- It looks superb, but it’s practical! I never see hangers like this in my kitchen.

- The place of the lonely wasted scrapes.

- A great cat will be ready for 15 bucks! I’ll save these ideas for myself and make sure to save them for Great Day. All materials are cheap, it’s easy to work with. Miracle!

- This can be used to replace the handles of kitchen ovens!

- Decorative clamp for kitchen curtains with forks. Charm!

Tsikavy virobi create a special atmosphere in the booth,
Are the original toys from the store no longer suitable for your child? Then, perhaps, the time has come to work with your own hands, there is more value in working with the help of available materials. We will show you a number of simple applications with blood photographs to create germs in your home. To lure the child into the robot, she will be able to singly pick up the toy on her own, and then she can play with it.
Creating viruses with your own hands from improvised means in your home is a fun and rewarding activity. Both children and adults crave here, expressing satisfaction with the process and preferring the dull routine. For viruses, you can use either artificial or natural materials. Viruses fit organically into the interior, thereby adding innovation and originality.
- The most beautiful products from cardboard.
- Cup stand.
- From servers.
- From wood.
- Made from salt dough.
- Frame with turtles.
- Zi shkarpetok.
- Made from plastic dances.
- From polyethylene bags.
- Z disks.
- Z paper.
- Puzzle.
- Original varieties from fruits and vegetables.
- Cool products from pine cones.
- Lamp.
- Use for keys.
- Unusual cups.
- Unusual keyboards.
- Candlestick.
- Decor.
- 3 tube.
- From pasta virobes.
- Meister class.
- Sadovi virobi.
- Do-it-yourself experiments for a children's kindergarten.
- That's it.
The main hosts of creative germs in households are, of course, children. Try to get your child busy with sleepy activities, for example, during the holidays at the dacha, so you don’t get overwhelmed with the results. Collect at once simple natural material that is in abundance in the area - flowers, stems, stems, cones, leaves, etc. Add a little of your imagination to this ensemble - and you can create an original masterpiece.
Colorful boxes from cardboard
You can easily create different types of eggs from paper with your own hands with diagrams and instructions for all members of the family. It’s a boring and tedious process that won’t leave anyone without something to do.
Cup standUsing white decorative stones of small sizes, you can create an original stand for a cup. For this purpose the stones must be glued together. This is the result of the robot, but the result of that. This stand can be used under hot dishes.
Unusual viruses from servers
You can manage your child's life with the help of simple servers. Children love to work independently because they develop motor skills.
From wood
Virgos made from wood are more suitable for young men, since it will be important for girls to work. An excellent allowance for boys and other people.
From salt dough
The tests from the test with short-term video instructions for mothers and their children will bring a neutral mood and emotions.
Frame with turtles
Sea muslins will help you create a decorative item from an original wooden frame. It is enough to paste them around the frame around the entire perimeter. Also, the pieces can be coated with a barless varnish with glitter for greater appeal.
Zi shkarpetok
Every household has scratches, so we would like to introduce a number of wonderful ideas from ordinary scratches, or, more precisely, a toy. There are a lot of different variants of germs, for example, bunny, snowman, witch, cat, owl and so on. You can fill this toy with cereal, synthetic padding, or cotton wool. Cereals are a miracle food, and even this recipe develops hand motor skills in children. It is good for them and their fathers to work with children.
So, for example, you can kill the red smugast caterpillar. What you need: a stitch for embellishment, a scraper, a marker for the face, thread, padding polyester or cotton wool. Stuff the fabric tightly and sew one end or tie it with thread. Visually divide the scraper into five sections and tie a thread between the skin sections to create small rollers.
The part, which is bare, is also tied with thread, and then from the stitches you can make a bow and tie it on the caterpillar’s head. The muzzle is marked with a marker, and the top of the baby is embroidered with thread to give the caterpillar volume. So you will see a bright and cheerful caterpillar with a forelock.3 plastic dances
Such surprises are suitable for older children, and if they want a lot of fun, just wait until they finish.
From polyethylene bags
Such miracles of tattoos and mothers and children will go to the New River, National Day and be otherwise sacred. Exclusive and unexpected gifts from polyethylene with powder instructions You can look below and choose something original for yourself.
3 disks
Gifts from them to mothers and grandmothers for National Day. For this you need quite a bit of time. Such a wonderful gift will definitely stink.
Z paper
If you want to earn something urgently from paper, we present a number of original and simple ideas. You can also make origami, from a variety of options.
Puzzle
Using the tools at your disposal, you can create a puzzle that develops. For this purpose, you need to take the same size sticks from the freezer and spread them out evenly. Apply glue to any paper picture of the same size and press it down to the sticks. After the glue has dried, cut with a stationery knife on the edges of the piece.
Original fruit and vegetable viruses
Here are presented the most beautiful ideas from fruits and vegetables, and you can create such a masterpiece on your own. Here we will make reasonable allowances for children and their fathers. So choose and enjoy a wonderful time spent.
Cool pine cones
If you want to make a toy with a cone, look at the photos, which show a lot of original and cool ideas.
Lamp
You can make an unusual and water-fired lamp from an autumn leaf and a simple light-colored can. To do this, you need to select a “golden” leaf and glue it from the outside side of the jar in such a way as not to deprive the empty spaces. The top of the jar is tied with twine; you can place a small candle in the middle. If necessary, burn it, add a few gold drops to the jar in the meantime, so that a quiet atmosphere will be created in the area. A great way to pass the hour with your baby.
Trimach for keys
With the help of a regular tennis ball, you can create a funny and cheerful key trimmer. You will need to mark eyes on the ball with a marker and pierce it with a knife, which is the mouth. A metal bolt is inserted at the opening. Then the ball is glued to the desired place.
Unusual cup
With the help of a marker and cardboard, you can transform the original cup of white color into a piece of art. For this you need to cut out the image from the cardboard and press it down to the cup. Place dots on the stencil with a marker, then clean it up. A wonderful do-it-yourself gift for Kohaniya for National Day or 8 Bereznya.
Unusual keyboard
An old computer keyboard will help you give original greetings to the saint. All letters need to be drawn out and glued to a board, the color chosen for taste. Then we insert the plaque into a wooden frame and the original gift with instructions for preparation.
Svichnik
You can decorate the area with the help of a candle holder, made by yourself. For this creation you need two bottle openings of the same height and different diameters. The smaller bottle is inserted into the larger one and secured with glue. The space between the bottles is filled with water and barnacles (you can choose any color). Insert a sleeve candle in the middle of the candle.
Decor
Viruses can be made from any available materials, or from wine corks. You can create a heart by becoming a decorative element in your room. To prepare it, you need to paint a heart on the arch of the paper and put in corks to glue the skin.
3 tube
Another miraculous idea is the use of a straw. Such small surprises will be welcomed by gifts from grandma, mother and sister.
From pasta virobіv
The Russian people are rich in wine, they drink pasta, and they demand the same. Do you want to make money for yourself? Then take the pasta. What kind of employment can you get children in any age?
Snowstorms with dances
The theme of plastic dances, as it seems, has not been thoroughly discussed. We encourage you to create original inventions with your own hands using improvised materials at home. Beautiful snowstorms will “flutter” through the house, and for this purpose simple words are available:
- tweezers;
- the middles of plastic dances;
- toothpicks;
- snowstorm patterns;
- glitter rhinestones, beads, sequins;
- marker;
- nail polish;
- knives.
Let's get started with Vikonanny:
- You can download blizzard templates on the Internet or download them from a child’s store.
- Then get out of the dances of straight cutlets of new sizes, having first seen off the excess glue and label.
- Add the plastic straight cutter to the snowstorm image. Using a marker, trace the contours on the other side.
- Carefully begin to sweep the snowstorm, do not forget about the delicate paws and ears.
- Decorate with added taste. Vicorize sequins, glitter and varnishes. Friction lines can be painted on with a toothpick.
- Fill the head with a black marker, then cover it with transparent varnish.
- Now your little room has a beautiful snowstorm that you can give to friends or decorate walls and curtains with.
Gwintocryl
Required materials:
- hairpin;
- a small plastic dance;
- three plastic tubes;
- knives;
- bag.
Let's get started with Vikonanny:
- Using scissors we prepare a hole in the crust. We cut the lower part of the dance and cut the edge.
- We cut the tubes into small pieces (amaze the little one) and connect them together.
- Now the parts of the helicopter need to be removed and secured with a stapler.
Pirate ship
We need:
- cardboard box;
- black fabric on display;
- superglue or a hot glue gun;
- wooden skewers;
- ruler;
- sticks of different sizes;
- olive;
- motuzka;
- stationery Nizh;
- black marker.
Let's start working:
- Cut the cardboard into pieces. On long pieces of clothing it is necessary to paint a template on the side of the ship. Remember that the nasal part is slightly raised (as seen in the photo).
- You will need two identical sides to the fuselage, two square pieces to be attached to the back, straight-cut cardboard to the bottom - front and stern - to the bow. It is necessary to draw the shapes exactly as shown in the photo.
- Using superglue or a hot glue gun, glue the sides of the vessel together. Check it out until the body is dry.
- Then we glue the bottom, not forgetting that the bow of the vessel is liable to go uphill a little. Wipe the cardboard in this position until the glue dries.
- Now we are preparing a cardboard bent in the shape of the letter L, a piece of polystyrene in the shape of the letter C (equal to the size of the diameter of the club) and a club on the goldfinch. The cardboard is the size of the ship (it appears in the middle).
- Then we apply glue to the stick and firmly under it straight down to the deck of the ship. For greater durability, the needle is fixed with polystyrene rubber.
- To make the effect of the stitches as realistic as possible, we attach a piece of stick to the nose part and connect it with the goldfinch behind an additional lace.
- Now we take two wooden skewers of the same sizes and firmly hold them perpendicular to the shoe, with the same lace. We were captivated by them. From the black fabric you can see the orthocutaneous plant, which is responsible for the little bits that fell between the skewers. You can decorate it for the best judgement. Tie the wind to the goldfinch.
- All you have to do is open the fabric and pull it through a new lace, tie it to the skewers (around the skin).
- Hold on to the doshka (for help in some way to pirate and destroy the enemies, throw yourself into the sea).
Axis and that's it, the pirate ship is river-bound, in this new world you can roll dolls on the sea!
Do-it-yourself garden plants from improvised means at home
An hour spent at the dacha can be decorated with the help of unusual garden plants made from available materials. To enhance your dacha space with its beauty and comfort, for our kind sake. Let not just berries and fruits ripen at your dacha, but creative ideas.
One of the most accessible and safe materials is, of course, plastic balls. Who would like to admit that you can make unnecessary palm trees from recycled containers. There are dozens of dances, and in your yard there will be a true tropical paradise for grown-up children.
Brilliant and simple ideas are literally scattered under your feet. This kind of awkward candle can be made from excess cement, concrete or gypsum.
Dancing caps will become a wonderful material for original decoration of the garden.
Original garden boxes can easily be transformed into stylish and cool boxes for all sorts of items, useful items and uses. For example, if you want to make a gift for your grandfather or father before February 23rd, you can decorate their toolboxes. In addition, you can make a portable stool from the drawers, those who are always in the garden or fishing may deserve a tattoo.
“Lined” and old tires are useful belongings for the implementation of summer cottage ideas. Don't believe me? Watch the video on YouTube on this topic - you will be captivated!
Forgive the children's nursery
Apparently, the kindergarten is a key gathering place for the social development of a child. This is necessary for comfortable absorption of excess light. At the kindergarten, they take care of children, teach them the basics of letters and arithmetic, and also develop creativity. Today, many children use various methods to create a variety of viruses, starting with salt dough and ending with paper. It also contributes to the development of hand motor skills and the child’s imagination. We present to you the most beautiful stories for children of all kinds.
Zhachok
You can saddle the hedgehog with the help of an emergency bump. This is a new toy to decorate the eggplant in the kindergarten and bring a lot of satisfaction to the children while working on it. Below you can see detailed instructions on how to create a cute hedgehog.
You will need:
- plasticine;
- cone.
Robot head:
- The muzzle is glued to the sharp part of the pine cone from plasticine; before that, you still need to make the tip of the nose and the tip.
- Now we are timid on our paws, even from plasticine. In this way, we have a prickly and very cute little hedgehog.
- In addition, you can make a gala by sticking a mushroom and forming leaves from plasticine.
Paper bookmark
The most widely used products from paper are bookmarks. They can be used with young children (ages 4 to 6). The chimera face of this little animal looks very organic. Below you can look at the master class with step-by-step instructions.
You will need:
- glue;
- color papier;
- olive;
- knives.
Robot head:
- Paint a square (20x20 cm) on the arch. Divide the sheep into equal parts. Now you have four squares measuring 5x5 centimeters.
- Divide the lower left and upper right squares with lines to create tricutlets. The line needs to be drawn from the lower right corner to the upper left one so that the smells are parallel. The outer knitted sweatshirts will settle down, there is no need for a stink.
- The figure is drawn from the paper, the seating of the plot is removed. We cut off the upper tricuput. If you place the papier evenly, you will get an unimaginable rhombus with two glued knits.
- The leather trikutnik is folded in two and placed across the rhombus. The intestine that came out as a result is the bookmark. You need to put on the sides to fix them.
- You can make an application from a colored paper and stick it on the intestine.
From small flat stones you can get various bugs. For this reason, soak up a little bit of baby. Such a bug, preparing at the same time with the child, will look good in the quack miner or at the police. To view such a virus below, you can look at the previous description with step-by-step instructions.
You will need:
- knives;
- a stone whose shape resembles a bug;
- color papier;
- farbi;
- glue.
Let's get started:
- Create a base for the paws and tails and glue them under the bottom of the stone.
- For help, paint the stone near the bug's appearance.
Yalinkova kulya with pasta
An excellent option for children in a kindergarten is pasta eggs. There are many different varieties of pasta germs, some of which are available in the skin. So, for example, you can add some embellishment to the yalinka - sack. In the description below you can familiarize yourself with the report instructions on how to prepare it.
You will need:
- farba;
- I’ll shake the bag;
- pasta;
- glue.
Robot head:
- We fill the bag to the desired size and tie it.
- Then we apply glue to the skin pasta and glue them together.
- After making a small piece of pasta, apply it to the bag (for ease of use, you can fix the dough with PVA glue and glue it to the bag). We glue the entire bag with the same pattern, with “Moment” glue the process will be much quicker, but if you end up with the child at the same time, it is recommended to use PVA.
- After everything is dry, we pierce the naked bag and pull it through the hole, now you can add the pasta that you have left over.
- Work a stitch or a spool so that the Yalin toy can be secured to the Yalin. Also, you can prepare a sack, or you can deprive it of the original appearance. This virus can be developed with a child from 5 to 7 years.
Metelik
One of the simplest viruses from paperworms is snowflake. Triadic children can easily get caught up in such work. This article lets us know what you need to easily get through it. A snowstorm, made with your own hands, a joyful child, and most importantly those that can be secured in any place.
Required materials:
- knives;
- servets;
- felt-tip pen;
- color papier;
- clothespins.
Robot head:
- You need serverets of two different colors and sizes. Place them one on top of the other, with a large serving table underneath. Make a hole in the middle.
- Place the servettes on a clothespin to become a tulub.
- Draw our little beauty's face on the pinches, and use a different colored paper to create whiskers, then attach them until pinched. Our snowstorm is ready!
Korivka made from plasticine
The little ones of the younger groups can be given the opportunity to create a little sun. Games made from plasticine can develop imagination, as well as hand motor skills. This is a cool cow, designed for children aged 7-10, so you can make it with your own hands. To overcome such a problem, please take a look at our master class with report instructions.
We need:
- white arkush paper;
- plasticine (white, black, red);
- pen;
- plastic cap 10-12 cm in diameter.
Let's get started with Vikonanny:
- Slip a tulub from red plasticine, and from black plasticine - a dot. Black plasticine is also needed for the head and paws.
- Take a plastic cap and paint a flower on it, so that the shape resembles a daisy.
- Place a white sheet under the bottom of the lid so that the outline of the baby can be seen. Then, behind the outline of the baby, seal the card with different colors of plasticine.
Eight
As a material, you can use cotton wool threads. They will produce eight legs, as befits a child. Such a virus is very easy to create, and it won’t take you much time. You can look at the master class so that you can earn everything on your own.
We need:
- knives;
- woven threads (sixty threads of 35 centimeters each and also a few for tying);
- color papier (for eyes), or you can buy it ready-made in the store;
- a small plastic bag, with which we will crush the head;
- stitch.
Procedure:
- Take the cut threads and fold them together, tie them with thread in the middle, then place the ball. Wrap the threads around it, tying them under the bag. This will be the head of our octopus.
- From the threads that were lost, weave the pussies around the tentacles.
- Vickory purchased eyes or paint on paper yourself, draw and glue to the head.
- Tie a string to your head and you will become a miracle beauty. Axis and that's it, our eight is ready!
Cipolline
Vickory vegetables and fruits for children's creativity. You can make Cipollino from sprouted cybula. This kind of virus is easy to understand by children aged 3-5 years. Below is a report description.
We need:
- plasticine;
- the head of the cybul is small;
- felt-tip pens;
- jar (the diameter of the neck is responsible for the smaller one);
- glue;
- knives;
- color papier.
Robot head:
- Use a felt-tip pen to paint your cheeks, mouth, eyebrows, and make your nose and eyelids out of plasticine.
- Douse the jar with paper and paint the cartoon character's cartoon character's body.
- Place your head next to the jar. Axis and the very cute Cipollino.
Vase
Another wonderful way to get rid of unnecessary plastic pieces is to make a vase. The original dance can be turned into a decorative visa with the cute appearance of an intestine or some other creature. The most beautiful do-it-yourself virus for a child with a written description and step-by-step instructions for presenting this article.
You will need a step:
- knives;
- plastic dance;
- marker;
- sponge (for making food);
- farbi.
Robot head:
- Cut the dance completely, we will need the lower part for the process.
- Place it so that the edges are even, fill in two three-pieces to serve as the ears of the creature.
- Using a sponge and white farbe, mince our preparation.
- Apply a pencil to the nose and the trikulets on the ears in erysipelas.
- Using a marker, I draw the face of the intestine.
- Our vase is ready.
The material for such a vibrator may be a small plastic bowl (0.5 liters). The toy will please not only children, but also their fathers. To learn how to do it, let's take a look at the instructions.
You will need:
- knives;
- plastic dance 1.5 l and 0.5 l;
- farbi;
- color papier.
Let's get started:
- The small dance needs to be prepared with additional farb or glued to the surface with a yellow papier.
- Similarly, work on the dance of thick black lines.
- On the cover of the paper you can see the eyes, ears, and mouth of the future woman.
- We cut the kryla from a large pad and glue them with additional glue onto the surface. The result will be a nice little piece. A great idea for spending quality time with your baby.
At the end of the day
More and more often, in rich households, you can learn how to make experiments with your own hands from improvised means at home. Many of them contain decorative elements, but they also have decorative, practical purposes. Children's viruses allow their children to develop, learning more about the world. They can be made from various materials, for example: leaves, plastic, plasticine, papier, wood and eggs.
It’s nice to decorate your garden, garden plot or clothes in an original way.
It has become increasingly fashionable to give out unexpected gifts, made with one’s own hands.
The Internet is filled with new ideas that don’t require large penny investments to be implemented.
All items are simple among wiccans and can be the subject of a gift.
Make your own lungs. Decorating the interior
Once a season I want to update my home interior. With this method, people change the tapestries on the walls, buy curtains and hangings, throw blankets and sofas. The easiest way to reach the bazhano is to add rodzinka to the environment. Change the look and introduce a few new accents.
For example, make a gray wall brighter - hang colorful pendants.

The pendants are made in Indian style. Elephant figurines are made from cardboard. On the new one there are textured little ones glued on it. Do-it-yourself self-made elephants at home are even simpler - ready-made elephants are glued to a jute thread and hung on the wall. The textured details on the elephant figurines can be changed at any time, depending on the color for the desired interior.
To update the internet, all you need to do is hang new pictures. Here's another simple way to improve your mood. Moreover, the panel can be created with your own hands.

To prepare a painting, the following materials are needed: two frames covered with fabric, farbi, penzlik, gum of different colors and sizes, glue.
Etapi roboti:
1. The frames are decorated with a white color scheme;
2. After the ball of white fabric dries, the tree is painted on the panel. Cob artists should paint the contours of the tree with a pencil, and then outline them with a pencil made of black pigment;

3. At the third stage, leaves and flowers from the gills are glued to the tree. It is recommended not to skimp on glue, as if the glue is loosely placed on the paste, what to glue will inevitably fall off over time;
4. At the last stage, you can give back the freedom to act with your imagination and prepare 4 easy games with your own hands for all seasons of fate and whatever your mood.

Well, how can you do without a stylish pillow for your sofa or car? Such a textile marvel can be proudly given as a holy gift to a relative or close friend. This gift must be appreciated.

To make a beautiful sofa fabric with your own hands, you will need: a synthetic cover, 2 companion fabrics (it is recommended to choose an American one), felt in different colors, coins, a black colored felt-tip pen, a heart-shaped piece of wood, matching threads, heads, knives, sewing The machine has an embroidery function (or with a darning function, if you can turn on the upper conveyor for feeding fabric).
Etapi roboti:
1. Sections of fabric for the pillow are sewn together, but not sewn together, so you first need to sew little ones in a patchwork style on the front side of the future fabric;
2. The shape of a tree, leaf, owl or swallow is drawn from the felt;
3. The resulting wood is glued to the fabric. In extreme cases, you can sew it down to the fabric, otherwise the row will, of course, be visible to the naked eye;
4. The leaves are also glued to the fabric base and to enhance the artistic effect - a row is laid in the center with a non-matching thread;
5. Using a sewing machine, twist the needles. The embroidery functions of the machine are affected when the upper conveyor is turned off and the fabric feed is not embroidered. It is recommended to embroider the stitches at this stage, since after sewing on the coins and the figure of the owl, it is important to allow the fabric to rotate freely under the foot of the sewing machine;
6. The owl and swallow are sewn on. It is recommended to embroider birds' feet by hand;
7. The text can be written on the tree using a black felt-tip pen. After the crash at the front car, I didn’t know what I wrote;
8. The writing on the pillow is made using a sewing machine. The paint should be applied onto the fabric with a greasy grease. If you are inexperienced with your searching powers, the writing can be applied with a dark blue felt-tip pen;
9. The trace of the sunflower is sewn manually. The finished cat can be sewn on, if you can find one in a grocery store;
10. At the last stage, coins are sewn into the baby and the pillow can be sewn and filled with a synthetic cover.
Easy do-it-yourself vibration. This is a very simple scheme for sewing a pillow, even if you are an amateur. Folding is possible only at the stage of casual embroidery, but for beginners it can be done by replacing the machine seam with a felt-tip pen.
Beautiful little things with your own hands. New life for the old man
Old worn out clothes can be easily replaced. Actual speeches can give a friend life. An old T-shirt will make a scarf or cloth for a little girl. From the old dining room tablecloth - cutlery or khustochki.

You can also sew short, trendy mittens from worn-out scarves. The heels and bowls, as shown in the baby, are cut. The edges are frayed when they are folded onto the turned side. You can sew it by hand, but in a knitted row (that is, navskis), so that the fabric does not lose its strength and stretch.

Then the accessory is decorated with a textile heart. For the heart, it is recommended to choose a fabric that has a slight fizz on both sides of the cuts. Especially if the cut is diagonal. The shortest time is thin felt or satin, and with melted edges using a candle. The resulting mittens can be easily washed in a washing machine on the delicate cycle setting. It’s a headache, no one even thinks about what the stench was in a past life.

If you find a boring T-shirt, you can turn it into a woman’s boring T-shirt. During the summer season, it’s time to go to the beach behind the cordon. It couldn’t be easier to make such a rich dish with your own hands. First of all, deep vises appear on the sides. The edges are frayed on a sewing machine. And on the back, butter, olive or felt-tip pen, which is wrinkled, the shape of a heart with some horizontal creases is drawn. Young women swear like little ones. The edges fray, but without sewing, like an overlock row for fine fabric. Since the edges of the fabric on the football shirt do not fray, the edges cannot be frayed.

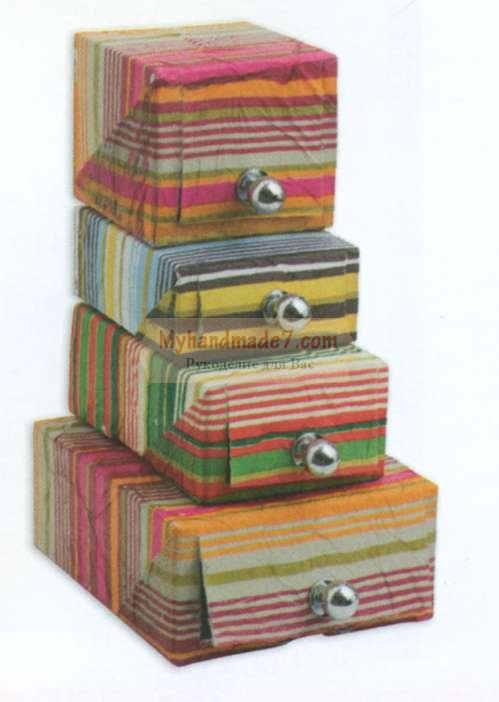
Do-it-yourself scraps in the home. Ways to preserve embellishment
There is no woman like her in the world, no matter how beautiful she is. Treating yourself with beauty and attractiveness is a tradition. And, of course, from the moment the first ring appears in the hut, food is delivered about the place of its preservation. The more embellishment, the more often food spills onto the surface of everyday turbos.

It’s not important to make such a self-made box with your own hands at home. At least an hour. Minimum financial expenses.
The box can be used in any case, regardless of the packaging that was previously purchased. It would be better if the box was equipped with a magnet for a strong closure. Since this type of magnet is permanent, it is recommended to glue it in by hand. The inner lining is made of buffalo fabric in a suitable color.

The fabric is then ironed and hung in the middle of the box like an accordion. It is necessary to achieve a tight fit on all textile balls so that the embellishments inserted into them do not fall through the middle of the fabric under the pressure of moisture. The embellishment box is decorated with colored paper. You can cover it with textured fabric or paper from a baby with a similar motif.

You can decorate the interior of your booth using an organizer for decorating. Rodzinka room - vintage wardrobe for precious stones. Collections from the old tray, which were still abundantly saved in the dachas and cities of my grandmothers and grandfathers. The spirit of antiquity on wooden walls can be removed by covering the structure with “bark-free wood varnish for interior details.” Abo – onoviti. The wood will need to be carefully sanded, coated with tar, and coated with dry powder. It is also necessary to decorate the interior wall. With this method you can use everything that is at hand. There are a lot of options: just coat it with farba, glue cardboard with exotic baby, textile decoration. A cardboard bottom is inserted into the tray onto the tray, onto which a piece of cotton fabric is stretched and glued to the back side.

Using a screwdriver or pliers, the screws are screwed into the wall. There are old wicker bobbins inserted into the thread. It is also recommended to coat the bobbins with varnish.

Self-made cardboard boxes are prepared by hand in the home. The tags on them are the same. The small boxes are shown open, but rather they are formed with lids, so in practice it is important to quickly wipe the pill from the skin. It is much more practical to clean the saw only the cover on the box.

Perhaps the best activity for children is the creation of viruses. The children are doing great things with great joy. In this article, we wanted to introduce you to miracles for children that are easy to make with your own hands. We are introducing you to all the new things in this area and guaranteeing that your child will be able to create with his own hands and be extremely happy with this process.
New viruses for children. Bright ideas
The fruits come from disposable plates.
Ribki.
To ensure a receptive mood, you need to do things in a spontaneous and unexpected way. Tropical fish are a wonderful option for you. For their creation, you must add a paper plate. Of course, you will need some paint for this painting. Sign them for the authorities to judge. This could be either a very dark man or a chimera. And when your fish are dry on the plate, glue the fins to your fish.


Aquarium.
Disposable plates are suitable for creating an aquarium. In this situation, you will need a number of plates to go together. Why do you need to scrape the bottom of one plate? Glue the underwater characters to the next plate. And for greater effect, use cellophane. It’s good to say that when the underwater light opens up, your child is liable to obligingly vikorize the turtles that were gathering eggs on the beach.

New wine.
Are you actively preparing for New Rock? Then the original paper plate will help you create a hot wine to decorate your home without any fuss.

Dr. Aibolit.
Using paper plates, it’s easy to create your favorite cartoon character – Doctor Aibolit. In a paper plate you can prepare the following materials:
- brown and white cardboard,
- marker and glue,
- eyepieces from the dart,
- Gujiks for the eyes.
Robot head:
- Of course, the creation of such a virus needs to reveal its mastery. Paint the character’s head on the arch of the horn cardboard and make it look.
- We begin to work with the paper plate. This requires folding and cutting. One part of the plate also needs to be cut in half.
- Use this piece of paper to mark out the beard. Also, don’t forget about the vus. Look at the details.
- We take a white piece of cardboard and make a hat for our hero.
- After this, glue all the parts to the cardboard. Paint a cross on your hat, and don’t forget to attach glasses to your hero.

Applications from Gudziki.
Puzzles of different colors and different sizes will help you create an original composition. The application from Gudziki is indispensable. They are easy to create. First, choose what is suitable for yourself, and then select the buzzers. Practice the markings, be patient, and don’t forget about the glue. As a result, you will have no germs.


New varieties of watermelon plants.
Viruses can be extremely manic. In this case, you will only receive new items. In this regard, we cannot forget about the fact that today there are no natural materials that can be successfully used to create viruses. Garbuzov's present helps to create the most important viruses. These can be either compositions or showpieces.
For example, if you quickly brighten plasticine, you can create little flowers. Place them near the vase, and the vase itself in a similar place. Ditina will be very happy about such a virob.

You can also make an applique from watermelon - gander.

Garbuzova can help you create an original Yalink toy. You simply glue the watermelon to the polystyrene bag. And to finish, decorate it with golden paint.

Olive shavings for original seeds.
For your skin germs, you can use olive shavings. It can produce a lot of germs. The technique of working with chips is very simple. On the arch you simply depict a baby, but decorate it not with farbs, but with beautiful and smooth shavings.
Marvel at the ideas for viruses we present to you.


Just make some eggs for the children's garden using paper and cardboard.
In our article, in addition to folding toys, you can see the ones for kindergarten that children can make with their own hands. Of course, children should work with the paper and make something out of it. For such children's eggs, choose bright cardboard and richly colored paper. Take a look at all the latest new products for children's gardens made from cardboard and paper.


A simple setup for a cage. Killing a hare.
Once the little bits are revealed, you can create a fruitful virib. For this purpose, take a cylinder and adhesive tape in a brown or white color. Look at the cardboard.

Cover their cylinder with tape. Attach the ear. Don't forget to paint your hare.

Kurka with chickens.
It’s even easier to understand this whole thing. For this creation, you may need disposable cups, which you will need to cover with yellow colored paper. Even before curling, attach around parts of the body such as the body and eyes. Use a stick and cardboard to cut your baby's legs.

Izhachok.
The next step is also simple for your witch and absolutely all students can master it. To make it work you will need basic plasticine and resin. We make the base of the egg out of plasticine, and then we make the heads from the ground.

At the end
As you can see, today there is a large number of viruses, including new ones. From this article we have collected only the most beautiful stories for you. And if you don’t know what to do with your child, then take note of our ideas and then your child will be buried in all kinds of activities and friendly enemies.